filmov
tv
How to add questions specifying answers & points to google forms

Показать описание
How to Create a Quiz Using Google Forms — Step-by-Step Guide
Looking to create an online quiz quickly and easily? Google Forms is one of the best free tools to design quizzes for students, employees, or fun! Follow this step-by-step guide to build and customize your quiz in minutes.
Steps to Make a Quiz in Google Forms
1. Get Started with Google Forms
Alternatively:
Open Google Forms in your browser.
Click on the Settings icon at the top.
Enable Make this a quiz.
👉 Pro Tip: If you want to collect respondents' email addresses automatically, go to Responses → click the dropdown arrow → select Collect email addresses.
2. Adding Questions to Your Quiz
If you're using a ready-made quiz template, skip this part and go directly to Update Questions.
For new quizzes:
Open your quiz in Google Forms.
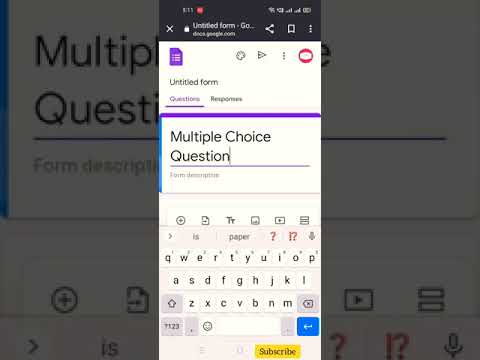
Click the + (Add question) button.
Choose your desired question type from the dropdown menu (multiple choice, short answer, checkbox, etc.).
Type your question text.
If applicable, add your list of possible answers.
💡 Optional:
To assign points or mark the correct answer, click Answer Key after creating each question.
⚡ Prevent Unanswered Questions:
Toggle Required to ensure users must answer before submitting.
3. Customizing Questions & Layout
You can fully personalize your quiz by updating and organizing your questions:
Reorder questions: Drag and drop using the Move icon.
Add extra info: Click More options → select Description.
Insert images: Click the Image icon beside the question.
Attach YouTube videos: Click the Video icon to embed.
Delete questions: Click the Trash icon.
💡 Preview Tip:
At any point, click the Eye icon (Preview) at the top right to view how your quiz will appear to respondents.
4. Assign Points & Add Answer Explanations
Make your quiz more interactive by assigning points and adding explanations for correct or incorrect answers.
After adding your question and answer choices, click Answer Key.
Select the correct answer(s).
Assign a point value in the top-right corner of the question.
To offer additional explanation or link to a helpful YouTube video, click Add answer feedback.
💡 Global Point Value:
Set a default point value for all questions by navigating to Settings → Global Quiz Defaults and entering the desired point number.
5. Preview, Send & Grade Your Quiz
Once your quiz is ready:
Click Preview to test your quiz.
Hit Send to share it via email, link, or embedded on a website.
After submissions, you can review and grade responses under the Responses tab.
6. Share Quiz Results
Once you've graded the quiz, you can send results back to participants:
Go to the Responses section.
Click Release Scores to notify respondents about their results.
Final Thoughts
Google Forms makes quiz creation fast and stress-free. Whether you're a teacher, trainer, or just creating a fun trivia night, this tool has you covered. Customize it, add images or videos, automate scoring — and you're ready to roll!
#GoogleForms #QuizMaker #CreateAQuiz #GoogleFormsQuiz #OnlineQuiz #QuizTutorial #GoogleTips #HowTo #Shorts #YouTubeShorts #ViralShorts #TechShorts #ProductivityTips #DigitalTools #QuizForStudents #EdTech #FreeQuizMaker #QuizHack #MakeAQuiz #GoogleWorkspace
Looking to create an online quiz quickly and easily? Google Forms is one of the best free tools to design quizzes for students, employees, or fun! Follow this step-by-step guide to build and customize your quiz in minutes.
Steps to Make a Quiz in Google Forms
1. Get Started with Google Forms
Alternatively:
Open Google Forms in your browser.
Click on the Settings icon at the top.
Enable Make this a quiz.
👉 Pro Tip: If you want to collect respondents' email addresses automatically, go to Responses → click the dropdown arrow → select Collect email addresses.
2. Adding Questions to Your Quiz
If you're using a ready-made quiz template, skip this part and go directly to Update Questions.
For new quizzes:
Open your quiz in Google Forms.
Click the + (Add question) button.
Choose your desired question type from the dropdown menu (multiple choice, short answer, checkbox, etc.).
Type your question text.
If applicable, add your list of possible answers.
💡 Optional:
To assign points or mark the correct answer, click Answer Key after creating each question.
⚡ Prevent Unanswered Questions:
Toggle Required to ensure users must answer before submitting.
3. Customizing Questions & Layout
You can fully personalize your quiz by updating and organizing your questions:
Reorder questions: Drag and drop using the Move icon.
Add extra info: Click More options → select Description.
Insert images: Click the Image icon beside the question.
Attach YouTube videos: Click the Video icon to embed.
Delete questions: Click the Trash icon.
💡 Preview Tip:
At any point, click the Eye icon (Preview) at the top right to view how your quiz will appear to respondents.
4. Assign Points & Add Answer Explanations
Make your quiz more interactive by assigning points and adding explanations for correct or incorrect answers.
After adding your question and answer choices, click Answer Key.
Select the correct answer(s).
Assign a point value in the top-right corner of the question.
To offer additional explanation or link to a helpful YouTube video, click Add answer feedback.
💡 Global Point Value:
Set a default point value for all questions by navigating to Settings → Global Quiz Defaults and entering the desired point number.
5. Preview, Send & Grade Your Quiz
Once your quiz is ready:
Click Preview to test your quiz.
Hit Send to share it via email, link, or embedded on a website.
After submissions, you can review and grade responses under the Responses tab.
6. Share Quiz Results
Once you've graded the quiz, you can send results back to participants:
Go to the Responses section.
Click Release Scores to notify respondents about their results.
Final Thoughts
Google Forms makes quiz creation fast and stress-free. Whether you're a teacher, trainer, or just creating a fun trivia night, this tool has you covered. Customize it, add images or videos, automate scoring — and you're ready to roll!
#GoogleForms #QuizMaker #CreateAQuiz #GoogleFormsQuiz #OnlineQuiz #QuizTutorial #GoogleTips #HowTo #Shorts #YouTubeShorts #ViralShorts #TechShorts #ProductivityTips #DigitalTools #QuizForStudents #EdTech #FreeQuizMaker #QuizHack #MakeAQuiz #GoogleWorkspace
 0:00:20
 0:03:49
 0:00:27
 0:07:24
 0:00:27
 0:00:30
 0:00:06
 0:01:17
 1:04:45
 0:02:03
 0:00:59
 0:11:11
 0:05:23
 0:00:20
 0:00:14
 0:00:15
 0:01:10
 0:00:13
 0:06:02
 0:00:31
 0:00:14
 0:00:16
 0:00:17
 0:00:12