filmov
tv
Fastest way to clean your face in photoshop | Remove pimples, blemishes, acne easily
Показать описание
Password - 1234
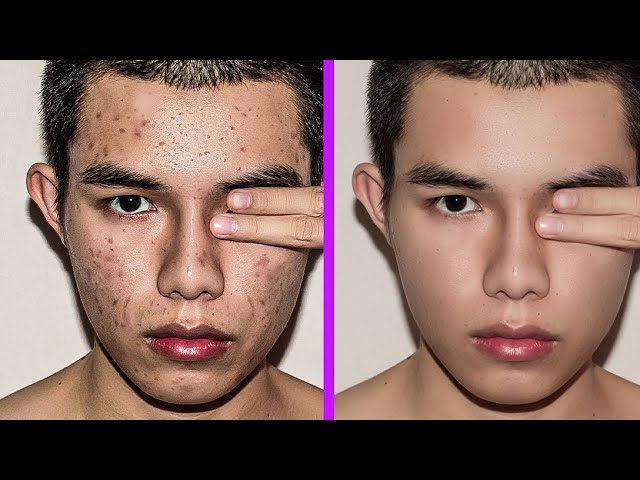
In this video, I’ll show you High-end skin-softening tricks in photoshop. Enjoy!
BE MY FRIEND:
Software used in this video: Photoshop cc 2020
Image used in this video:
High-End Skin Softening in 1 Minute or Less in Photoshop
How to Smooth Skin and Remove Pimples in [Hindi] | Photoshop 7.0 tutorial
Skin Softening with Beautiful Texture | 1-Minute Photoshop (Ep. 4)
Awesome Skin Smoothing and Skin Retouching Techniques In Photoshop | Remove Freckles in Photoshop
Face Retouch In Photoshop | Face texture in Photoshop | Skin Retouching
HASHTAG
#blemishes #acne #skin #retouching #faceskin #removepimples #skinretouching #photoshop #photoshoptricks #obaedakorani #piximperfect #grapexels #photoshoptutorial#madewtihphotoshop
#shorttutorial
#photoshop
#photoshoptutorial #skincare #skinclean #faceclean #removepimples
#easyphotoshop #easyphotoshoptutorial
Adobe,Photoshop,Photoshop CC 2014,tutorial,skin,retouch,head shot,face portrait,portrait photography,blemish,remove acne,acne,scar,layer mask,refine edge,smart radius,add noise,grain,texture,surface blur,blur,blur tool,wrinkles,selection,brush,spot healing brush,smooth skin,Adobe Photoshop (Software),glamorous,glamor,pimples,papules
photoshop cc face retouching tutorial in hindi,how to face retouch hindi,adobe photoshop face retouching,photoshop face retouch,how to face retouch in photoshop,face ko retuch kaise karen,photoshop face retouching tutorial,photoshop skin retouching,sunny rana photoshop video,skin retouching,Sunny rana,retouch skin,Face texture in Photoshop,photo editing,smooth skin photoshop,Photoshop tutorial,How to smooth skin in photoshop,photoshop tutorials
NOTICE:
"Copyright Disclaimer under Section 107 of the copyright act 1976, allowance is made for fair use for purposes such as criticism, comment, news reporting, scholarship, and research. Fair use is a use permitted by copyright statutes that might otherwise be infringing. Non-profit, educational, or personal use tips the balance in favor of fair use."
 0:10:33
Cleaning Expert: My Secret System to Cleaning Fast & Effectively!
 0:26:03
How to Clean house FAST! (Whole house cleaning in 1 hour)
 0:04:22
Speed Cleaning Top Tips for 2017 ⭐⭐⭐⭐⭐
 0:07:12
How To Clean Fast And Efficiently | How to Speed Clean Your House | My Speed Cleaning Routine!
 0:06:05
How To Clean Your Room Fast + Cleaning Hacks & Organisations Tips + Tricks.
 0:11:39
HOW TO DEEP CLEAN FASTER + EASIER | MINDBLOWING CLEANING TIPS
 0:05:32
HOW TO CLEAN YOUR ROOM FAST!
 0:05:02
How to Clean Your Room FAST!
 0:08:57
How to clean your house FAST (Clean your home in under an hour!)
 0:10:33
10 Proven Tricks To Clean Your House Faster
 0:05:18
HOW TO CLEAN YOUR ROOM FAST IN 10 STEPS | 2018
 0:06:52
How To Clean Fast! My Speed Cleaning Routine
 0:06:40
How To Clean Your Room FAST! In 30 minutes | Cleaning Hacks
 0:14:49
Hobby Cheating 213 - How to Clean Your Airbrush Fast
 0:06:38
How to Clean Your Bathroom in 5 Minutes!
 0:11:18
7 EXPERT CLEANING TIPS YOU NEED TO BE USING!
 0:09:08
How I clean my whole house super fast!
 0:08:29
How to Clean an Oven FAST with NO Harsh Chemicals
 0:20:38
🧹how to (deep) clean your entire home in 1 week
 0:11:58
How to Clean Walls, Ceilings & Baseboards (Spring Cleaning 2022)
 0:11:12
BATHROOM SPEED CLEANING ROUTINE - How to deep clean your bathroom FAST!!! || SORTED HQ
 0:05:28
Quick & Easy Shower Cleaning Routine! How to Clean A Shower (Time Saving Tips) Clean My Space
 0:06:10
FAST KITCHEN CLEAN UP | 15 MINUTE CLEANING | my quick cleaning tips
 0:01:28
You Can Clean Blinds the Fastest Way With This Simple Trick
Комментарии