filmov
tv
A0263 Mouse Wool Needle Felt Kit

Показать описание
Mouse handmade wool needle felt
A0263 Mouse Wool Needle Felt Kit
 0:35:35
Needle Felt With Me: Professor Mouse || LittleFeltedWonders
 0:04:44
Needle Felted Mouse Tutorial
 0:00:15
Come and make a super simple needle felted mouse with me! Fab beginner’s project #needlefelting
 0:21:42
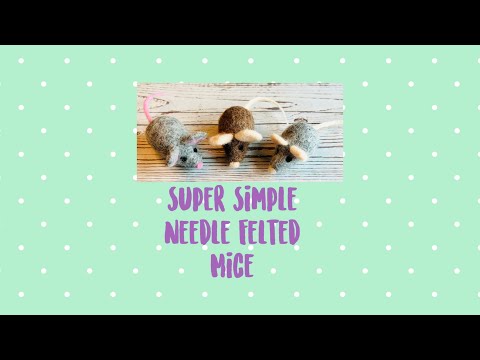
Super Simple Needle Felted Mice - Easy Beginner’s project #needlefelting #NFUK
 0:00:23
Teeni Tiny mouse/ Needle Felted
 0:13:28
Needle Felted Mouse (Part 1 - Armature)
 0:18:40
NEEDLE FELT CHRISTMAS MOUSE IN SNOW GLOBE JAR - DIY - ART - THE WISHING SHED -MICE
 0:09:51
Needle felting a simple litte mouse
 0:19:18
Lily Chef Mouse Felting Tutorial - Handmade Felted Doll
 0:00:40
Miniature Needle Felted Mouse
 0:01:00
Needle Felting Dolls Flip Through #shorts
 0:00:59
Teeny Mouse's First needle Felting Lesson #shorts
 0:00:42
Needle felted mouse tutorial #shortsvideo #needlefelting #mouse
 0:01:35
White wool mouse Needle Felt felting figurine cute mouse gift mouse miniature
 0:15:48
Needle Felt Mouse Ornament Tutorial - Beginner Needle Felting Christmas Project
 0:29:45
Knitting Mouse/Needle Felting Tutorial
 0:00:13
I needle felted a cute mouse! 🐁
 0:29:55
Needle Felting For Beginners, Needle Felted Mouse, How To Needle Felt A Mouse
 0:00:10
#short #mouse #myszka #rat #needlefelting #wildanimals #wildlife #diy #chomiki
 0:00:41
Needle Felting. Getting started.
 0:29:49
Needle Felted Sleepy Mouse | FELTING TUTORIAL
 0:00:16
I can't stop making wool mice. (needle felting kit)
 0:00:06
Yes I make needle felted mice too! 🐭🐭#needlefelting #cute #artist #needlefelt #smallbusiness
Комментарии