filmov
tv
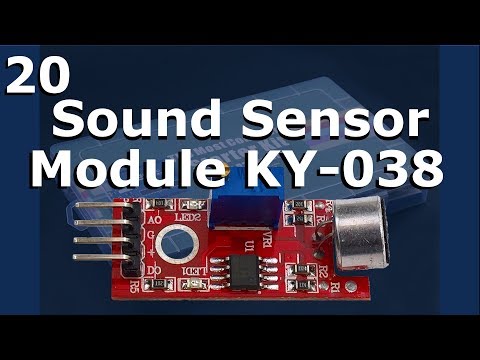
Lesson 20 - Sound Sensor Module KY-038

Показать описание
KY-038 (KY-037) Sound Sensor Module. Demonstrate the Elegoo sketch provided in the tutorial covering the Sound Sensor Module and expand the sketch to include an LED and OLED meter. A beginner's guide to the Most Complete Starter Kit by Elegoo.
Hello everyone, I'm Rick the Tech Enthusiast here with the next Elegoo Lesson. This is the next lesson on my Arduino UNO Series covering the Most Complete Starter Kit by Elegoo. I try to follow the included tutorial and will point out any changes or corrections as I find them.
As mentioned before, I purchased this Elegoo starter kit and Elegoo isn't sponsoring me. I just thought it would be fun to do a video of each Lesson as I was learning the Arduino environment.
We’ll need a few things from your Elegoo Arduino UNO kit. I’ll list the items below. In this lesson we’re going to check out the Sound Sensor Module, aka, KY-038 (perhaps wrongly identified as KY-037). I’ll step through the Elegoo provided tutorial, briefly explain the code, and build and configure a simple circuit that is provided in the tutorial to demonstrate the functionality. Then will expand the sketch to include an LED an OLED voltage meter. I hope you enjoy it.
Parts you’ll need for the tutorial:
* Elegoo Arduino UNO R3 board
* KY-038 Analog and Digital output Sound Sensor Module (KY-037 typically only has a Digital output)
* Four female-to-male jumper wires
The next lesson will be Lesson 21: RC522 RFID Module
Links:
Various Parts can be found: (Note these are Amazon Associates links)
(Full Disclosure: I get a little credit/$ if you purchase a linked item.)
Software:
Affiliate Links that Help my channel:
♫♪ Credits ♪♫
This is another video for my Arduino tutorial series. If you like the series, be sure to rate and subscribe.
Thanks for watching
 0:26:46
Lesson 20 - Sound Sensor Module KY-038
 0:05:36
Lesson 20 Update Sound Sensor Module
 0:03:09
Lesson 20 Sound Sensor Module
 0:07:22
Connecting A Sound Sensor Module To Your Elegoo Mega 2560 Microcontroller - Lesson 20 Tutorial
 0:00:46
(Arduino) ELEGOO The Most Complete Starter Kit - Lesson 20「Sound Sensor Module」
 0:00:28
Lesson 20: Sound Sensor
 0:00:09
Lesson 20 Sound Sensor Module
 0:00:24
Sound Sensor Potentiometer Adjustment
 0:01:23
Lesson 20 Microphone Sensor
 0:07:45
SOUND SENSOR DATA ON ARDUINO SERIAL PLOTTER - Arduino tutorial #30
 0:02:56
How To Use A Sound Sensor With Arduino
 0:05:06
Arduino with Sound Sensor and LED (Tutorial)
 0:00:11
Arduino Sound Sensor with LEDs
 0:03:29
SOUND SENSOR ARDUINO with clap control | SOUND SENSOR ARDUINO Nano project [Code & Circuit Diagr...
 0:00:40
ELEGOO Most Complete Starter Kit 'Sound Sensor Module'
 0:01:11
Sound Sensor Module for Arduino/ESP family
 0:02:28
ks0035 keyestudio sound sensor module
 0:01:54
Sound Sensor Module with Arduino Tutorial.Clap Switch!!!
 0:12:28
Arduino Basics - Lesson 20 - Creating a collision detector with an ultra sonic sensor
 0:00:07
Sound Sensor With Arduino || Arduino Project.
 0:00:10
Lesson 27 Sound Sensor Module
 0:00:43
620658885 test Sound Frequency Sensor Module Sound Activation LM567 aktifasi suara
 0:00:10
Chengsuchuang 4pin Voice Sound Detection Sensor Module for Arduino
 0:00:11
Sound Sensor With Arduino || Arduino Project
Комментарии