filmov
tv
How to Install Windows 10 via Boot Camp on Older Mac Pro via USB

Показать описание
This way does require you have a Mac compatible graphics card handy as it'll be required for the installation process, so if you don't please see the Boot Camp via DVD guide which allows you to install Windows 10 onto a Mac with a non-Mac flashed card like the RX 580.
COMPANION VIDEOS
WHERE TO BUY
WARNING
Installing Windows is generally safe, but you can accidentally select the wrong disk to format and end up wiping macOS, so be very careful to select the BOOTCAMP partition. Proceed at your own risk.
GUIDE
Alright first up, if you don't already have a copy of Windows, just jump on google and get a copy of the latest iso from the Microsoft website.
Inside you want to search for two things.
PreUSBBootSupportedModels - Where you should see your Mac version listed, in my case I'll just remove the entry MacPro5,1.
NonWin10Models - Where I'll again remove the entry of my machine MacPro5,1.
Now if you launch the modified Boot Camp Assistant app, it should say Install Windows 7 or later version.
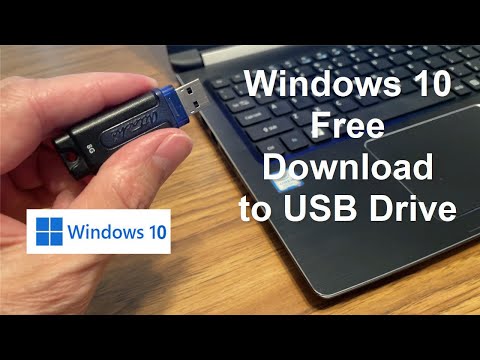
Insert a USB drive in, and point the ISO Image to the ISO you just downloaded.
After your USB drive is prepared, you'll be able to select how much space you want to give Windows. Now be careful at this stage as it's really hard to modify the amount of space after setting.
Boot Camp Assistant will now go ahead and try to reset your computer in Windows.
However, as booting from USB isn't available on this Mac Pro, you'll have to hold down the Alt key as the system boots to load up the Boot selector screen. If you don't have a Mac compatible graphics card plugged in, now is the time to plug it in, as the Boot selector screen will not load without one.
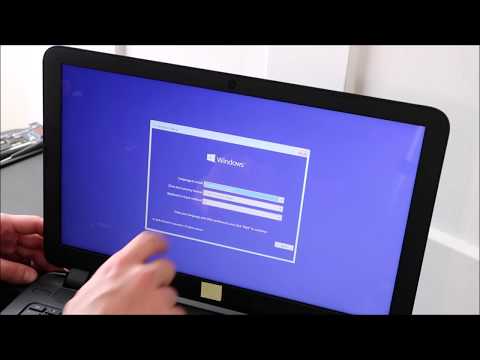
Once the Windows 10 installer has loaded, go ahead and select your region and input your product key. When you get to the Where do you want to install Windows screen, select the BOOTCAMP labelled partition. Windows will at this stage require you to format the partition to NTFS. Note, this won't affect macOS, just the new partition you selected earlier when you split your drive up.
If after formatting Windows complains of a 0x80300024 error, that just means it's confused about which drive it should install Windows still. In my case, I was installing Windows on a PCIe SSD drive and I needed to unplug the SATA drive I had plugged in.
Once unplugged I was able to continue.
After the install, Windows will restart your computer, in my case it rebooted back into Windows and continued the install, however in some cases, you might be rebooted back into macOS. If this happens to you, just hold down the alt key again on boot, wait for the boot manager to load up and select your Bootcamp partition to continue.
Alright, that's pretty much it, finish up the installer, go ahead and install the Boot Camp drivers and reboot your machine.
You might notice that your screen is a little stretched at first, but after Windows update has finished updating the drivers for your graphics card, all should be good in the world.
You can also at this stage of course, turn off your system and plug back in your original non-Mac compatible graphics card.
One thing to note is that some users have experienced issues when swapping the PCI slots of the graphics cards, so it's worth making sure you plug your go to graphics card in the slot you plan on using it long term.
Finally, to get back into macOS you can use the Boot Camp app. Unfortunately, if you are using a non-Mac compatible graphics card, as the boot manager isn't loaded, it'll just reboot you back into Windows.
So to get around this, you can either have both your Mac compatible graphics card and your non-Mac compatible graphics card plugged into your Mac at the same time, or reset the PRAM every-time you want to reboot back into macOS - which unfortunately is very tedious.
Once back in macOS you can always reboot back into Windows again from System Preferences - Startup Disk.
MOJAVE
SPECIAL THANKS
FILMING TOOLS
Links to products often include an affiliate tracking code which allow us to earn fees on purchases you make through them.
CREDITS
Audionautix - United We Groove
COMPANION VIDEOS
WHERE TO BUY
WARNING
Installing Windows is generally safe, but you can accidentally select the wrong disk to format and end up wiping macOS, so be very careful to select the BOOTCAMP partition. Proceed at your own risk.
GUIDE
Alright first up, if you don't already have a copy of Windows, just jump on google and get a copy of the latest iso from the Microsoft website.
Inside you want to search for two things.
PreUSBBootSupportedModels - Where you should see your Mac version listed, in my case I'll just remove the entry MacPro5,1.
NonWin10Models - Where I'll again remove the entry of my machine MacPro5,1.
Now if you launch the modified Boot Camp Assistant app, it should say Install Windows 7 or later version.
Insert a USB drive in, and point the ISO Image to the ISO you just downloaded.
After your USB drive is prepared, you'll be able to select how much space you want to give Windows. Now be careful at this stage as it's really hard to modify the amount of space after setting.
Boot Camp Assistant will now go ahead and try to reset your computer in Windows.
However, as booting from USB isn't available on this Mac Pro, you'll have to hold down the Alt key as the system boots to load up the Boot selector screen. If you don't have a Mac compatible graphics card plugged in, now is the time to plug it in, as the Boot selector screen will not load without one.
Once the Windows 10 installer has loaded, go ahead and select your region and input your product key. When you get to the Where do you want to install Windows screen, select the BOOTCAMP labelled partition. Windows will at this stage require you to format the partition to NTFS. Note, this won't affect macOS, just the new partition you selected earlier when you split your drive up.
If after formatting Windows complains of a 0x80300024 error, that just means it's confused about which drive it should install Windows still. In my case, I was installing Windows on a PCIe SSD drive and I needed to unplug the SATA drive I had plugged in.
Once unplugged I was able to continue.
After the install, Windows will restart your computer, in my case it rebooted back into Windows and continued the install, however in some cases, you might be rebooted back into macOS. If this happens to you, just hold down the alt key again on boot, wait for the boot manager to load up and select your Bootcamp partition to continue.
Alright, that's pretty much it, finish up the installer, go ahead and install the Boot Camp drivers and reboot your machine.
You might notice that your screen is a little stretched at first, but after Windows update has finished updating the drivers for your graphics card, all should be good in the world.
You can also at this stage of course, turn off your system and plug back in your original non-Mac compatible graphics card.
One thing to note is that some users have experienced issues when swapping the PCI slots of the graphics cards, so it's worth making sure you plug your go to graphics card in the slot you plan on using it long term.
Finally, to get back into macOS you can use the Boot Camp app. Unfortunately, if you are using a non-Mac compatible graphics card, as the boot manager isn't loaded, it'll just reboot you back into Windows.
So to get around this, you can either have both your Mac compatible graphics card and your non-Mac compatible graphics card plugged into your Mac at the same time, or reset the PRAM every-time you want to reboot back into macOS - which unfortunately is very tedious.
Once back in macOS you can always reboot back into Windows again from System Preferences - Startup Disk.
MOJAVE
SPECIAL THANKS
FILMING TOOLS
Links to products often include an affiliate tracking code which allow us to earn fees on purchases you make through them.
CREDITS
Audionautix - United We Groove
 0:01:55
How To Install Windows 10
 0:06:17
How to Install Windows 10 on your NEW PC! (And how to activate it)
 0:04:11
How To Install Windows 10 From USB (2022)
 0:17:54
Windows 10 Clean Install Guide | The ENTIRE process | How to Install Windows 10
 0:10:14
How to install Windows 10 on PC or Laptop ( Complete Guide for Beginners )
 0:08:57
How to Install Windows 10 in 2024 (Step By Step Tutorial)
 0:07:04
How to Install Windows 10 without USB Pen drive or DVD (Easy)
 0:11:22
How To Install Windows 10 HP Computer FREE & EASY !!
 0:06:18
How to Download & Install MySQL on Windows 10/11 | Quick & Easy Tutorial
 0:09:21
How to Download Windows 10 from Microsoft - Windows 10 Download USB Free & Easy - Full Version
 0:10:50
How to download and install Windows 10 FOR FREE! (2021)
 0:06:20
How to Reinstall/Clean Install Windows 10
 0:05:30
How to Install Windows 10/11 Onto a New PC [2025]
 0:00:52
How to install Windows on your PC 😀
 0:12:26
How to Install Windows 10 for Free on a New PC
 0:01:00
How to Install Windows on a USB Drive
 0:08:12
How To Install Windows 10
 0:18:14
How to Download and Install Windows 10 from USB Flash Drive Step-By-Step
 0:00:48
Guide to Install Windows in Under 45 Seconds (FREE!) #shorts
 0:05:19
How to download and install Windows 10 FOR FREE! (2024) | Full Version
 0:05:10
How to Upgrade Windows 7 to Windows 10 (Easiest Method) Works 100%
 0:08:11
How to Download and Install Windows 10 from USB Flash Drive for FREE!
 0:14:36
How to Install Windows 10 From USB Flash Drive! (Complete Tutorial)
 0:18:34
How to install Windows 10 MALAYALAM | Windows 10 bootable pendrive | Malayalam
Комментарии