filmov
tv
MiScreen: Screen Printing Applications - Digital Screen Maker

Показать описание
MiScreen, the portable digital screen maker. Screen print anytime, anywhere! Lightweight and eco friendly, no emulsion, no water, no positive films, no chemicals.
Watch three of the many ways to diy screen printing with MiScreen, the first and the latest portable and compact digital screen maker, expose your screen within seconds and screen print anywhere, fast and easy. You may instantly customize on any materials with MiScreen, use the RISO Aqua Inks – water based screen printing inks included in the MiScreen Box, go bold and shiny with your screen printing results with foil printing, add intensity in your print outcomes with emboss screen printing.
In this video, were going to show you 3 different styles in screen printing using the MiScreen.
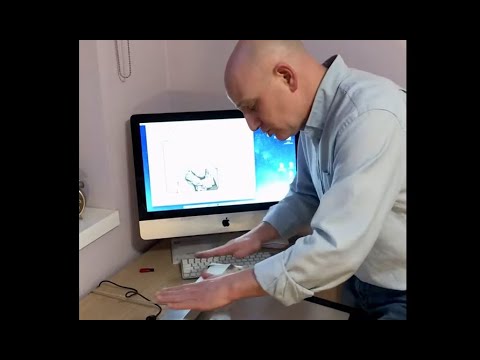
Step 1 - Open any designing software like Adobe Photoshop and save your artwork as a jpeg file
Step 2 - Open the rip software for MiScreen, and just click - drag - and drop the jpeg file, click fit-to-page, set the width upto 200mm, proceed to play with the Slice level, attach usb plug from MiScreen to the laptop, and then click send image. Thus, having the MiScreen ready for screen making. The rip software is compatible with MacOS and Windows.
Step 3 - Use the double sided adhesive tape onto the metal frame, using the MiScreen Instruction manual you may follow the directions illustrated to neatly attach the screen master onto the metal frame.
And now you’re ready!
Step 4 - set the frame with the arrow mark showing up and insert the frame into the MiScreen Machine while aligning on both sides.
Step 5 - proceed to hold down to start screen making, and once finished gently withdraw the frame out of the MiScreen Machine.
Screen printing time!
Prepare the screen table and spray some adhesion for the fabric to stick and just even them out nicely. Place the frame on top of the table and align and tighten it on the center accordingly. Now, proceed to use the RISO Aqua ink from MiScreen itself, the RISO Aqua inks are water base, here you’ll see 1 COLOR WATER BASED SCREEN PRINTING. Then, use the spatula to scoop and spread the ink on top of the screen. Now you may proceed to use the squeegee and screen print!
Foil screen printing, moving towards foil screen printing. Follow the same procedure as shown in previous clip, insert frame accordingly, place the ink on top of the screen, screen print 4 times for bold results, and move to the heat press, place the foil on top, then the protection paper hold and press for less than 10 secs. Once done, use any cloth to cool down the foil for a bit and then proceed to remove the foil.
How is bold and shiny is that?
Emboss screen printing, follow the same procedures as the previous clips. In emboss screen printing you may use hand dryer or tunnel dryer for the puff ink to emboss out.
Whatsapp: +971 50 55 88 315
Follow us on
Watch three of the many ways to diy screen printing with MiScreen, the first and the latest portable and compact digital screen maker, expose your screen within seconds and screen print anywhere, fast and easy. You may instantly customize on any materials with MiScreen, use the RISO Aqua Inks – water based screen printing inks included in the MiScreen Box, go bold and shiny with your screen printing results with foil printing, add intensity in your print outcomes with emboss screen printing.
In this video, were going to show you 3 different styles in screen printing using the MiScreen.
Step 1 - Open any designing software like Adobe Photoshop and save your artwork as a jpeg file
Step 2 - Open the rip software for MiScreen, and just click - drag - and drop the jpeg file, click fit-to-page, set the width upto 200mm, proceed to play with the Slice level, attach usb plug from MiScreen to the laptop, and then click send image. Thus, having the MiScreen ready for screen making. The rip software is compatible with MacOS and Windows.
Step 3 - Use the double sided adhesive tape onto the metal frame, using the MiScreen Instruction manual you may follow the directions illustrated to neatly attach the screen master onto the metal frame.
And now you’re ready!
Step 4 - set the frame with the arrow mark showing up and insert the frame into the MiScreen Machine while aligning on both sides.
Step 5 - proceed to hold down to start screen making, and once finished gently withdraw the frame out of the MiScreen Machine.
Screen printing time!
Prepare the screen table and spray some adhesion for the fabric to stick and just even them out nicely. Place the frame on top of the table and align and tighten it on the center accordingly. Now, proceed to use the RISO Aqua ink from MiScreen itself, the RISO Aqua inks are water base, here you’ll see 1 COLOR WATER BASED SCREEN PRINTING. Then, use the spatula to scoop and spread the ink on top of the screen. Now you may proceed to use the squeegee and screen print!
Foil screen printing, moving towards foil screen printing. Follow the same procedure as shown in previous clip, insert frame accordingly, place the ink on top of the screen, screen print 4 times for bold results, and move to the heat press, place the foil on top, then the protection paper hold and press for less than 10 secs. Once done, use any cloth to cool down the foil for a bit and then proceed to remove the foil.
How is bold and shiny is that?
Emboss screen printing, follow the same procedures as the previous clips. In emboss screen printing you may use hand dryer or tunnel dryer for the puff ink to emboss out.
Whatsapp: +971 50 55 88 315
Follow us on
 0:04:02
MiScreen: Screen Printing Applications - Digital Screen Maker
 0:04:47
MiScreen Screen Printing made easy Demo
 0:04:35
MiScreen - Digital Screen Maker
 0:02:48
Easiest Way of Screen Printing Step by Step with MiScreen Maker
 0:09:57
Getting Started in Screen Printing. MiSCREEN - How it Works and What You Need!
 0:01:01
How to Easy Screen Print in Few Minutes with MiScreen
 0:01:01
Embossing on Textile - Screen Printing at Home with MiScreen
 0:05:41
GOCCOPRO UK - MiScreen - print front of a t-shirt
 0:00:21
Digital Screen Printing Workshop - MiScreen A4 Demo
 0:05:11
MiScreen - learn how to screen print product, in a new modern way.
 0:19:35
Xpresscreen MiScreen User Video - In Depth
 0:05:27
Transfers with the MiScreen
 0:02:49
MiScreen Screen Maker Tension Stiffen Frame
 0:07:31
MiScreen digital silk screen maker - from photo to printed limited edition print in 7 mins
 0:01:22
Silk Screen Printing halftones using Mi Screen Portable Digital Screen Maker
 0:04:57
Tools and Tips for Screen Printing with MiScreen
 0:00:26
Screen Print 35 SECONDS #screenprint #screenprinting #printingbusiness #miscreen #screenmaker
 0:01:21
How to Screen Print at Home: MiScreen - Digital Screen Maker
 0:01:48
2-Color Print/ Heat Transfer with the MiScreen Digital Screen Maker
 0:02:26
10 Items to Screen Print at Home
 0:02:10
MiScreen Couch Series - Episode 3: Software
 0:01:27
Home Based Emboss Screen Printing with MiScreen - Portable Digital Screen Maker
 0:00:26
How to: MiScreen 101
 0:22:32
MiScreen A4 Screen Printing System with a surprise
Комментарии