filmov
tv
A Basic Introduction to SFM and Thank You for the 15k Milestone!

Показать описание
TRANSCRIPT:
Hello everyone!
I wanted to say thank you for the 15,000 subscribers and taking intrest into SFM shorts, whether they be original or not. As a way to show my appreciation, I’ve decided to teach newcomers the basics of Source FilmMaker.
First you need a map to start anything!
Cntrl+L is the fastest way.
From here on out – click this button to add anything new.
Let’s start out with cameras.
Create a new camera this way and you can switch it by clicking this button on the viewpoint window.
On this pane your options are here.
Can’t move or change them? You’re in the clip editor of the timeline! Like the name states it’s used to edit clips, not motion. Switch it in these icons near the timeline. The motion and graph editor are used to edit the movement of models.
Once in the second tab aka the motion editor you can now adjust the camera settings!
Set-up your camera by controlling it either using these buttons which are quick keyed to Q W E and R. OR with the WASD keys, Z and X to adjust the height.– The work camera acts as a camera that is only used for reference when working with a lot of stuff and wont reflect the final product.
Next up player models!
This is essentially the exact same thing, and the model will load at the camera
Load a new model like a camera.
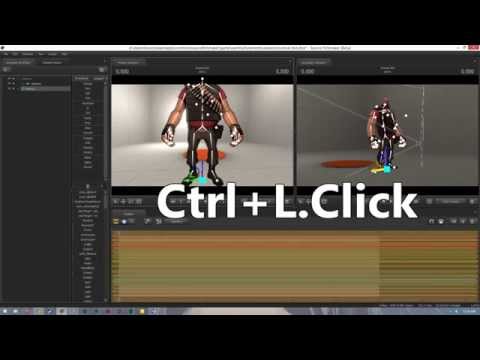
Hold Ctrl to Click on his bones on points and move him around just like the camera.
Holding shift in the timeline and selecting parts allows you to edit the model in the selected time only. Cntl+A selects everything so the entire timeline is edited.
Doing so is essential since your goal is to basically make Storyboard in motion.
Selecting the points in-between you can have various options, but most essential is smoothing and rounding.
Hold shift and use the scroll wheel to select an ease in and out area.
Making a hand animated movie is done through this method, and smoothing the in-betweens to make movement seem natural.
Lights!
Same thing as before, the light will spawn at the camera, infact everything will.
Just like a model, move it around to your liking, and like the camera adjust it’s settings in this pane here.
Notice a pattern yet?
That’s right! Everything is controlled the same way! Even rounding and smoothing!
This can lead to some really cool stuff!
Once you have all of your models animated to your liking, head back to the clip edit and hit B to splice up the cameras. Change each scene the exact same way how you changed cameras before.
Once done it’s time to export.To do go file, Export, and adjust your settings there.
After exporting your lovely SFM will be done!
Now you’re probably thinking how to record gameplay, lipsync, and copying animations from other games. Well Valve is much better at explaining than I am. just wanted to give you an understanding how this all works.
If you haven’t tried SFM give it a shot! It’s free on Steam with an ever growing Workshop. Take care my lovelies!
Hello everyone!
I wanted to say thank you for the 15,000 subscribers and taking intrest into SFM shorts, whether they be original or not. As a way to show my appreciation, I’ve decided to teach newcomers the basics of Source FilmMaker.
First you need a map to start anything!
Cntrl+L is the fastest way.
From here on out – click this button to add anything new.
Let’s start out with cameras.
Create a new camera this way and you can switch it by clicking this button on the viewpoint window.
On this pane your options are here.
Can’t move or change them? You’re in the clip editor of the timeline! Like the name states it’s used to edit clips, not motion. Switch it in these icons near the timeline. The motion and graph editor are used to edit the movement of models.
Once in the second tab aka the motion editor you can now adjust the camera settings!
Set-up your camera by controlling it either using these buttons which are quick keyed to Q W E and R. OR with the WASD keys, Z and X to adjust the height.– The work camera acts as a camera that is only used for reference when working with a lot of stuff and wont reflect the final product.
Next up player models!
This is essentially the exact same thing, and the model will load at the camera
Load a new model like a camera.
Hold Ctrl to Click on his bones on points and move him around just like the camera.
Holding shift in the timeline and selecting parts allows you to edit the model in the selected time only. Cntl+A selects everything so the entire timeline is edited.
Doing so is essential since your goal is to basically make Storyboard in motion.
Selecting the points in-between you can have various options, but most essential is smoothing and rounding.
Hold shift and use the scroll wheel to select an ease in and out area.
Making a hand animated movie is done through this method, and smoothing the in-betweens to make movement seem natural.
Lights!
Same thing as before, the light will spawn at the camera, infact everything will.
Just like a model, move it around to your liking, and like the camera adjust it’s settings in this pane here.
Notice a pattern yet?
That’s right! Everything is controlled the same way! Even rounding and smoothing!
This can lead to some really cool stuff!
Once you have all of your models animated to your liking, head back to the clip edit and hit B to splice up the cameras. Change each scene the exact same way how you changed cameras before.
Once done it’s time to export.To do go file, Export, and adjust your settings there.
After exporting your lovely SFM will be done!
Now you’re probably thinking how to record gameplay, lipsync, and copying animations from other games. Well Valve is much better at explaining than I am. just wanted to give you an understanding how this all works.
If you haven’t tried SFM give it a shot! It’s free on Steam with an ever growing Workshop. Take care my lovelies!
 0:01:59
A Basic Introduction to SFM and Thank You for the 15k Milestone!
 0:01:01
HOW 2 ANIMATE IN SFM (SPEEDRUN TUTORIAL)
 0:07:59
sfm tutorial: getting started
 0:03:46
Introducing the Source Filmmaker
![[SFM TUTORIAL] Learning](https://i.ytimg.com/vi/9wG1dBlY8mg/hqdefault.jpg) 0:27:56
0:27:56
[SFM TUTORIAL] Learning Animation in Source Filmmaker Part 1 - The Absolute Basics Of Animation
 0:00:18
3,000th Hour in SFM
 0:06:39
00 basics
![[SFM] Keyframe animation](https://i.ytimg.com/vi/ex01gD9ZPiY/hqdefault.jpg) 0:00:20
0:00:20
[SFM] Keyframe animation practice step by step
![[FNAF/SFM] PIPEDREAMS -](https://i.ytimg.com/vi/fkXblfPCorU/hqdefault.jpg) 0:03:54
0:03:54
[FNAF/SFM] PIPEDREAMS - FULL FNAF AMV
 0:03:13
A Simple Tip for Cinematic Lighting: An Animated Guide to SFM
![[SFM TUTORIAL 01]](https://i.ytimg.com/vi/eDiifbVoGDw/hqdefault.jpg) 0:39:12
0:39:12
[SFM TUTORIAL 01] Making a basic movie Start to Finish
 0:09:55
An Absolute Beginners Guide to SFM - Part 1 - The Basics
 0:00:19
Animating for Blender vs SFM
 0:00:32
SFM: My custom Equestria Girls intro
 0:00:30
American Dad Intro but it's the Soldier [SFM]
 0:01:08
Big Smoke Men in Black intro parody [SFM]
![[SFM] Gravity Falls](https://i.ytimg.com/vi/a3GI1pgOoDU/hqdefault.jpg) 0:00:41
0:00:41
[SFM] Gravity Falls
 0:24:49
SFM TUTORIAL - Character Movement (part 1)
![[SFM] Interview Intro](https://i.ytimg.com/vi/Xz0sbb0K1dg/hqdefault.jpg) 0:00:29
0:00:29
[SFM] Interview Intro Sequence
![[SFM Baldis Basic]](https://i.ytimg.com/vi/rqbwqipH5ls/hqdefault.jpg) 0:10:12
0:10:12
[SFM Baldis Basic] The Interview
 0:05:52
Level Up Your Virtual Camera: An Animated Guide to SFM
 0:14:04
Introduction to Structure from Motion (SfM) and Scientific Motivations | SfM Short Course (Part 1)
 0:00:43
SFM: Crash 3 Intro
![[SFM Tutorial] How](https://i.ytimg.com/vi/-W31BDQosdw/hqdefault.jpg) 0:23:14
0:23:14
[SFM Tutorial] How to make a basic walking animation in Source Filmmaker
Комментарии