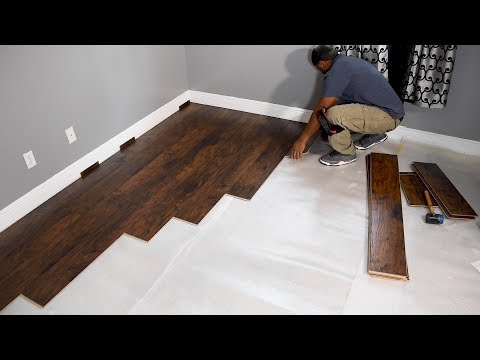
How to install laminate flooring around doors and cabinets.

preview_player
Показать описание
It's easy to click boards together, but how you handle transition areas makes the difference between a professional and amateur looking job. In this video I'll show you how to tackle two common challenge areas; installing laminate around doors, and installing laminate next to cabinets. If you wondering how to install the last row of laminate next to the wall, you guessed it, this technique works there too. This applies to click lock laminate or vinyl flooring.

Small trimming plane

Tapping Block

Robert 13" Floor cutter

Laminate installation kit

I'm an Amazon affiliate so I'll get a tiny commission if you purchase through the links above. The price is the same regardless so I appreciate your support of my channel!

Disclaimer: I'm not a professional installer but this is a technique that works well for me. Cutting the lip may or may not void the manufacturer warranty so you may want to check on that. However, I've heard nothing but negative reports anytime anyone has tried to warranty a laminate floor, and I've never had one come apart, so I figure what do I have to loose. In fact years ago I installed floors without snap locks and the EVERY panel was glued. In my opinion a glued joint is actually stronger than a snap lock.
Рекомендации по теме
Комментарии
Автор

Check out this video to see the tools I use when laying a laminate or vinyl plank floor.

HomeSource
Автор

This was a huge help, thank you! In retrospect, cutting off the edge and using glue seems so obvious, but it never occurred to me. I've spent years (literally) trying to figure out how to snap a piece in under a door jamb, lol.

Lizziemae
Автор

I'm a cabinetmaker and when I do floating floors here in Australia in my home, I do the same thing works well.Some flooring are too hard to snap in place under door jambs.Excellent video

OwenManuela
Автор

Now if you can just explain to my wife why these projects aren't like on TV; I can't edit out all of the headaches (warped floors, out of square walls and rotten toilet flange supports, trips tp the hardware store and scores of other challenges you run into on old homes), cut to commerical and return in 5 minutes looking buff, intelligent, happy and relaxed. After forty years you'd think a light would go on but, if it did, she'd just want me to change the light fixture to fit in with the rest of the house that seems to be in perpetual remodel mode. LOL
I like this video though, very straight forward, simple and well presented. Good job.

dalemulder
Автор

This is great, working around door frames is a pain. What I have done in the past is slide the interlocking parts together on the short side by tapping the piece in, so you would only have to shave one side.

kdbublitz
Автор

Some products require a transition in all doorjambs I guess for expansion. I've generally started doing that by default as it makes the install a bit easier. You do really nice work here though. Shaving that female joint and glueing is a life saver.

rowankeltizar
Автор

Hey Janssen
I have finally reached your video after searching for what feels like hours for a good explanation to the exact issue you are describing. It appears I had to do the search in English as all the danish videos didn't solve it properly or explained it in a confusing way.

So despite English not being my native language, I found your video the absolute best and helpfull in this matter. 

Thank you and all the best wishes from Denmark.

johannesramskov
Автор

Thank you I couldn't figure out how to snap pieces together once they were under the frame. Hallelujah!!

nenaxx
Автор

That's wonderful machine. I envy you. Also i want to take your machines. Haha. Just joke. Good machine. My country of tile's machine developments speed is not good. And most of old tilers are fraid of development. Because when they learnded and studied from the tile skill of the older than tile's master, they were hit from the master. So they are fraid of change, challenge, and own position shaking. You are a good tile master. I also tile engineer. I have worked for 8 years. I appreciate to you. I am archtecture in Republic of Korea the first grade that pubilish my country. By the way i was wood maker for 2 years. Last i learned from tile master skill of the best of best in Pohang city ( now i live in city). Finally glad to see your youtuve channel. Good study to me. I own my youtube channel that homemaker. Thanks. God Bless you.

homemaker
Автор

Man what a simple and clever idea, I’ve been dreading this part of my installation. Thanks!

Bobby
Автор

I cant believe how much crap people can give someone who is just trying to help, to all of those critics out here, let's see your wood flooring laying techniques.
Good video bro.

aregusci
Автор

trying to translate to English what I was looking for but came straight to you, freaking on point, exactly what I was having problems with. Thank you!

bluetorch
Автор

The later portion of the video regarding cabinets or opposing walls. You can start the flooring at a 45° angle like he did and use the curved end of a flat bar and pry slightly against the flooring and wall by twisting the flat bar while pressing down on the flooring and it will snap right in no need to shave off the top tab. If you lay it enough you will find all kinds of tips and tricks

justinferguson
Автор

Thanks for sharing! Great job! Those doorways can be a P.I.A. when running a flow through floor. I totally agree, using the oscillating tool is the best method for cutting out those jambs and trim. I start my flooring on the doorway wall when using T-Molding and running the flooring parallel with it. Just cut > pre-assemble > slip in place and continue on. That way, I'm not all jambed up at the LOL. Thanks again and Happy Holidays! 👍😊

rapaent
Автор

Another approach is to still lock the longer board in on the other side of the doorway then slide it into place under the jam. The same could be done against that cabinet. That way you're only having to remove the locking and doing glue only on the much shorter side. Nonetheless, GREAT video! GREAT advice!

CrazyGuyBlahBlah
Автор

DAMNIT MAN!!! YOU JUST SAVED OUR ASS ON THIS BIG JOB WE ARE ON YOU!!! we were hired by a bigger flooring company to put down L.V.P.so we loaded all the equipment to do l.v.p. and not tile or wood laminate. Drove three and a half hours to the shop and forklift driver drops a load of damn wood laminate. Now I know it's kinda the same with shape how it snaps together and how it's installed..but this part is extremely frustrating without the correct tools and made the job way harder.and cutting in under the door jamb and getting it locked in place has been the most frustrating experience I have ever dealt with just about.i cannot wait till tomorrow to get to work and show this to my boss he is going to be so happy. It is such a struggle that he has himself convinced we are putting them in backwards and that is what is making it so hard.i don't know how someone with 50 years experience with flooring has frustrated himself so bad the it made him think that and know matter how I show him it is impossible to convince him..this is going to change all of that.if it had been lvp it would have been ok because that is a lot more playable and easier to molest it in there but with the wood it is not and it's very easy to chip it or mess up the joint to where it doesn't cnap together and then have to go re cut the piece and try again.i don't think I've been so excited to go back to a job that has frustrated me to the point of almost wanting to quit because between me being annoyed and my boss pissed off because he convinced himself I have him installing them backwards I have had it.he has never installed this flooring before I have but I had my boss doing the door jambs so I never learned the proper technique and he has always just done tile so he took on the job because we were told it was lvp and I have put down acres of that stuff and told him take it we can knock it out quick and it being wood has made it such a struggle and our install time is almost up..but the time this is going to save us tomorrow will most likely make it so we can finish a day early instead of being a day late or someone staying behind and working all night t hit the deadline..thank you so much for this video dude

mikestrickland
Автор

Thanks for showing what to use to cut the wood to slide boards under. That makes it understandable and knowing what saw to use to do this makes it possible to install my flooring without worries of it being cut badly to fit. Thanks for the video.

blaakrose
Автор

This was a big help to me, thank you! I've been laying some click laminate flooring and had wondered about shaving boards to fit around a door opening so I just slide the boards in under the door jam, but lacked the confidence to know if it was the correct thing to do. Your video confirmed my idea and showed me I was on the right track. Thank you so much from the other side of the pond! 😀👍🏻🇬🇧

TheRamblyChannel
Автор

This is exactly what I needed to see. Was having trouble working around the door jambs. Thank you!

sw-ohiolakers
Автор

There’s lots of ways to do this. I do it differently. But your way works well and would work well for homeowners that want to tackle it themselves.

mikeh