Diy 5th axis trunnion build part4

preview_player
Показать описание
Diy 5th axis trunnion build series for my epoxy granite vertrical mill.
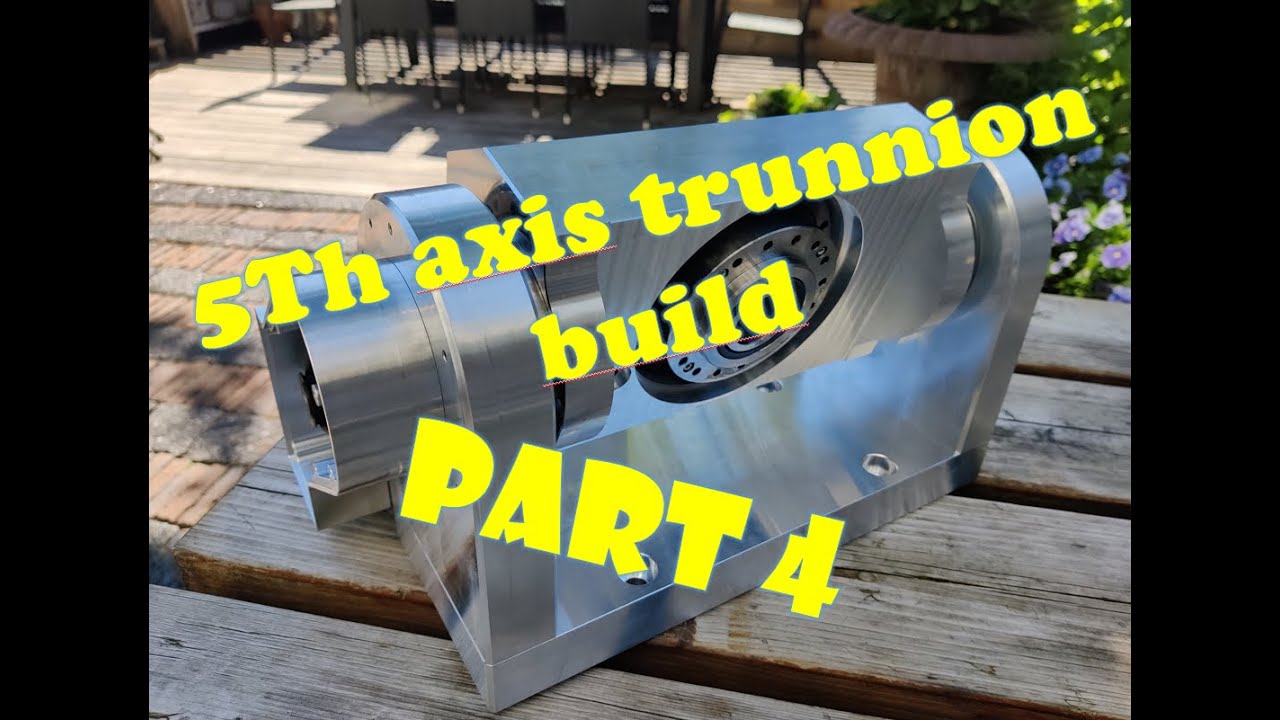
Its a B-C configuration trunnion running on Harmonic drives with delta Servo's. Raw material is weighing in 26kg. In this video I am machining the main body that will hold the C axis.

Рекомендации по теме
Комментарии
Автор

7075 is quite a bit harder from other aluminum types. I'm not surprised the end mills broke. Thanks for sharing this. Great lesson on fixturing as well, might be worth taking the vise off and mounting your plate directly to the table for those operations.

vcedge
Автор

Well done. Amazing job.
Sometimes you get parts that give problems for no good reason. I can't wait for the next part.

nickvanwyk
Автор

Gday, I’m glad you keeper going with this part and didn’t scrap it and you showed the mistakes, there’s a lot of channels that never make mistakes but when know that everyone does, I believe you have done a fantastic job, I’ve throughly enjoyed watching this series mate, cheers

MattysWorkshop
Автор

Yeah, some times luck is just not on our side … never mind, the trunnion design looks solid and I’m sure it will work great. For the angle plate slip, a screw jack under the stick out can always help as insurance policy. Great design and video. Looking forward to the next one. Cheers

PWLopes
Автор

Excellent work, Stef! You have put a lot of thought into the CAD side, while also considering the CAM, so it should be a fine product. I suspect I'd be finding a way to recover the work by filling and remachining those slots, unless any proper f*ckups occur.

Almost all of my tool breakages are due to recutting, which in turn is due to insufficient removal of the swarf. I've concluded that if you want to run good MRR, you need (very) high coolant flow rates and this is particularly critical for closed cavities / pockets where the swarf and coolant will collect if you don't blow them clear - through holes are helpful for draining it away. I'm not an expert but I would suspect some of your breakages are due to this problem. Until I've got a decent enclosure, I have dialled back my F&S so that I don't spend so much on 10mm cutters!

I note that you did the 3D surfacing with your 10mm tool, IIRC. However, the face mill has a much higher surface speed (4-5 times?), so can achieve the same toolpath in fraction of the time and generates a larger radius cut which is also helpful. These face mills are also good for side cutting, such as the first (adaptive clearing) op you did and are less prone to break. It's easy to think of them as facing tools when in fact they can do a lot more.

One thing that's held me back from doing a 5th axis is the CAM. Do you plan to pay for the damned Fusion "extensions" or will you generate multi axis toolpaths some other way? As it is, my own 4th axis can now only do indexed 4th axis moves, not true simultaneous toolpaths, which really pissed me off, as the changes to Fusion happened just as I was putting the finishing touches to my harmonic drive 4h axis. The extensions come in at something like £200/month, which just isn't going to happen.

murrayedington
Автор

Good job! As long as its a part for your own projects, always - within reason - try to save it or atleast as you do, justify continue working on it, to gain knowledge.

Looking forward to see your next video!

steinarne
Автор

Dang, sometimes it's just one of those parts.
Was just waiting for you too say you lost a tap in one of the holes aswell. But good on you for not giving up.

nils
Автор

Hi. Good video. When you made presision parts like this with so "tiny" setup - you should reduce feeds and speeds use lighter cuts to avoid displasment of part - this take more time but it will be done

godtattoomachines
Автор

Stef, the endmill snapped because of your lead in, maybe slow the entry, or make the entry radius larger, great video nontheless.

max_eley
Автор

Looking good! Can't wait to see it in action!

IvanStepaniuk
Автор

Great video, thanks for sharing your set backs and progress. Much appreciated.

Ryan-dzjo
Автор

Jesus some serious work, machine looks awesome and the parts looks awesome to !!!

joppepeelen
Автор

Geweldige machine heb je Stef kijk uit na de volgende video’s

melvinmeppelink
Автор

I already built a similar one some years ago. The tunrion is made up of several pieces, they are screw fixing together. I like your challenging method of one sturdy piece although the machining method is a bit difficult. Hoping you finish them all and then the outcome accuracy can be seen.

ray-charc
Автор

Great work, Stef. I call stuff-ups 'prototypes'

ReubenSchoots
Автор

Awesome work! I was wondering if that angle plate was gonna be sturdy enough to keep the part square. Hopefully you can still use it

diygaragetx
Автор

Damn, fixturing and work holding are tricky.
Something I don't see on YT is paper between the part and the clamping surface.
Absolutely improves the gripshon...
Unless you personally surface ground that import angle plate I wouldn't trust its trueness.
Didn't like that set up in the first place and had my fingers crossed, bugger.
Pretty much designed to Bolt to a table etc.
You should try a 20mm indexable insert end mill for hogging out or that face mill if it fits.
But good vid, thanks.

captcarlos
Автор

Angle blocks are designed to be bolted directly to the table, if is old it can be shimmed to get it aligned.

andrewclark
Автор

be a lot easier to make that part with a 5th axis (-' the part looks amazing!

airgunningyup
Автор

Great progress.
Prob should have tipped the whole vice on its side, from mem those vertex vices are capanle of this actio

roguecnc