filmov
tv
The Ultimate Drill Storage and Charging Cabinet

Показать описание
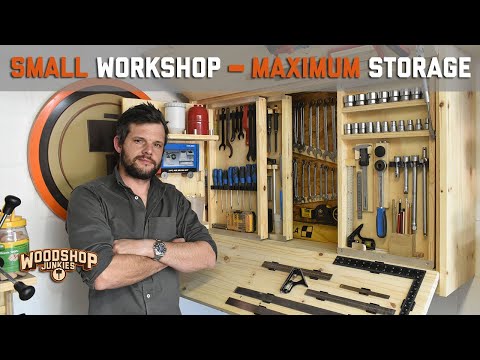
This is the one ultimate, amazing, extraordinary, omnipotent, illustrious, shop organization cabinet that every self-respecting woodworker will want in their shop.
Get the Free plan (imperial & metric):
Thank you INTOTHEAM for these Everyday Elevated Graphic Tees! Get yours now and get 10% off site-wide when you click this link:
This is the one ultimate, amazing, extraordinary, omnipotent, illustrious, shop organization cabinet that every self-respecting woodworker will want in their shop.
Step-by-step details of this project:
Lower Cabinet:
Upper Cabinet:
Don't waste your hard-earned money on unnecessary tools. My Free checklist will show you exactly what tools and accessories you need for the beginner to advanced woodworking shop. Download it Free:
Discounts on great products (Affiliate Links - I make a small commission at no extra cost to you):
Save 10% on TotalBoat epoxy with code 'otw10'
Save 15% on Starbond CA glues with code 'OUTOFTHEWOODWORK15'
Tools and other accessories I use:
Follow Out of the Woodwork on these other channels:
Music:
#intotheam
 0:11:51
The Ultimate Drill Storage and Charging Cabinet
 0:11:21
Drill Storage and Charging Station
 0:10:28
Ultimate Drill Charging / Storage Station | 60
 0:15:06
DIY Drill Storage: A Faster, Easier, AND Cheaper Way to Organize Your Workshop?
 0:06:40
Cordless Drill and Tool Storage Rack - Shop Organization
 0:05:53
DIY Drill Charging Station
 0:17:17
Ultimate Drill Press Table with 3 Types of Dust Collection and Storage (with build plans)
 0:19:27
The Ultimate Drill Press Stand: Sturdy Storage Solutions
 0:03:40
EdrawMax Review || The Ultimate AI Diagram Designing Tool
 0:23:43
Ultimate DIY Tool Storage For Small Garage Workshops - Workshop Organizer
 0:04:51
EASY DIY Drill/Impact Storage & Charging Station
 0:03:12
20-Minute Power Tool Storage
 0:13:46
A Better Tool Storage Cabinet | Shop Organization
 0:05:55
Super Easy Cordless Tool Storage | Makita
 0:00:59
Best Modular Tool Storage System Deal? Home Depot - LOWE'S - Harbor Freight - WalMart!
 0:00:26
Ryobi cordless tool storage brackets
 0:04:19
80 Tool Storage Ideas
 0:01:47
Fast Access Tool Storage - QUICK DRAW Drill Drawer - Double Action Cordless Tool Upcycled Woodshop
 0:17:43
Packout VS Systainer - The Best Tool Storage
 0:00:34
Perfect 3D Printed Tool Storage
 0:10:24
BEST Portable Tool Storage systems (RANKED) WATCH BEFORE YOU BUY!
 0:00:27
Drill Storage Rack | Wall Mount Tool Organizer
 0:00:27
Screwdriver Rack Small Tool Storage Desk | Work Bench Organizer | Aluminum Tool Holder 🔧😍 #shorts...
 0:00:19
we're 'hooked up' on these Milwaukee Tool PACKOUT shop storage mods. In-stock at tool...
Комментарии