filmov
tv
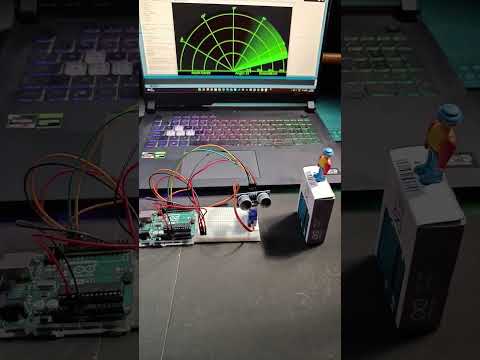
Radar Emulator with Arduino and Python

Показать описание
An Arduino-based radar project is implemented here using an Arduino, HC-SR04 ultrasonic distance sensor, MG90S micro servo motor, and Python code run on a Raspberry Pi. The goal of this project is to introduce a novel concept related to real-world technology, but implemented through inexpensive tools available to the maker and aspiring engineer. The HC-SR04 uses sound waves to approximate the distance between its receiver and an object in the distance, while the MG90S servo rotates in a prescribed fashion according to pulse-width modulation signals controlled by the Arduino board. In order to visualize the outputted angular position and approximate ranging of the HC-SR04 - Python code was implemented on a Raspberry Pi to create a plan position indicator on a polar plot. This PPI gives the user a way of visualizing the objects that surround the motor and ultrasonic sensor, much like a radar approximates the objects surrounding its base station. Several skills used in this tutorial can be applied to real-world applications, whether through obstacle detection, motor control, distancing and ranging, or even a new tool for visualizing data.
.
.
.
The word radar is a combination of ‘RAdio Detection And Ranging’ - which describes the function of early radar systems that were developed to detect and range approaching enemy aircraft using radio waves. Commonly, radar systems use a visualization tool called a plan position indicator (PPI), which places points in a polar configuration to represent objects occupying space in the range of the detector (read more about radar: Introduction to Radar Systems). In this tutorial, an ultrasonic sensor (HC-SR04) will be used in place of a radio emitter; and a plan position indicator will be constructed in Python by recording the angular movements of a servo motor.
.
The replication of a radar system involves two essential components: a ranging device and an angular motor/detector. As stated above, the ranging device can be any device that detects distance from a stationary point. The HC-SR04 ultrasonic device will be used, however the VL53L0X ranging sensor (uses the time-of-flight technique with a 940nm laser) has also been used and works just fine with this tutorial as well.
.
The graphical user interface (GUI) allows users to stop the program or close the plot and exit the program. Meanwhile, the plot should be updated every 5 degrees (about every 300ms), with scatter points being placed where objects are detected by the HC-SR04. There is also a sweeping arm that is part of the plan position indicator, which notifies the user of the approximate location of the motor or area being ranged.
.
.
.
The word radar is a combination of ‘RAdio Detection And Ranging’ - which describes the function of early radar systems that were developed to detect and range approaching enemy aircraft using radio waves. Commonly, radar systems use a visualization tool called a plan position indicator (PPI), which places points in a polar configuration to represent objects occupying space in the range of the detector (read more about radar: Introduction to Radar Systems). In this tutorial, an ultrasonic sensor (HC-SR04) will be used in place of a radio emitter; and a plan position indicator will be constructed in Python by recording the angular movements of a servo motor.
.
The replication of a radar system involves two essential components: a ranging device and an angular motor/detector. As stated above, the ranging device can be any device that detects distance from a stationary point. The HC-SR04 ultrasonic device will be used, however the VL53L0X ranging sensor (uses the time-of-flight technique with a 940nm laser) has also been used and works just fine with this tutorial as well.
.
The graphical user interface (GUI) allows users to stop the program or close the plot and exit the program. Meanwhile, the plot should be updated every 5 degrees (about every 300ms), with scatter points being placed where objects are detected by the HC-SR04. There is also a sweeping arm that is part of the plan position indicator, which notifies the user of the approximate location of the motor or area being ranged.
 0:00:33
Radar Emulator with Arduino and Python
 0:00:16
Ultrasonic Mini Radar tested on 2.8 inch lcd display #arduinoproject #radar #circuitschools
 0:00:08
How To Make Radar With Arduino || Arduino Project.
 0:00:19
DIY Radar With Ultrasonic Sensor And Chat-GPT Generated Arduino Code | Coders Cafe
 0:00:38
Arduino Missile Defense Radar System Mk.I in ACTION
 0:00:06
Arduino Radar Simulator Project! Free Code! #arduino #shorts #radar
 0:00:41
Arduino radar simulator
 0:00:16
Top 5 Arduino Projects #arduino #arduinoprojects #arduinorobot #lightdetector
 0:00:14
Radar based on ultrasonic sensor and Arduino
 0:00:16
Amazing arduino project | Check description to get free money.
 0:01:16
Arduino Radar detector
 0:00:17
When The Quiet Kid Does Your Homework 💀 #electronics #arduino #engineering
 0:00:17
Arduino Radar 360 degree angel with ultra sonic sensor #shorts #viral #short #trending #radar
 0:00:16
Radar Arduino Uno System #viral #shorts #arduino #radar @ytyogendra
 0:00:19
Arduino Himars System Simulator! Free Code!
 0:01:32
Arduino radar proteus
 0:03:33
Arduino Radar System Build
 0:00:57
Radar Using Arduino Uno
 0:04:12
The Ultimate Guide to Make a Ultrasonic Radar System with Arduino
 0:44:34
How To Make A Radar Using Python And Arduino - An Easy Guide
 0:00:16
arduino radar
 0:07:08
How to make a Sonar/Radar with Arduino and Python
 0:00:12
Simulator radar cu Arduino
 0:00:25
Ka-50 Missile Guidance System | DCS
Комментарии