filmov
tv
Beginners Blender 3D Tutorial 7 Modelling with the Mirror Modifier in Blender 2 82

Показать описание
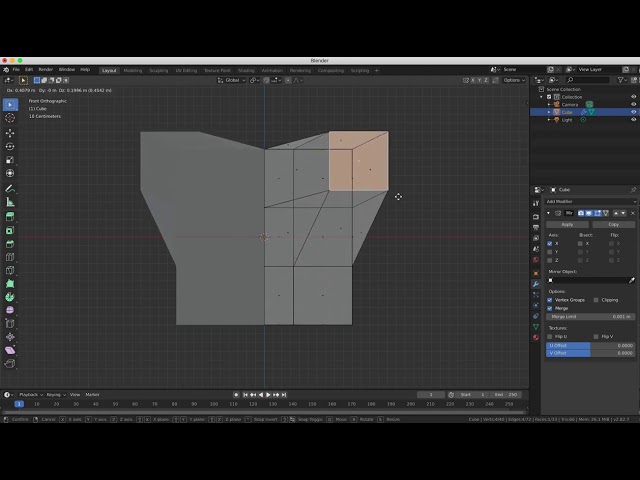
This tutorial introduces the Mirror Modifier and demonstrates how it works.
1. You can use Modifiers to do lots of interesting and useful things to your meshes.
2. Enter edit mode by pressing tab. Choose ‘Face Selection’ and press ‘A’ to select all.
3. Right click on the cube, choose ‘Subdivide’ and select 2 subdivisions.
4. Press ‘a’ twice to deselect all. Press ‘Ctrl+R’ to do a Loop Cut down the centre of the cube.
5. Choose ‘Vertex Selection’ and press ‘1’ to go to Front View. Press ‘B’ to box select.
6. Switch off the ‘Limit Selection to Visible’ button, located in the top right corner (now called the x-ray button in Blender 2.82).
7. Select the left 3 boxes in Front View. Press ‘x’ to delete them and choose ‘Vertices’.
8. The rule when deleting is to delete what you selected. So if you selected vertices you should delete vertices. If you selected edges, you should delete edges and if you selected faces you should delete faces.
9. We are now left with half a cube.
10. Open the Object Modifiers tab in the properties panel. It is represented by the blue wrench/spanner symbol
11. Add a Modifier from the list called ‘Mirror’. The full cube reappears.
12. We have a number of options for each modifier displayed in the properties panel. Switch back to Object mode with ‘tab’
13. Compare the cube in Object mode and Edit mode. Only half of the cube is editable. When you make a change on one side, it happens on the other.
14. Switch the ‘Limit Selection to Visible’ (or x-ray) button back on again.
15. Select the centre face and press ‘e’ to move it outwards. Select the top face and move it up.
16. Select the corner vertices and scale them towards the centre.
18. If we move faces in certain directions with the Mirror modifer, we can accidentally create holes or overlaps which are unsightly and glitchy and not what we want. Be careful of this.
19. Under the mirror modifer options, select ‘clipping’ to prevent overlapping from happening when you cross the centre line.
20. Extrude the character’s nose again and there should be no overlap.
21. There are tons of other Modifiers built into Blender, each of which modifies the elements of your object in different ways. Experiment with them and see what you can come up with.
This has been a short overview of how to use the Mirror Modifier tool in Blender.
 0:10:08
 0:31:19
 0:19:45
 0:19:23
 1:22:19
 0:53:32
 0:51:55
 0:00:54
 0:18:19
 0:44:51
 0:19:36
 0:35:17
 0:16:41
 0:16:43
 0:00:20
 0:00:31
 0:17:58
 0:00:18
 0:13:38
 0:48:01
 0:22:46
 0:00:30
 0:38:43
 0:00:28