filmov
tv
How to set up a Nano 16 Gallon Reef Tank #nuvo16

Показать описание
Step 1: Setting up the Tank
So we included a Nano 16 Gallon Nuvo Aquarium from Innovative Marine. The tank is a sleek design, easily sets up and comes with LED lights, overflow and filtration columns on the back. Place the aquarium on a sturdy table or countertop. Adding the rock is completely up to personal preference but try to stack the rock so that it is a few inches away from the top and sides of the tank. Pour in your sand and evenly spread it around the rock and bottom of the tank.
Step 2: Mixing Saltwater
You can use any container to mix your saltwater, at BRS we recommend a trash can or five gallon bucket. Initially, we started by pouring 15 gallons of water into the container. We've included Crystal Sea Marinemix in the kit. This is a high quality salt containing a de-chlorinator so that you don't need to worry about the chlorine in your tap water. Add the salt to the water and let dissolve. By using the refractometer you can easily see the salinity of your water - we are shooting for 35 parts per thousand or 1.026. Fifteen gallons of water should take around seven or so cups of salt.
Step 3: Get Familiar with the Back of the Tank
The area at the back of the tank in used to house pumps, filters and heaters. So at this point let's take the heater and mount it in the left or right chamber and place it fairly low so that it will always be submerged. Check all your tubing connections. Pour you saltwater and plug everything in. Be sure to use a GFI outlet or a powerstrip with a GFI built in and be safe by having a drip loop on your cords. Set your heater to 78 degrees.
Step 4: Install your Lights
The Nano 16 comes with two LED lights that easily attach. That's it.
Step 5: Cycle your Tank
Cycling your tank allows beneficial bacteria to multiply. We've included our Reef Saver rock in this kit, which is 100% free of nuisance algae and pest organisms, and greatly reduces the time it takes for your tank to cycle. Let the tank sit overnight and heat up. The next morning add the Bio-Spira, this will make your tank ready for your first fish. We recommend a hardy fish like a clownfish. Then give your tank a month stabilize with the lights off before adding anything new. Keeping the lights off will help reduce algae growth that are common with new tanks. As a general rule, it is wise to never more than double your fish load in a single month meaning next month add another fish and possibly two the month after.
Step 6: Choose your Tank Inhabitants
Choose fish that will help you be successful: clownfish, purple or red fire fish, shrimp and goby pairs, lawnmower or midas blennys or an orchid dotty back.
Once the tank is stabilized around your fish population,you can add snails, crabs and shrimp. Nassarious and astria snails are popular as well as small hermits, emerald crabs, cleaner shrimp, peppermint shrimp and pistol shrimp.
The LED lights that come with the aquarium are strong enough to keep some low light corals, as a beginner is also wise to select some that don't require much effort like soft or even some LPS corals. Zoanthids, mushrooms, ricordea, polyps, candy canes, duncan, torch and frog spawn.
Step 7: Tank Maintenance
It is wise to feed the fish only a small amount. Overfeeding can easily pollute the tank and cause algae growth. Due to evaporation, you will need to top off the tank with freshwater every couple of days. We recommend distilled or reverse osmosis water. Keeping the glass clean with a glass cleaner and performing a partial water change - say, 5 gallons every other week.
Step 8: Enjoy Your New Saltwater Aquarium
 0:00:46
How to set up a PS5 in 45 seconds
 0:00:28
3 Steps to make your setup better!
 0:04:19
ResellerGSuite Review : How to Set Up a Professional Email?
 0:00:22
Budget items you NEED in your gaming setup #shorts
 0:01:57
How To Set Up Your First Yoyo (Everything You Need To Know)
 0:00:19
This 10 Year Old Built Gaming Setup From $0
 0:37:53
I built my PC, now what? - How to set up a PC, the last guide you'll ever need!
 0:03:27
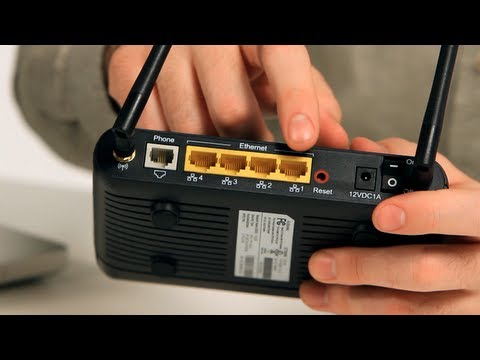
How to Set Up a Router | Internet Setup
 0:04:01
NordVPN Setup Tutorial - Purchase, Installation & VPN Setup
 0:03:23
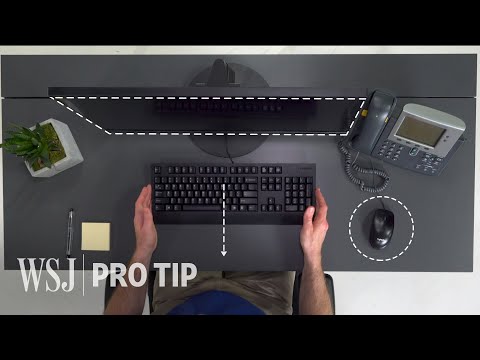
Ergonomics Expert Explains How to Set Up Your Desk | WSJ Pro Tip
 0:05:53
How to Create a YouTube Channel for Beginners (Step-by-Step Tutorial)
 0:10:11
How to Set Up a Notebook You’ll Actually Use [GIVEAWAY]
 0:00:52
UPGRADING sisters SETUP!! #pcupgrade #girly #aestheticsetup #cozysetup #whitepc #surprise #setup
 0:05:59
How To Set Up Amazon Fire Stick (2022)
 0:34:26
How to Set Up a Wacom Tablet for Retouching
 0:32:46
It's a set up!
 0:03:38
How to install and set up Chromecast with Google TV
 0:17:55
How to Set Up and Use a Wacom Tablet
 0:07:21
How to Set Up a Home Media Server
 0:12:21
Acoustic Guitar Setup – How to Set up an Acoustic Guitar 🎸 | Guitar Lesson
 0:04:16
How to set up your Nano X
 0:09:59
How to Set Up a Garage Workshop | Ask This Old House
 0:03:29
Hornady® TECH TIPS: How to set up a Seater Die with a roll crimp
 0:05:24
How To Set Up a Fretless Bass | Guitar Tech Tips | Ep. 90 | Thomann
Комментарии