EEVblog #506 - IR Remote Control Arduino Protocol Tutorial

preview_player
Показать описание
How to capture and reverse engineer an infrared IR code and use an Arduino or other microcontroller to replay the command.
Oscilloscope and logic analyser capture, coding, troubleshooting, tounge angle, it's all here.
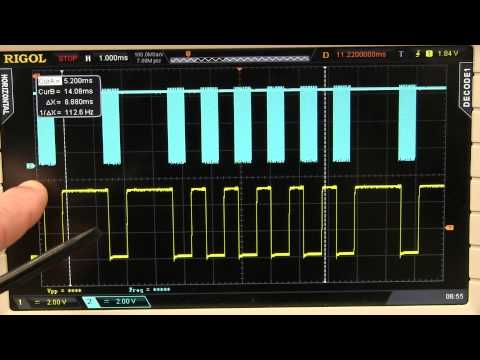
In this instance Dave captures the NEC (Japanese) code from his Canon video camera remote control on the digital oscilloscope, figures out all the bits and encoding, and writes an Arduino library to replay the code back, and verifies it with his Saleae Logic logic analyser.

EEVblog Main Web Site:
EEVblog Amazon Store:
Donations:
Projects:
Electronics Info Wiki:
Рекомендации по теме
Комментарии
Автор

Btw, just to be clear for folks, the 26ms that you divided by in your IRcarrier() function is THE PERIOD of the 38Khz. Freq = 1/Period, which means Period = 1/Freq = 1/38Khz = 0.0000263157 sec = 0.0263157msec = 26.3157usec, which is roughly 26usec.

So, your code wanted 9000usec of 38Khz carrier freq means that "how many periods of 26usecs do I need to generate?", which means 9000usec/26usec = 346 periods, that is, 346 iterations of the loop in your IRcarrier() function.

That's how the 38Khz carrier frequency is generated with an I/O pin.

unebonnevie
Автор

great work Dave.
i'm an electrical engineer who has been out of the technical loop for 25 years.
your videos are perfect for bringing somebody like me up to date.

cbranalli
Автор

If you don't have a digital scope, just connect the output of a photo diode to your line  input of your pc's audio card and record the data.

sagaertj
Автор

I recently made a remote control and IR receiver for dimming six leds individually. Used a timer to create the carrier signal and used the UART with a baud rate of 2400 to send the information, worked liked a charm :D Each transfer consisted of four bytes, the first and last byte are address bytes, I hardly get any bit error :)

plecto
Автор

Amen to that. This channel is really getting good with all the how-tos as opposed to teardowns, mailbags, and rants (not that those aren't appreciated).

knox
Автор

Thanks Dave!
i used your code to make a AC ON/OFF control for the Dometic HB2500 Airco. As far as i known no replacement remote controls are available for this Dometic HB2500 so i am making my own to help out a neighbour. He was told to buy a new Airco for his RV when his remote control broke down.
Greetings from the low lands :-)

PACSX
Автор

Thanks for this video Dave! Your code is much more elegant and easier to understand than any of the IR libraries online. I was able to modify it to duplicate a Sony AV remote and it worked!

bennydontplaythat
Автор

"The old fashioned way" : A digital oscilloscope. :D

GuardedDragon
Автор

This is exactly how a fundamentals video should be done. Well played Dave, a great combination of theory, practical and how to salvage stuff from everyday consumer junk. I dont have enough thumbs to put up.

TheBananaPlug
Автор

Excellent explanation, thanks for showing how things actually work by theory using the oscilloscope.

ShopperPlug
Автор

What I enjoyed about this video is not the programming, although that is always instructive, but the reverse engineering of the raw pulses into a carrier freq., pulse codes, NEC standard... Big thumbs up video for newbie hackers and those who just want to understand how things work! Are there many major IR coding standards besides NEC?

Inspironator
Автор

An Arduino sketch IS in native C. It's just calling an abstracted routine to write to the IO pin. You can simply bypass that if you want and the sketch will give you the exact same speed as AVR studio.

EEVblog
Автор

David - it’s an older video but I found it really useful! I’ve been recording a custom protocol used on original Macintosh keyboards (pre ADB) and plan to do an Arduino implementation. Your segment about using the Arduino and pitfalls to be mindful of confirmed the best practices I was anticipating - thank you!

StephenArsenault
Автор

By far one of the best explanations of IR signaling I've ever seen or read ... I definitely understand it 50% better than I did before watching the video ... but I am still uncertain how this knowledge can be applied to different protocols such as Sanyo, Sony etc. I'm going to power up the scope and see what I can figure out. Thank you for once again producing a quality electronic tutorial.

MikeSims
Автор

That would be the more efficient approach, but I think that this video is more about how to use your gear to reverse-engineer or diagnose a serial protocol and how to implement it in A microcontroller. The IR protocol is just a special case and Dave did a good job by not introducing PWM here...

Vorsteven
Автор

A good little bit on reverse engineering. I like the fact that you pointed out something that not many newcomers (to programming) catch; the fact that subroutine calls do not take zero time to execute, especially when they have to change registers or interface to the real world... usually not a big deal, unless you are writing tight timing loops, and then it really matters. Good job.

EngineeringVignettes
Автор

Dave thank you for this video, I just got my first oscilloscope and this made my day for another semi beginner! The protocol explanation was great it helps me put what I have learned about protocols into real world examples! Thanks again!

kftkj
Автор

As I pointed out to countless people, yes the previous hack was much simpler and faster, that's why I did it originally. But this isn't too hard, even if you have to write your own IR library as I showed, but yes, you need at least some programming knowledge. You can just cut'n'paste code though of course.

EEVblog
Автор

As you saw in the previous video, I am using the Arduino for the matrix display, it came with an Arduino driver and connection board.

EEVblog
Автор

If you want to see some truly twisted IR encoding look at the MILES 2000 a.k.a. military laser tag. The older system used a relatively slow IR signal and when they decided to update things they still wanted to be able to use the old gear so they snuck in the new bits inside the existing bits. As I recall it was something like they split up the high time from one 'long' bit for the old system to many short bits for the new system. The old receivers would filter out the new fast bits and still work just fine and the new receivers would be able to 'see' the additional data.

Since it did not add value to the project we were working on at the time to decode the actual MILES 2000 signals we skipped it (we were adding haptic feedback to the soldiers gear so they would feel where they were hit.)

HeyBirt