filmov
tv
Volvo Steering Angle Sensor Replacement - (S60, S80, V70, XC70, XC90)
Показать описание
►
Chances are that many of you have received the common "Anti-Skid Service Required" message from your P2 Volvo. If you haven't, there's a good chance that you may come across it during the span of owning your vehicle. This common error message tends to be found the most on the P2 platform vehicles ranging from model years 2005-2010.
The most common cause for this message is due to a faulty steering angle sensor. The steering angle sensor is incorporated into the Supplementary Restraint System (SRS) contact reel which is actually part of your steering wheel module. Inside of the steering wheel sensor is a code wheel which follows the movement of the steering wheel and calculates the steering wheel angle, turning speed, and number of turns.
Step 1: Disconnect the battery and wait about 5 minutes before performing any work - Safety first.
Step 2: Remove the 3 T-25 torx screws from the steering column covers - Remove the covers
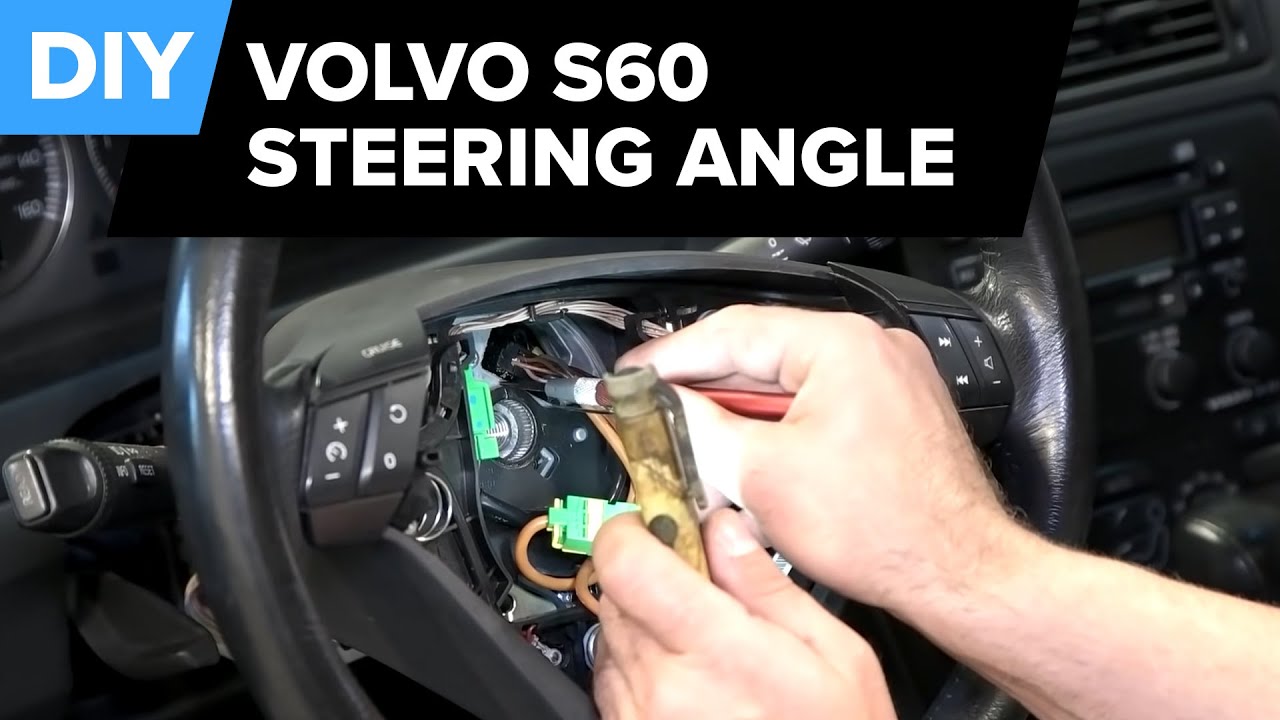
Step 3: Insert the key into the ignition to free the steering lock. Turn the wheel a quarter turn on each side to expose the two holes on the rear of the wheel. Insert a flat head screwdriver into the hole and pry up so that the screwdriver presses down on the catch release. Do this in both holes. This will release the air bag from the steering wheel.
Step 4: Take note of the wiring and the colors of the connectors. The connector housing on the airbag with either be pink or green to match the pink or green connector housings on the wiring harness. Remove the two connectors. Remove the green connector for the Steering Wheel Module. Place the air bag off to the side with the airbag portion facing up. Caution: Do not place the airbag surface on the ground or rest area, the connector side should always be placed on the ground or rest area.
Step 5: Remove the key and lock the steering wheel by turning it. Once the column is locked you can then remove the 18 mm bolt securing the steering wheel to the steering shaft.
Step 6: Once the bolt is removed, this will expose the steering shaft spline area. With a Sharpie marker, make a mark on the steering wheel splines so that they transfer onto the steering shaft splines. This will be used later so you know exactly where to re-position your steering wheel.
Step 7: Remove the steering wheel.
Step 8 : Now that you have the Clockspring / SAS unit completely exposed you'll notice the 3 Phillips head screws - Remove them.
Step 9: Remove the connector on the left side of the SAS.
Step 10: Replace the unit. When removing and installing be sure to remove and install it perfectly straight to avoid bending the terminal pins.
Step 11: Reinstall using the previous steps in reverse.
Once the new unit has been installed there is a good chance that if you have the latest software already installed into the vehicle, that the unit will not need to be reprogrammed. It's also recommended to have an authorized repair facility perform a calibration of the unit (DSTC ONLY). This should not take more than 20 minutes of the repair facility's time. At this time it's also a good opportunity to have them clear any DTCs that are still left in the system.
Get free parts from FCP Euro:
Follow FCP Euro on:
Chances are that many of you have received the common "Anti-Skid Service Required" message from your P2 Volvo. If you haven't, there's a good chance that you may come across it during the span of owning your vehicle. This common error message tends to be found the most on the P2 platform vehicles ranging from model years 2005-2010.
The most common cause for this message is due to a faulty steering angle sensor. The steering angle sensor is incorporated into the Supplementary Restraint System (SRS) contact reel which is actually part of your steering wheel module. Inside of the steering wheel sensor is a code wheel which follows the movement of the steering wheel and calculates the steering wheel angle, turning speed, and number of turns.
Step 1: Disconnect the battery and wait about 5 minutes before performing any work - Safety first.
Step 2: Remove the 3 T-25 torx screws from the steering column covers - Remove the covers
Step 3: Insert the key into the ignition to free the steering lock. Turn the wheel a quarter turn on each side to expose the two holes on the rear of the wheel. Insert a flat head screwdriver into the hole and pry up so that the screwdriver presses down on the catch release. Do this in both holes. This will release the air bag from the steering wheel.
Step 4: Take note of the wiring and the colors of the connectors. The connector housing on the airbag with either be pink or green to match the pink or green connector housings on the wiring harness. Remove the two connectors. Remove the green connector for the Steering Wheel Module. Place the air bag off to the side with the airbag portion facing up. Caution: Do not place the airbag surface on the ground or rest area, the connector side should always be placed on the ground or rest area.
Step 5: Remove the key and lock the steering wheel by turning it. Once the column is locked you can then remove the 18 mm bolt securing the steering wheel to the steering shaft.
Step 6: Once the bolt is removed, this will expose the steering shaft spline area. With a Sharpie marker, make a mark on the steering wheel splines so that they transfer onto the steering shaft splines. This will be used later so you know exactly where to re-position your steering wheel.
Step 7: Remove the steering wheel.
Step 8 : Now that you have the Clockspring / SAS unit completely exposed you'll notice the 3 Phillips head screws - Remove them.
Step 9: Remove the connector on the left side of the SAS.
Step 10: Replace the unit. When removing and installing be sure to remove and install it perfectly straight to avoid bending the terminal pins.
Step 11: Reinstall using the previous steps in reverse.
Once the new unit has been installed there is a good chance that if you have the latest software already installed into the vehicle, that the unit will not need to be reprogrammed. It's also recommended to have an authorized repair facility perform a calibration of the unit (DSTC ONLY). This should not take more than 20 minutes of the repair facility's time. At this time it's also a good opportunity to have them clear any DTCs that are still left in the system.
Get free parts from FCP Euro:
Follow FCP Euro on:
 0:04:40
Volvo Steering Angle Sensor Replacement - (S60, S80, V70, XC70, XC90)
 0:04:30
Volvo XC90 steering angle sensor (fault code disappears after disassembly and cleaning)
 0:24:11
Volvo ratin asentotunnistimen purkua | Taking apart Volvo steering wheel angle sensor
 0:03:37
Volvo XC90 Steering Angle Sensor Dissection - Can it be cleaned?
 0:06:55
steering angle sensor replace of volvo XC90 , ABS -0108 code issue in volvo XC90
 0:13:16
Volvo P2 Clock Spring Airbag Stalks - Anti-skid Temporarily Off Possible Fix - V70 S60 XC90 S80 XC70
 0:08:36
Volvo anti skid repair tutorial
 0:07:57
volvo Clockspring (sas steering angle sensor) Anti skid light
 0:01:01
Volvo 2021 steering angle sensor replacement
 0:00:37
how to reset the steering angle sensor without a scanner. VW Steering Angle Sensor Basic Setting.
 0:02:51
C0051 28 Steering Angle Sensor SAS Calibration | 2012 Volvo S60 S80
 0:08:02
Faulty Steering Angle Sensor/Clock Spring - Airbag Light Solution
 0:10:53
2020 Volvo VNL760 Steering wheel clock spring control wires
 0:05:18
Quick tip on calibrating steering angle sensor
 0:03:46
TOP 7 SYMPTOMS OF A BAD STEERING ANGLE SENSOR
 0:01:57
Steering-Angle Sensors 101
 0:00:44
Volvo SAS angle sensor repair XC90 S60 V70
 0:14:07
How to Diagnose a Bad Steering Angle Sensor
 0:02:18
xc90 angle position sensor replacing
 0:02:05
Steering Angle Sensor Recalibration | Maintenance Minute
 0:06:18
HOW TO KNOW IF STEERING ANGLE SENSOR IS BAD OR NOT CALIBRATED. BRAKE TRACTION CONTROL LIGHT ON
 0:05:50
HOW TO TEST STEERING ANGLE SENSOR on Most Cars
 0:01:09
Freightliner Cascadia Steering angle sensor replacement SAS
 0:03:58
Volvo calibration on vida 🤙🏻🇸🇪
Комментарии