filmov
tv
How To Setup a Raspberry Pi Home Surveillance System with MotionEyeOS

Показать описание
In this video we'll look at How To Setup a Raspberry Pi Home Surveillance System with MotionEyeOS using a raspberry pi and a webcam.
You're going to need the following:
- Raspberry Pi (or other supported single-board computer)
- MicroSD Card (the larger the better and class 10 is preferred)
- Raspberry Pi Power Supply
- USB Webcam (higher resolution is better.)
Here are the steps:
- extract the image file from the archive
- write the image file to your SD card
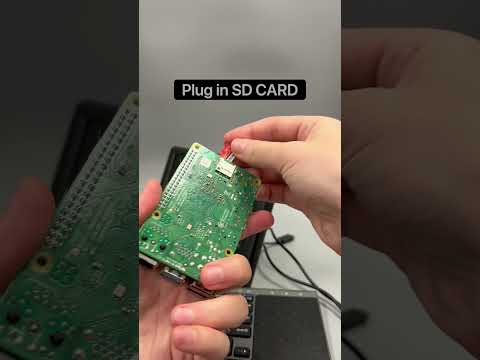
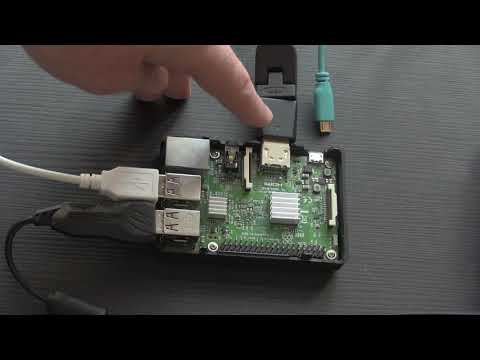
- Insert the microSD card into your Raspberry Pi
- Plugin your Raspberry Pi
First Boot
When booting a fresh image installation, a few initialization steps will take place and therefore the system won't be ready for about 1-2 minutes. Please do not disconnect or reboot your board during these first two minutes!
These steps are:
- preparing the data partition on the SD card
- configuring SSH remote access
- auto-configuring any detected camera devices
Of course your motionEyeOS needs an IP address before you can communicate with it so you'll have to use the ethernet connection with DHCP enabled, unless you have preconfigured a wireless network setup.
To access it, enter the IP address of your board in the address bar of your browser.
To find the address, connect to your router (most routers can display the addresses of all connected devices) and look for a device name beginning with "meye-". Alternatively, you can use a network scanner such as the free mobile app Fing.
Use admin with no password when asked for credentials. Feel free to explore all the available configuration options.
DO NOT ASK FOR EDIT PRIVILEGES. DOWNLOAD IT TO YOUR COMPUTER AND EDIT THE FILE THERE.
/=========================================/
Follow Up Videos
Adding Cameras to motionEye:
Backing Up motionEye to Google Drive:
/=========================================/
DO NOT DM ME ON SOCIAL MEDIA ASKING FOR TECH SUPPORT. LEAVE YOUR QUESTIONS IN THE COMMENT SECTION ON THE APPROPRIATE VIDEO AND I WILL ANSWER IT THERE.
/=========================================/
Music
Phife for Life
by Otis Mcdonald
/=========================================/
Here's my Amazon Influencer Shop Link:
/=========================================/
Like what I do? Want to be generous and help support my channel? Here are some ways to support:
/=========================================/
Remember to leave a like on this video and subscribe if you want to see more!
/=========================================/
Follow Me:
#RaspberryPi #motionEye #diy
You're going to need the following:
- Raspberry Pi (or other supported single-board computer)
- MicroSD Card (the larger the better and class 10 is preferred)
- Raspberry Pi Power Supply
- USB Webcam (higher resolution is better.)
Here are the steps:
- extract the image file from the archive
- write the image file to your SD card
- Insert the microSD card into your Raspberry Pi
- Plugin your Raspberry Pi
First Boot
When booting a fresh image installation, a few initialization steps will take place and therefore the system won't be ready for about 1-2 minutes. Please do not disconnect or reboot your board during these first two minutes!
These steps are:
- preparing the data partition on the SD card
- configuring SSH remote access
- auto-configuring any detected camera devices
Of course your motionEyeOS needs an IP address before you can communicate with it so you'll have to use the ethernet connection with DHCP enabled, unless you have preconfigured a wireless network setup.
To access it, enter the IP address of your board in the address bar of your browser.
To find the address, connect to your router (most routers can display the addresses of all connected devices) and look for a device name beginning with "meye-". Alternatively, you can use a network scanner such as the free mobile app Fing.
Use admin with no password when asked for credentials. Feel free to explore all the available configuration options.
DO NOT ASK FOR EDIT PRIVILEGES. DOWNLOAD IT TO YOUR COMPUTER AND EDIT THE FILE THERE.
/=========================================/
Follow Up Videos
Adding Cameras to motionEye:
Backing Up motionEye to Google Drive:
/=========================================/
DO NOT DM ME ON SOCIAL MEDIA ASKING FOR TECH SUPPORT. LEAVE YOUR QUESTIONS IN THE COMMENT SECTION ON THE APPROPRIATE VIDEO AND I WILL ANSWER IT THERE.
/=========================================/
Music
Phife for Life
by Otis Mcdonald
/=========================================/
Here's my Amazon Influencer Shop Link:
/=========================================/
Like what I do? Want to be generous and help support my channel? Here are some ways to support:
/=========================================/
Remember to leave a like on this video and subscribe if you want to see more!
/=========================================/
Follow Me:
#RaspberryPi #motionEye #diy
 0:00:19
Setting Up a Raspberry Pi 4 | Vilros
 0:02:08
Raspberry Pi Explained in 100 Seconds
 0:24:43
Raspberry Pi 5: Getting Started
 0:00:30
How to set up a Raspberry Pi
 0:19:21
Raspberry Pi 5 Setup: Getting Started Guide (Step By Step)
 0:06:24
Raspberry Pi Beginner's Guide: Install and Setup NOOBS
 0:24:54
Raspberry Pi 4 Getting Started
 0:10:51
Raspberry Pi 5 setup | Full Tutorial for Beginners (2025)
 0:15:29
Raspberry Pi Pico OLED Display Setup: Easy MicroPython Tutorial (I2C/SSD1306)
 0:24:13
how to build a Raspberry Pi NAS (it’s AWESOME!!)
 0:12:23
Raspberry Pi 5 Getting Started // How to Setup a Raspberry Pi 5
 0:00:10
How to better connect the raspberryPi the way you want #raspberrypi #electronics #elektronik
 0:00:17
How to setup the new Raspberry Pi Imager (Part 1)
 0:10:16
How To Install & Set Up Raspberry Pi OS - Pi4 Pi3 Pi2
 0:00:32
Setting up my new Raspberry Pi Zero 2W. Suggest an OS #raspberrypi #arduino #pizero #electronics
 0:00:26
The best raspberry pi case
 0:08:39
Raspberry Pi versus AWS // How to host your website on the RPi4
 0:00:26
Never Buy A Raspberry Pi
 0:00:10
Camera Project for RaspberryPi #raspberrypi #engineering #project #diy
 0:00:46
a raspberry pi docker container?!?
 0:00:19
Raspberry Pi 5 Extreme
 0:01:00
What is a raspberry pi and why do companies use it? #tech #techskills
 0:02:45
Raspberry Pi OS Installation Guide: Installing the Operating System on a Micro SD Card
 0:00:25
Raspberry Pi 4 with four Raspberry Pi Zero 2W. PoE powered #raspberrypi #hardware #diyelectronics
Комментарии