filmov
tv
Different 'Select Area' functions of iShowU Instant
Показать описание
Area Selection
iShowU Instant presents there main ways by which you can select the area you want to record, full screen, by window and by area.
Full Screen
Useful when you’ve multiple monitors attached to your mac, or if you want to quickly tell iShowU to capture the whole screen.
You just move the mouse to the display you wish to record, and left click. The entire display is set as the capture area.
You can see I’ve selected my odd sized 1600x1000 screen here.
Note: if you click ‘full screen’ and you’ve only got one display, you won’t see a selection choice. iShowU will just automatically change the selected area to your full display, and then flash the green “this is your selected area” rectangle.
By Window
In “by window” mode, the select area tool lets you choose based on windows that are visible on screen. Let me move a couple over, so I can show you.
Here I’ve a couple of other windows. When I move the mouse, you see the selected area change. I just need to click on one to confirm my selection. Notice that if I move outside a window area (i.e: the desktop background) I can still choose full screen.
In case you’re wondering: iShowU Instant doesn’t follow the window around. It is used to make selection of a window easier, but it doesn’t track the window position during recording.
By Area
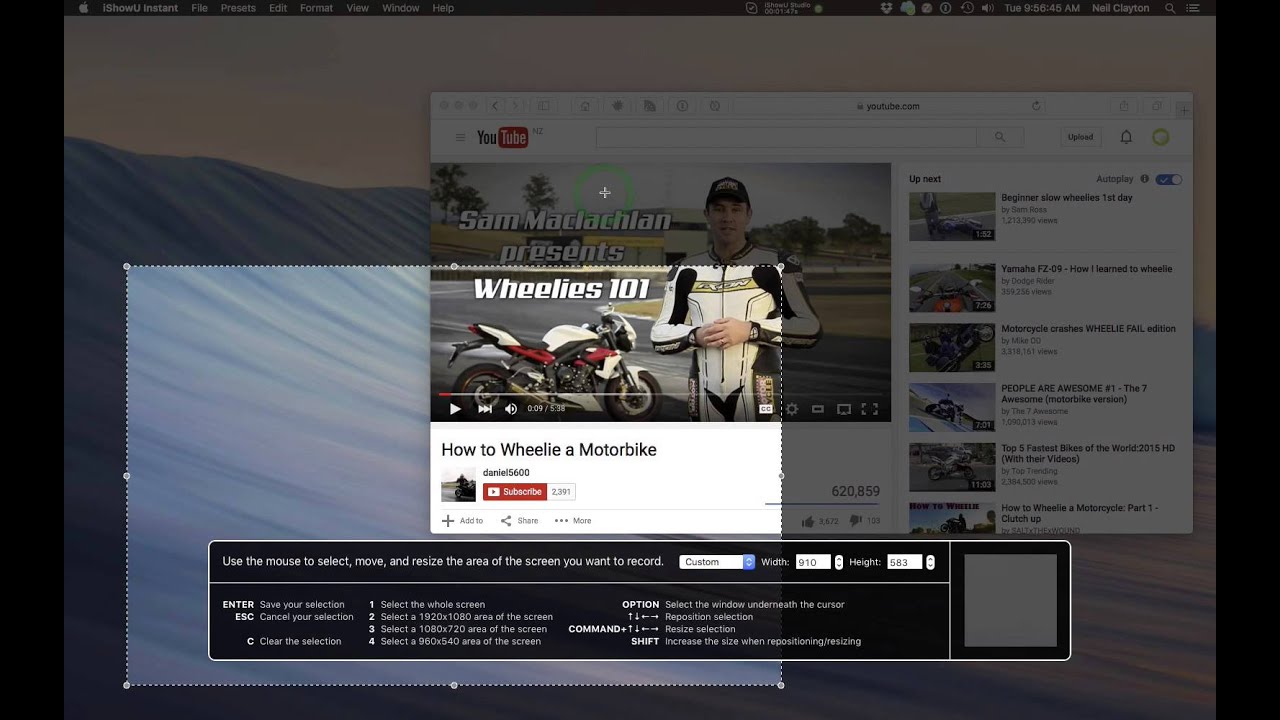
Here you can draw any area you like, this mode gives you the most flexibility.
Not only can you draw any area, you can also select from a preset size using the dropdown, use the 1/2/3 & 4 shortcuts (these choose sizes, as you can see here) or simply type in any size you want manually.
Once you have a rough size, you can move it by clicking and dragging using the mouse.
In this mode you can use the keyboard to nudge the selection rectangle, and you can get very accurate by nudging while looking at the provided magnified area.
Here I’m getting the top left correct using the arrow keys…
And then I’m fixing up the bottom right doing the same thing, but holding CMD. I’m also looking at the zoomed in area, to check exactly where my selection rectangle is. You can see that I can get it exactly on the movie, really easily.
Once I’m happy, I press Enter to confirm, and I’m done!
You can double check your area by clicking the ‘show area’ button. This presents a visible green rectangle on screen, showing where iShowU will capture from.
…
iShowU Instant presents there main ways by which you can select the area you want to record, full screen, by window and by area.
Full Screen
Useful when you’ve multiple monitors attached to your mac, or if you want to quickly tell iShowU to capture the whole screen.
You just move the mouse to the display you wish to record, and left click. The entire display is set as the capture area.
You can see I’ve selected my odd sized 1600x1000 screen here.
Note: if you click ‘full screen’ and you’ve only got one display, you won’t see a selection choice. iShowU will just automatically change the selected area to your full display, and then flash the green “this is your selected area” rectangle.
By Window
In “by window” mode, the select area tool lets you choose based on windows that are visible on screen. Let me move a couple over, so I can show you.
Here I’ve a couple of other windows. When I move the mouse, you see the selected area change. I just need to click on one to confirm my selection. Notice that if I move outside a window area (i.e: the desktop background) I can still choose full screen.
In case you’re wondering: iShowU Instant doesn’t follow the window around. It is used to make selection of a window easier, but it doesn’t track the window position during recording.
By Area
Here you can draw any area you like, this mode gives you the most flexibility.
Not only can you draw any area, you can also select from a preset size using the dropdown, use the 1/2/3 & 4 shortcuts (these choose sizes, as you can see here) or simply type in any size you want manually.
Once you have a rough size, you can move it by clicking and dragging using the mouse.
In this mode you can use the keyboard to nudge the selection rectangle, and you can get very accurate by nudging while looking at the provided magnified area.
Here I’m getting the top left correct using the arrow keys…
And then I’m fixing up the bottom right doing the same thing, but holding CMD. I’m also looking at the zoomed in area, to check exactly where my selection rectangle is. You can see that I can get it exactly on the movie, really easily.
Once I’m happy, I press Enter to confirm, and I’m done!
You can double check your area by clicking the ‘show area’ button. This presents a visible green rectangle on screen, showing where iShowU will capture from.
…
 0:03:08
 0:05:39
 0:10:28
 0:05:16
 0:02:09
 0:11:01
 0:05:06
 0:07:37
 0:00:36
 0:06:44
 0:08:03
 0:11:08
 0:02:19
 0:06:09
 0:01:55
 0:05:07
 0:05:41
 0:01:00
 0:31:07
 0:00:22
 0:08:11
 0:09:25
 0:03:42
 0:09:22