filmov
tv
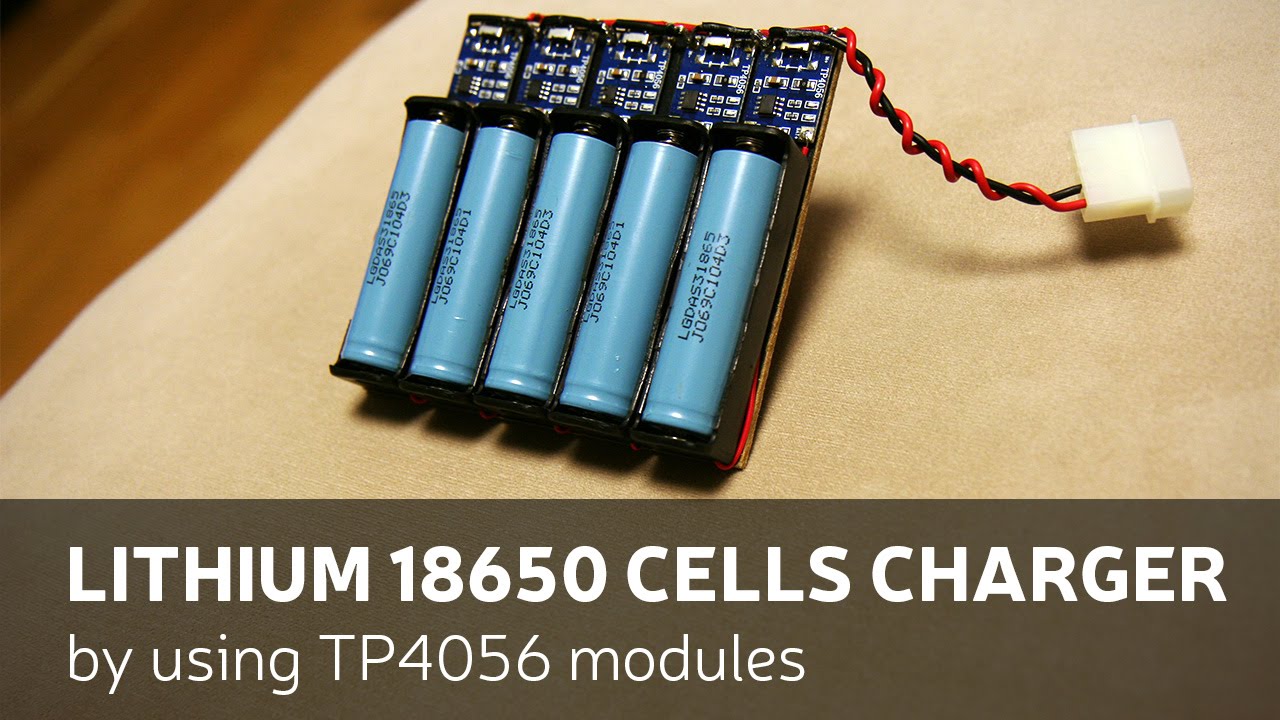
DIY: Lithium 18650 Cells Charger By Using TP4056 Modules
Показать описание
This time I'll make a charger, which could charge 5 pcs of lithium ion 18650 cells at a time. Parts for this build cost only 5$ at ebay: 18650 battery holders and TP4056 charging modules.
In video, I forgot to mention about power supply current. In my case - to power up 5pcs of TP4056, it's need a power supply witch could give minimum 5 amps of current.
Julian Ilett video about charging 18650 with TP4056:
Due to factors beyond the control of WellDoneTips, it cannot guarantee against unauthorized modifications of this information, or improper use of this information. WellDoneTips assumes no liability for property damage or injury incurred as a result of any of the information contained in this video. WellDoneTips recommends safe practices when working with the tools or equipment seen or implied in this video. Due to factors beyond the control of WellDoneTips, no information contained in this video shall create any express or implied warranty or guarantee of any particular result. Any injury, damage or loss that may result from improper use of these tools, equipment, or the information contained in this video is the sole responsibility of the user and not WellDoneTips.
 0:07:44
DIY: Lithium 18650 Cells Charger By Using TP4056 Modules
 0:11:06
Simple DIY 18650 Battery Charger - TP4056 Review (Everything Explained)
 0:00:20
4S 4A lithium 18650 3.7V Battery charger module #ideas
 0:00:58
3.7V Lithium ion Battery Charger With Indicator
 0:00:25
How to Make Charging Module for Lithium Battery | Homemade Lithium Battery Charger
 0:08:01
Biggest Li-ion Charging Station | 10 Cell Li-on Battery Charging Station | DIY 18650 Battery Charger
 0:00:11
18650 Lithium battery charging system USB DIY Project #shorts
 0:00:23
Lithium Battery Charging Module #electronics #batterycharger #diy
 0:01:29
18650 battery charger,18650 battery charger module,18650 battery charging module,3.7v#shorts
 0:05:46
How to make Lithium ion 18650 battery charger at home
 0:00:26
DIY 18650 Li-Ion Battery Charger with TP4056 | How to make 3.7 v battery char #DIY #TechProjects
 0:00:20
How to make a 18650 lithium battry charger #homemade
 0:00:26
DIY 18650 lithium ion Battery Charger using TP4056|| How to make battery charger
 0:00:59
Making 18650 Lithium Ion Battery Charger Using TP4056 #shortvideo #shorts #battery #18650
 0:03:02
How To Make Lithium Battery Charger | 3.7v Lithium Battery Charger
 0:13:24
My DIY 18650 Battery Charger
 0:16:38
DIY 18650 Battery Charger - How to make lithium-ion cell Charger
 0:11:32
How to Make a Lithium-ion Battery FAST Charger - 200% Working | 18650 Battery Fast Charger
 0:00:16
Simple 3.7v Auto Cut Charger / How to make lithium ion battery charger #18650 #electronic
 0:00:15
How to Charge Lithium Batteries at Home DIY Battery Charger
 0:10:34
USB Battery charger + 10A BMS - Interesting, right?
 0:00:21
DIY Lithium Battery Charger (3.7V) #shorts #battery.
 0:00:16
HOW TO make 18650 Lithium battery charging magnet club Kaise banaen free mein #viral #video #views
 0:00:12
Lithium ion battery Charger 18650 battery #diy #battrey_Charger #For_Homemade
Комментарии