filmov
tv
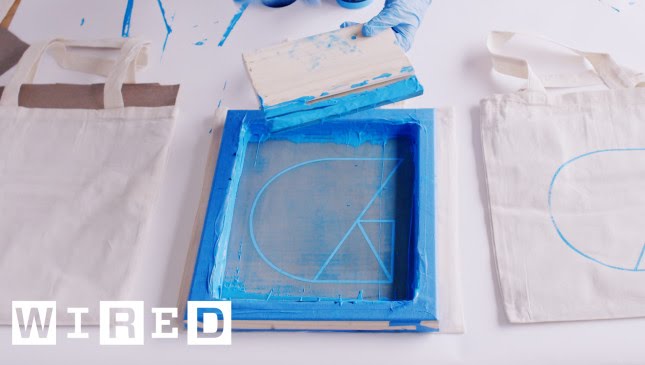
DIY: How To Burn a Silkscreen and Print at Home
Показать описание
Screen printing is the pinnacle of DIY culture. We're going to show you how to make your own design and screen it onto whatever you'd like. You’ll need to block out a few hours, and you'll need to have a design or logo in mind to print.
CONNECT WITH WIRED
ABOUT WIRED
WIRED is where tomorrow is realized. Through thought-provoking stories and videos, WIRED explores the future of business, innovation, and culture.
DIY: How To Burn a Silkscreen and Print at Home
CONNECT WITH WIRED
ABOUT WIRED
WIRED is where tomorrow is realized. Through thought-provoking stories and videos, WIRED explores the future of business, innovation, and culture.
DIY: How To Burn a Silkscreen and Print at Home
 0:01:54
DIY: How To Burn a Silkscreen and Print at Home
 0:01:38
DIY How To Burn A SilkScreen
 0:05:07
Screen Print with me ✸ HOW I BURN A SCREEN ✸ Printing at home ✸
 0:14:17
3 Ways to Burn Designs on Wood without a Laser!
 0:01:08
The DR Burn Cage. Backyard burning Done Right!
 0:00:27
How to Burn a Letter on Wood - Wood Burn Letters DIY
 0:11:57
DIY Smokeless Burn Barrel Build in less than 12 minutes
 0:03:47
DIY Burn Barrel Tips and Tricks
 0:00:37
Burn Book DIY | Mean Girls #Shorts
 0:06:49
WOOD BURNING! BURN PICTURES & DESIGNS INTO WOOD W/ ANY CRICUT MACHINE | CRICUT TUTORIAL FOR BEGI...
 0:05:50
How to burn ANY DESIGN OR IMAGE INTO WOOD! DIY Wood Burning for Beginners
 0:03:31
How to make an amazingly simple burn barrel: DIY tips and tricks
 0:00:12
Step by Step guide. Learn to burn with my in 16 projects. #pyrography #mandalaart
 0:00:20
Blow me up I made a burn book with my bestie
 0:00:56
Burn a Shirt with Pure Oxygen!
 0:00:52
Making A Burn Barrel
 0:03:56
How to Ease a Burn Fast
 0:06:24
HOW TO: Burn Your Screens for Screen Printing at Home
 0:05:33
How to Burn a CD
 0:13:52
Cheap way to Burn a Screen for Beginners | Part 3 Screen printing from start to finish.
 0:00:34
fix cigarette burn hole in clothes #fix #sewing #shorts #girlycraft
 0:01:30
Burn Away Cake Tutorial!
 0:00:17
burn A lore #shorts #diy #shortvideo
 0:03:41
Burn Barrel That Works/How To
Комментарии