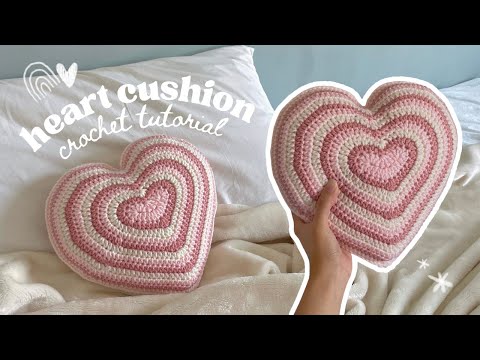
how to crochet a heart-shaped cushion/pillow | cute crochet room decor tutorial

preview_player
Показать описание
The perfect pillow cushion to make your bed look even cuter!

Chapters:
0:00 Intro
0:52 How it works
1:33 Important notice!
1:37 Round 1
6:32 Ending round 1
7:42 Round 2
12:04 Ending round 2
12:52 Round 3
19:04 Round 4
27:03 Round 5
35:18 Rounds 6-12
35:57 Putting the pieces together
Рекомендации по теме
Комментарии
Автор

Hi everyone, I’ve updated the written pattern on the blog with the stitch count and the corrected version for round 9. Based on recent activity, please don’t send me mean/rude messages on my social media platforms. I’ve acknowledged that I made a mistake in the written pattern for round 9 and made changes to the pattern.

mahumcrochets
Автор

I just used this tutorial to make a heart bag! Rather than stuffing for a pillow, I just connected and left an opening at the top and made some straps! 12 rounds is the perfect medium sized bag!!

emmaholm
Автор

This is one of the best tutorials I have seen! As a semi-beginner, I have struggled learning to read patterns and after this tutorial I think I have it down! Thank you!

chedbun
Автор

*For anyone who is more use to the standard format pattern writting, I have translated the pattern below up to round 5~*

*Terms*
Rnd: Round
SL: slip stitch
CH: chain
DC: double crochet
HDC: half double crochet
SC: single crochet
INC: increase (typically means 2 stitches in a single stitch but this pattern contains various amounts of increases indicated in parenthesis)
TOG: x amount of stitches together
FO: finish off
CC: color change (tie next color on)


*Pattern in standard notation*
Rnd 0: SL, CH 8,

Rnd 1: Sk 2, DC, INC (3dc in ST), Inc(3dc in ST), DC, INC(4dc in ST)
(on bottom stitches), INC(3dc in ST), 4DC TOG, INC(6dc in ST), SL and FO

Rnd 2: CC, CH1, HDC INC in same ST, 4HDC, DC INC(3DC in ST), 4HDC, 2 HDC INC, 2 HDC INC(3 ST in one), SC, SC 2 TOG, SC, HDC INC, HDC INC(3HDC in ST), HDC INC, SL, FO

Rnd 3: CC, CH1, HDC in same ST, 6HDC, 2DC INC, 8HDC, 6HDC INC, 2SC, SC 4 TOG, 2 SC, 6HDC INC, HDC, SL, FO

Rnd 4: CC, CH1, HDC in same ST, 8HDC, DC INC(3dc in ST), 12HDC, (HDC INC, HDC)x4, SC INC, 2SC, 2SC, SC INC, (HDC, HDC INC)x4, 3HDC, SL, FO

Rnd 5: CC, CH1, HDC in same ST, 9HDC, 2DC INC, 13HDC, (INC, 2HDC)x4, SC INC, SC, SC 3 TOG, SC, SC INC, (2HDC, INC)x4, 3HDC

artareon
Автор

I always end up clicking on your vids without realizing because they’re so aesthetic and unique! I love how gently and clearly you explain which is so helpful for a beginner like me!

jessalinnguyen
Автор

hands down the best tutorial ever. I started crocheting 3 weeks ago and coming into this didn't really know how to read patterns. now coming out of it I can read written patterns so well. Thank you so much for being such a great teacher!!!

LilySteele
Автор

Lovely tutorial, it turns out even cuter if you single crochet the two panels together and add ruffles to the edge!

itslexeeyo
Автор

Awesome it turned out very good...
Tips for those who are struggling (based on my experience🤡👍)
1. Iron it if it's wobbly
2. If left with extra stitch single crochet them together (like at the middle curve of the heart)
3 . Don't fill it directly with cotton make a pillow then stitch it...

All the best 🫂💖

SaishaSawant-boti
Автор

i’m making this as a christmas gift for my sister who LOVES the color pink! instead of making a pillow though, i’m making it a little smaller and adding eyes and arms and legs to make it a little plushie, hopefully she likes it!! 💗

tipsbyurfav
Автор

Slipknot, ch 8, dc into 3rd ch from your hook, 1 dc, 3 dc x 2, 1 dc, 4 dc, *now work on the other side of the ch*, in the same stitch as the previous 4 dc - 3 dc (total 7 dc in that stitch), dc 4 together, 6 dc,  end the round and attach your next color (ss + ch 1)

Round 2:

2 hdc (in the same stitch as the ss from the previous round), 1 hdc x 4, 3 dc, 1 hdc x 4, 2 hdc x 2, 3 hdc x 2, 2 hdc, 1 sc, sc 2 together, 1 sc, 2 hdc, 3 hdc x 2, 2 hdc,  end the round and attach your next color (ss + ch 1)

Round 3:

1 hdc x 7, 2 dc x 2, 1 hdc x 8, 2 hdc x 6, 1 sc x 2, sc 4 together, 1 sc x 2, 2 hdc x 6, 1 hdc,  end the round and attach your next color (ss + ch 1)

Round 4:

1 hdc x 9, 3 dc, 1 hdc x 12, *2 hdc, 1 hdc* x 4, 2 sc, 1 sc x 2, sc 2 together, 1 sc x 2, 2 sc, *1hdc, 2 hdc* x 4, 1 hdc x 3,  end the round and attach your next color (ss + ch 1)

Round 5:

1 hdc x 10, 2 dc x 2, 1 hdc x 13, *2 hdc, 1 hdc x 2* x 4, 2 sc, 1 sc, sc 4 together, 1 sc, 2 sc, *1 hdc x 2, 2 hdc* x 4, 1 hdc x 3,  end the round and attach your next color (ss + ch 1)

Round 6: 

1 hdc x 12, 3 dc, 1 hdc x 15, *2 hdc, 1 hdc x 3* x 4, 2 sc, sc x 2, sc 2 together, sc x 2, 2 sc, *1 hdc x 3, 2 hdc* x 4, 1 hdc, end the round and attach your next color (ss + ch 1)

Round 7: 

1 hdc x 13, 2 dc x 2, 1 hdc x 13, *2 hdc, 1 hdc x 4* x 4, 2 sc, sc x 2, sc 4 together, sc x 2, 2 sc, *1 hdc x 4, 2 hdc* x 4, 1 hdc x 2, end the round and attach your next color (ss + ch 1)

Round 8:

1 hdc x 15, 3 dc, 1 hdc x 16, *2 hdc, 1 hdc x 5* x 4, 2 sc, sc x 2, sc 2 together, sc x 2, 2 sc, *1 hdc x 5, 2 hdc* x 4, 1 hdc, end the round and attach your next color (ss + ch 1)

Round 9:

1 hdc x 16, 2 dc x 2, 1 hdc x 17, *2 hdc, 1 hdc x 6* x 4, 2 sc, sc x 2, sc 2 together, sc x 2, 2 sc, *1 hdc x 6, 2 hdc* x 4, 1 hdc, end the round and attach your next color (ss + ch 1)

Round 10:

1 hdc x 18, 3 dc, 1 hdc x 19, *2 hdc, 1 hdc x 7* x 4, 2 sc, sc x 2, sc 2 together, sc x 2, 2 sc, *1 hdc x 7, 2 hdc* x 4, 1 hdc, end the round and attach your next color (ss + ch 1)

Round 11:

1 hdc x 19, 2 dc x 2, 1 hdc x 20, *2 hdc, 1 hdc x 8* x 4, 2 sc, sc x 2, sc 2 together, sc x 2, 2 sc, *1 hdc x 8, 2 hdc* x 4, 1 hdc, end the round and attach your next color (ss + ch 1)

Round 12:

1 hdc x 21, 3 dc, 1 hdc x 22, *2 hdc, 1 hdc x 9* x 4, 2 sc, sc x 2, sc 2 together, sc x 2, 2 sc, *1 hdc x 9, 2 hdc* x 4, 1 hdc, end the round and attach your next color (ss + ch 1)

iwnwyu
Автор

Such a well written and explained tutorial! Noted I’m not a beginner, but I usually free hand most of my projects. But every once in a while I’ll find a tutorial I want to follow. This pulled me in. Great job!

Zoievan
Автор

This was a fantastic tutorial! The idea is so cute, and you explain it really well. I'm not necessarily a beginner, but I never used a pattern before and you made it very simple to understand. Thank you and I'm excited for what you bring out next💜💞

lisa
Автор

Even as an intermittent crocheter, the written pattern was confusing so I came here only to find out I was reading it wrong 🤦🤦😂😂 amazing pattern and clear instructions for when you're not rushing through it!! Mine came out lovely

vikkusfikkus
Автор

Thank you for this video! I wanted to make this for my partner for valentines! This is my first time ever crocheting something and I managed to get it done in 4 nights by having a lot of late nights... Doesn't look as clean as yours still looks nice. Thank you once again :)

_jayna
Автор

this is the best tutorial of heart shaped crochet i’ve ever seen! thank you so much, you’re so sweet!

sophiagarcia
Автор

thank you so much for this video! the way you explain things and how you have your pattern written is so user friendly and easy to follow! this pattern was super enjoyable to make and they're literally adorable and so fast to make! Such an awesome gift too, thank you!!!

lyssa
Автор

Personally as someone who’s worked with very intricate patterns i by far have found this tutorial to be one of the hardest to follow definitely not for beginners and I find that your stitch count never matches mine no matter how many time I rewind and re do it

ALyes-fg
Автор

THIS IS SO CUTE AHHHH I'm definitely doing this one as soon as I can, thank you so much luv <333

bephany
Автор

This is such a nice beginner friendly tutorial! I made it and it turned out absolutely fabulous :) its super aesthetic and not that time consuming (some crochet projects take up to months)

anayabutt
Автор

girl I LOVE YOU. Thank you for giving us so many good patterns I've been looking for a good one for SO long 😭😭

chiara.b