filmov
tv
Position and Distribute Layers in a Composition in After Effects

Показать описание
Position and distribute layers in a composition.
Learn how to position, transform, and organize layers visually in a composition.
#Afer_Effects
***, Download Practice Files:
***, SUBSCRIBE FOR MORE:-
What you learned: Different methods for positioning and distributing layers evenly in a composition
Use settings and panels that help with positioning layers in a composition
Enabling Snapping helps you reposition layers in relation to other layers in a composition. Using the Align panel can help distribute layers evenly when multiple layers are selected.
Shape layers have settings for each shape on that layer you can use to position the shape within the composition
Select the Blue Bar shape layer and press UU on your keyboard to reveal only the changed properties for a shape.
Set the X parameter setting for the Transform: Rectangle 1 Position to a value of 0 to center the shape horizontally in the Composition panel.
Layers selected in the timeline have control handles that you can use to transform the layer directly in the Composition panel.
Drag any handle to distort the layer. Shift-drag a handle to keep the layer’s proportions as it is transformed.
Drag inside the handles to reposition a layer in the composition.
Use layer labels to select layers
Click the yellow label in the timeline for Layer 2 and choose Select Label Group to select all layers with the same label color.
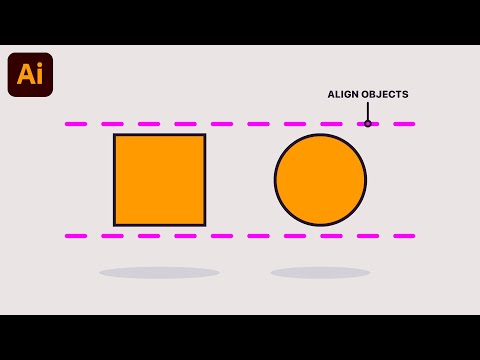
The Align panel helps organize selected layers
Go to Window Align to open the Align panel.
Click the bottom align button in the Align Layers To section of the Align panel.
Click the Center Horizontally button in the Distribute Layers section of the Align panel.
Enabling Snapping helps align layers in relation to other layers in a composition
Enable Snapping by checking the Snapping box in the top center of the interface.
Drag near the center axis point of the Left layer icon to drag all the layers and to use the center of the Left layer as the snapping point.
Drag the layers until the middle of the Left layer snaps vertically to the center of the Blue Bar shape layer.
Scrubbing a parameter with multiple layers selected will adjust all selected layers
Press S on your keyboard to open the Scale properties for all of the selected Illustrator layers.
Scrub the scale value down on any of the selected layers to resize all of the layers to fit within the Blue Bar shape layer.
Use the arrow keys on your keyboard to fine-tune the position of any selected layer
Click near the lower-left corner of the Travel text layer and drag it to the upper left corner of the Left icon so it snaps into position.
Use the Up-Arrow key to nudge the Travel text layer up vertically in the Composition panel one pixel at a time. Position the Travel text layer so its baseline lines up just on the edge of the Blue Bar shape layer.
Tip: Holding down Shift on your keyboard while using the arrow keys moves selected layers 10 pixels at a time.
Contact us:-
Learn how to position, transform, and organize layers visually in a composition.
#Afer_Effects
***, Download Practice Files:
***, SUBSCRIBE FOR MORE:-
What you learned: Different methods for positioning and distributing layers evenly in a composition
Use settings and panels that help with positioning layers in a composition
Enabling Snapping helps you reposition layers in relation to other layers in a composition. Using the Align panel can help distribute layers evenly when multiple layers are selected.
Shape layers have settings for each shape on that layer you can use to position the shape within the composition
Select the Blue Bar shape layer and press UU on your keyboard to reveal only the changed properties for a shape.
Set the X parameter setting for the Transform: Rectangle 1 Position to a value of 0 to center the shape horizontally in the Composition panel.
Layers selected in the timeline have control handles that you can use to transform the layer directly in the Composition panel.
Drag any handle to distort the layer. Shift-drag a handle to keep the layer’s proportions as it is transformed.
Drag inside the handles to reposition a layer in the composition.
Use layer labels to select layers
Click the yellow label in the timeline for Layer 2 and choose Select Label Group to select all layers with the same label color.
The Align panel helps organize selected layers
Go to Window Align to open the Align panel.
Click the bottom align button in the Align Layers To section of the Align panel.
Click the Center Horizontally button in the Distribute Layers section of the Align panel.
Enabling Snapping helps align layers in relation to other layers in a composition
Enable Snapping by checking the Snapping box in the top center of the interface.
Drag near the center axis point of the Left layer icon to drag all the layers and to use the center of the Left layer as the snapping point.
Drag the layers until the middle of the Left layer snaps vertically to the center of the Blue Bar shape layer.
Scrubbing a parameter with multiple layers selected will adjust all selected layers
Press S on your keyboard to open the Scale properties for all of the selected Illustrator layers.
Scrub the scale value down on any of the selected layers to resize all of the layers to fit within the Blue Bar shape layer.
Use the arrow keys on your keyboard to fine-tune the position of any selected layer
Click near the lower-left corner of the Travel text layer and drag it to the upper left corner of the Left icon so it snaps into position.
Use the Up-Arrow key to nudge the Travel text layer up vertically in the Composition panel one pixel at a time. Position the Travel text layer so its baseline lines up just on the edge of the Blue Bar shape layer.
Tip: Holding down Shift on your keyboard while using the arrow keys moves selected layers 10 pixels at a time.
Contact us:-
 0:04:43
 0:00:34
 0:00:15
 0:08:00
 0:00:54
 0:04:41
 0:04:12
 0:00:56
 0:07:52
 0:10:52
 0:01:28
 0:05:01
 0:01:00
 0:05:12
 0:00:32
 0:02:20
 0:03:48
 0:02:18
 0:05:31
 0:01:28
 0:08:51
 0:08:45
 0:09:30
 0:01:28