filmov
tv
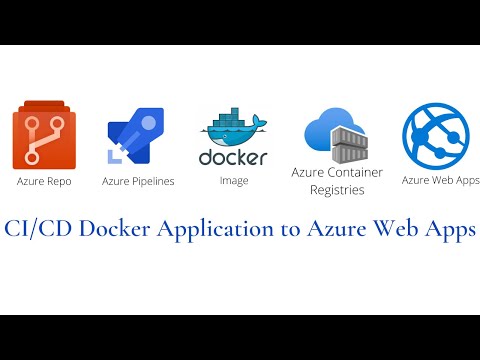
Dockerizing FastAPI: From Azure DevOps to Docker Hub to Running Your App | Docker Images DevOps

Показать описание
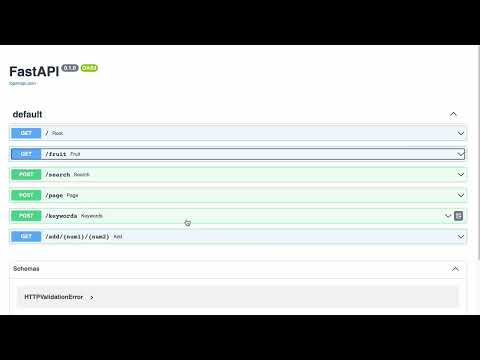
This is the webpage running on the fastapi server of python. This server is running on a docker container. Using our custom build docker image. Let's see how?
In our previous video, we saw how to build an image of fastapi & python using the azure devops pipeline.
In the previous video, we built the docker image using the Azure pipeline and Microsoft-hosted agent. But to use the image we will have to upload it to the docker registry. From there we can pull it and use it.
Go to docker hub. Create an account. Go to the repository. Click on Create. name the repository. and create it. Here we can see the created repository.
Now to publish this image to this repo we will use the token. token will be used to authenticate. Go to your account settings in your profile section. Go to the security section. Click on the new access token. Please provide the name of the access token and generate it. Now copy the code displayed, this is the token code.
Go to azure devops. Go to the project. Go to project settings. Go to service connections. Click on Create Service Connection. Search for docker. Provide the docker ID or docker username. In the password section paste the token copied. And click on verify. Name the service connection to be referred to later in the pipeline. Click on verify and save. And here it is displayed.
let's go to the pipeline now. Till now we have been building the image and listing it. Now we will select the build & push option. Then select the container registry. Provide the name of the container repository that we had created. Add some tags to make the image unique. Add the task. Validate the pipeline, save and run it. It will show a warning to manually authorize the pipeline to push the image to register. Now the pipeline is started. And here we can see it is preparing the images, and waiting. Then push it to the registry. Go back to the registry on the docker hub. Click on the tags, and the image will be displayed with the pull command. Copy the command. Click on the tag name to see more details of the image. Go to labs and play with docker. Login with docker credentials. Once the session is started, Click on add new instance. Once the terminal is started, paste the command copied. this will pull our image into the machine from the registry. It will download and extract all the layers of the image one by one. Now let's run the command. In the previous command just change the pull to run. we will have to map the port 8000 of the container to the port 8000 of the machine. And we can see the fastapi server is started. Also, we can see a hyperlink in blue with the port number 8000 is also displayed. Let's click on it. The page is loaded and we can see a message from the world. Let's zoom in. This is the same message that we have mentioned in our python code. Let's go back to our python code in repo and recheck it. Yeah, it's the same message. In the terminal,l we can see the get requests to the servers and their responses. Now let's press control plus c. This will stop the server. Let's delete the instance. And let's close the session. Let's go back to the same page and refresh it. Here we can see it stopped working because we have stopped the server and deleted the VM instance.
Python every day!!!
 0:04:53
 0:10:08
 0:08:43
 0:07:22
 0:02:34
 0:04:49
 0:14:19
 0:00:52
 0:03:52
 0:10:37
 0:03:28
 0:12:34
 0:09:33
 0:08:28
 0:07:24
 2:03:17
 0:06:33
 0:18:10
 0:35:25
 0:15:00
 0:14:58
 0:11:02
 0:10:36
 0:12:03