filmov
tv
Create a SQLite Database in Xamarin Forms with Ease

Показать описание
Discover how to easily create a `SQLite` database in your `Xamarin Forms` application and troubleshoot common issues, including exceptions.
---
Visit these links for original content and any more details, such as alternate solutions, latest updates/developments on topic, comments, revision history etc. For example, the original title of the Question was: How can i create a database using SQLite on Xamarin forms?
If anything seems off to you, please feel free to write me at vlogize [AT] gmail [DOT] com.
---
Creating a Database Using SQLite on Xamarin Forms
Understanding the Problem
When trying to create a SQLite database using the SQLite-net-pcl library in Xamarin Forms, encountering exceptions is not uncommon. For instance, the error message indicating that a database file could not be opened may suggest a problem related to file paths or permissions. Understanding the root folder and how to properly set up your SQLite database connection is key to resolving these issues.
Step-by-Step Solution
We will break down the process of creating and managing a SQLite database in Xamarin Forms into clear sections.
Step 1: Setting Up Your Project
Before you start, ensure that you have installed the SQLite-net-pcl package in your Xamarin Forms project. You can do this via NuGet:
Open the NuGet Package Manager.
Search for SQLite-net-pcl.
Install it in all project references (including shared and platform projects).
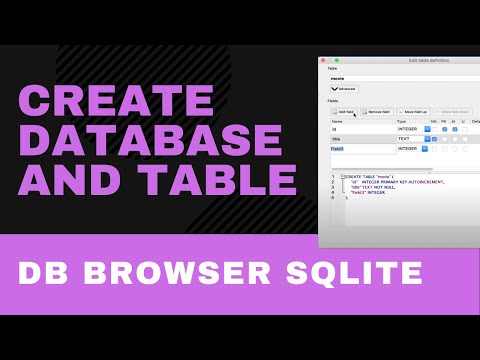
Step 2: Create a Database
To create a SQLite database, you can use the following method, which initializes the database and ensures the necessary tables are created.
[[See Video to Reveal this Text or Code Snippet]]
Explanation:
LocalRootFolder: This represents the root folder on the device where you can store your files.
SQLiteAsyncConnection: This class provides asynchronous database operations. The path to your database file is formed using Path.Combine, ensuring that the database is stored in the correct location.
Step 3: Inserting Data into the Database
Once the database is created, you might want to add data to it. You can set up a function as shown in the following example:
[[See Video to Reveal this Text or Code Snippet]]
Key Points:
Create an instance of your table model (MyTable in this case).
Insert data using the Insert method of your SQLite connection object.
Step 4: Closing the Connection
It's important to close your database connection once your operations are complete:
[[See Video to Reveal this Text or Code Snippet]]
Common Issues and Troubleshooting
If you encounter errors while implementing the above methods, consider the following:
Ensure the path where you are trying to create the database is accessible and that your application has the necessary permissions to write files in that location.
Make sure you have properly referenced and imported the SQLite-net-pcl library in all project files.
If using older versions of the library, consider updating to the latest version for added features and fixes.
Conclusion
Using SQLite with Xamarin Forms can considerably enhance your application's data management capabilities. By following the steps outlined in this guide, you should be able to set up your database seamlessly and overcome common errors that may arise.
Now that you have all this information, start integrating SQLite into your Xamarin Forms app and enhance your app's functionality today!
---
Visit these links for original content and any more details, such as alternate solutions, latest updates/developments on topic, comments, revision history etc. For example, the original title of the Question was: How can i create a database using SQLite on Xamarin forms?
If anything seems off to you, please feel free to write me at vlogize [AT] gmail [DOT] com.
---
Creating a Database Using SQLite on Xamarin Forms
Understanding the Problem
When trying to create a SQLite database using the SQLite-net-pcl library in Xamarin Forms, encountering exceptions is not uncommon. For instance, the error message indicating that a database file could not be opened may suggest a problem related to file paths or permissions. Understanding the root folder and how to properly set up your SQLite database connection is key to resolving these issues.
Step-by-Step Solution
We will break down the process of creating and managing a SQLite database in Xamarin Forms into clear sections.
Step 1: Setting Up Your Project
Before you start, ensure that you have installed the SQLite-net-pcl package in your Xamarin Forms project. You can do this via NuGet:
Open the NuGet Package Manager.
Search for SQLite-net-pcl.
Install it in all project references (including shared and platform projects).
Step 2: Create a Database
To create a SQLite database, you can use the following method, which initializes the database and ensures the necessary tables are created.
[[See Video to Reveal this Text or Code Snippet]]
Explanation:
LocalRootFolder: This represents the root folder on the device where you can store your files.
SQLiteAsyncConnection: This class provides asynchronous database operations. The path to your database file is formed using Path.Combine, ensuring that the database is stored in the correct location.
Step 3: Inserting Data into the Database
Once the database is created, you might want to add data to it. You can set up a function as shown in the following example:
[[See Video to Reveal this Text or Code Snippet]]
Key Points:
Create an instance of your table model (MyTable in this case).
Insert data using the Insert method of your SQLite connection object.
Step 4: Closing the Connection
It's important to close your database connection once your operations are complete:
[[See Video to Reveal this Text or Code Snippet]]
Common Issues and Troubleshooting
If you encounter errors while implementing the above methods, consider the following:
Ensure the path where you are trying to create the database is accessible and that your application has the necessary permissions to write files in that location.
Make sure you have properly referenced and imported the SQLite-net-pcl library in all project files.
If using older versions of the library, consider updating to the latest version for added features and fixes.
Conclusion
Using SQLite with Xamarin Forms can considerably enhance your application's data management capabilities. By following the steps outlined in this guide, you should be able to set up your database seamlessly and overcome common errors that may arise.
Now that you have all this information, start integrating SQLite into your Xamarin Forms app and enhance your app's functionality today!
 0:03:31
 0:21:49
 0:00:37
 0:03:56
 0:06:54
 0:01:38
 0:05:24
 0:13:32
 0:02:21
 0:04:02
 0:04:53
 0:01:43
 0:02:33
 0:05:07
 0:29:49
 0:06:43
 0:00:13
 0:04:47
 0:00:16
 1:29:37
 0:09:58
 1:28:22
 0:01:11
 0:00:14