filmov
tv
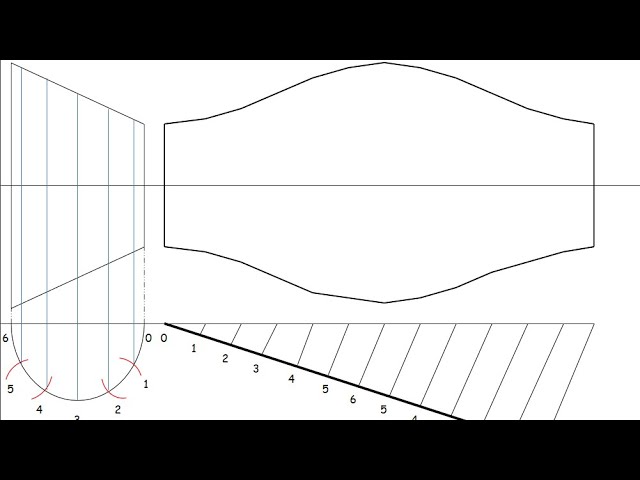
Pattern development parallel line development of a tube/cylinder
Показать описание
Pattern development for parallel lines involves creating a template or blueprint for a design that features parallel lines. This is commonly used in various fields such as woodworking, metalworking, and sewing. Here's a general guide on how to develop a pattern for parallel lines:
1. Define Your Parameters:
Spacing: Determine the distance between the parallel lines.
Orientation: Decide on the angle or direction of the lines (horizontal, vertical, diagonal).
Length: Specify the length of the lines.
2. Choose a Scale:
Decide on the scale of your pattern. This depends on the size of the surface or material you're working with.
3. Sketch the Design:
Use graph paper or any drawing tool to sketch the pattern. Start with a basic unit that includes one set of parallel lines.
4. Replicate and Align:
Duplicate the unit as needed to create a repetitive pattern. Align the units to maintain consistent spacing.
5. Use Software (Optional):
For more complex patterns or digital applications, consider using graphic design software like Adobe Illustrator or CAD tools. These tools allow you to create precise and scalable patterns.
6. Consider Symmetry:
Determine if your pattern should have symmetry. Symmetrical patterns are often easier to replicate and can create a more balanced design.
7. Test the Pattern:
Create a small-scale prototype or test piece to ensure that the pattern looks as expected and fits your requirements.
8. Transfer to Material:
Once satisfied with the pattern, transfer it to your actual material using the appropriate tools. For woodworking, this may involve marking and cutting; for sewing, it may involve marking and stitching.
9. Adjust as Necessary:
During the implementation phase, be open to adjustments. Depending on the material and tools used, you may need to make minor modifications to achieve the desired result.
10. Documentation:
Document the pattern for future reference. Note the dimensions, spacing, and any other critical details.
Remember that the specific steps can vary depending on the context of your project and the materials you're working with. Always consider the requirements of your specific application and adapt the process accordingly.
join in the chat with our Socials:
Don't forget to like and subscribe for all future content.
#cuttingshapes #fluxcore #weldtube#patterndevelopment#technicaldrawing#offsetsquaretoround
#weldingmachine #weldingrigs #weldingtipsandtricks #lathe #lathework #how #howto #welder #welderlife
#stickwelding #stickwelder #bendingmachine #bending #cutting #cuttingskills #cuttingandstitching #cuttingshapes#games #gameswelding
#games#weldingfabrication#tigwelder #fluxcore #weldingnation#tradeschool #vessel #tuglife #weldtube #divertido#MMAwelding#MAGwelding#squaretoround#radialline#triangulation#parrallelline
 0:07:51
 0:05:02
 0:09:35
 0:21:49
 0:14:32
 0:07:30
 0:09:13
 0:00:59
 0:08:19
 0:16:17
 0:00:58
 0:00:43
 0:06:04
 0:15:32
 0:08:40
 0:09:09
 0:09:18
 0:04:16
 0:01:34
 0:03:43
 0:12:35
 0:12:15
 0:01:00
 0:06:33