filmov
tv
How to use the Dr. ColorChip System to fix rock chips on your car!

Показать описание
Dan McCool and Mike Phillips show you step by step how to use the Dr. Color Chip Repair System to quickly do rock chip repair work to any car.
Step 1
Inspect the car for rock chips by walking around the car and looking for areas of missing paint in all the normal areas like the front bumper, the front of the hood, door edges, the edges of the trunk lid, edges of a hatchback door or around the gas tank filler lid.
Step 2
Wipe the areas with rock chips clean using a waterless wash. This will help you to identify actual rock chips and dirt specs or bug splatter.
Step 3
Pick and match the best color of Dr. ColorChip touch-up paint to match the paint on the car to be repaired.
Step 4
Use the correct technique to apply the touch up paint.
The dab and smear Technique
Dab a tiny amount of paint in front of a rock chip to be repaired. Then using your thumb or finger smear the paint into the rock chip.
The squirt and squeegee technique
For this technique you use paint that's in the squirt bottle. Squirt a little paint in front of the rock chip and then use the squeegee blade to spread the touch-up paint into the chipped area.
You can also apply a drop or two of paint onto the squeegee and then use the squeegee to spread the paint into the chipped area.
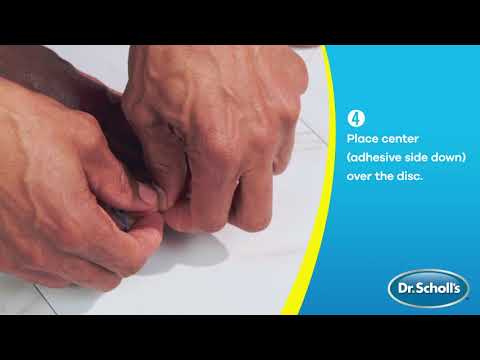
Step 5
Shake the Sealact Blending Solution well so that it's fully mixed. Then apply a liberal amount to the lint free wiping cloth with a flat surface. Gently rub the wiping cloth over the touch-up paint to remove any excess off the factory paint and level the touch-up paint.
For more information visit,
Or call
561-845-6122
:)
Step 1
Inspect the car for rock chips by walking around the car and looking for areas of missing paint in all the normal areas like the front bumper, the front of the hood, door edges, the edges of the trunk lid, edges of a hatchback door or around the gas tank filler lid.
Step 2
Wipe the areas with rock chips clean using a waterless wash. This will help you to identify actual rock chips and dirt specs or bug splatter.
Step 3
Pick and match the best color of Dr. ColorChip touch-up paint to match the paint on the car to be repaired.
Step 4
Use the correct technique to apply the touch up paint.
The dab and smear Technique
Dab a tiny amount of paint in front of a rock chip to be repaired. Then using your thumb or finger smear the paint into the rock chip.
The squirt and squeegee technique
For this technique you use paint that's in the squirt bottle. Squirt a little paint in front of the rock chip and then use the squeegee blade to spread the touch-up paint into the chipped area.
You can also apply a drop or two of paint onto the squeegee and then use the squeegee to spread the paint into the chipped area.
Step 5
Shake the Sealact Blending Solution well so that it's fully mixed. Then apply a liberal amount to the lint free wiping cloth with a flat surface. Gently rub the wiping cloth over the touch-up paint to remove any excess off the factory paint and level the touch-up paint.
For more information visit,
Or call
561-845-6122
:)
 0:05:13
How to Use Caffeine & Coffee to Improve Focus | Dr. Andrew Huberman
 0:01:18
How to Use DR-HO'S Circulation Promoter Baseplate
 0:00:52
How to Use Dr. Scholl's® Freeze Away® Skin Tag Remover
 0:00:40
How to use Dr.pen A6s?
 0:01:09
How to Use Your Dr. Scholl's® Skin Tag Complete Care
 0:00:28
How to use Dr. Martens Wonder Balsam | Tips from the Experts
 0:04:40
How to Use The Waterpik - Dr. Nemeth Tutorial
 0:05:23
Dr. Oz Shows How To Use A Public Defibrillator, Administer CPR To Save A Life | TODAY
 0:00:38
Ostocalcuim Tab. Kab Use Mei Ati. Hei.(Dr.Sunil). Medical student knowledge video. #shortvideo #neet
 0:14:16
How to Use DR HO’S Circulation Promoter?
 0:01:18
BC116C The Knot Dr - How to use
 0:01:51
Dr. Scholl's | How To Use Corn Removers With Duragel® Technology
 0:01:23
Dr. Scholl's | How To Use Callus Cushions With Duragel® Technology
 0:00:22
How to use Dr. Sheth's Rosehip & Retinoid Power Emulsion
 0:01:43
Dr Zoe Demonstrates How to Use an EpiPen | This Morning
 0:01:29
What Is Activated Charcoal and How To Use it? – Dr. Berg
 0:15:08
How to use acids for your skin type| Dr Dray
 0:03:23
How to Use DR-HO'S Circulation Promoter
 0:13:49
HOW TO USE MANDELIC ACID | The Ordinary, WISHTREND, & MORE | Dr Dray
 0:00:28
How to use Dr. Sheth's Vitamin E & Ginseng Moisturizing Cream
 0:16:14
How to use inhaler properly by Dr Akhtar Ali Chadhar | Urdu / Hindi | Check out @MaalomatKiDunya
 0:01:36
Dr. Scholl's | How To Use Pain Relief Orthotics for Ball of Foot Pain
 0:06:24
How to Use a VITAMIN C Serum the Right way | Dr Janet
 1:21:29
Sauna Benefits Deep Dive and Optimal Use with Dr. Rhonda Patrick & MedCram
Комментарии