Continuous Loops Tutorial: Locked Brummel Method

preview_player
Показать описание
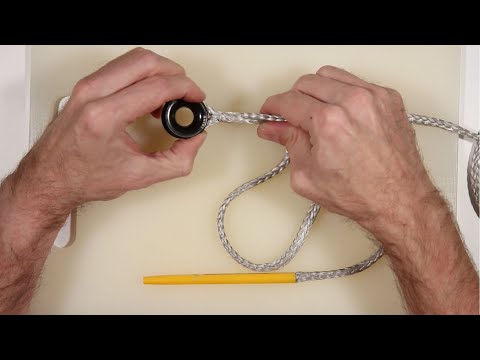
This way of making a continuous loop utilizes a modified version of the locked brummel, where the tails are crossed to create the "lock", then buried back on themselves. It is more secure using this method than other methods that have been discussed, where the tails are just spliced in line. This "in line" method would be preferred if the buries were lock stitched, but most tutorials do not include that step in their instructions. The locked brummel method is also the preferred way to make continuous loops for some of the more well known hammock cottage vendors, such as Dream Hammock, Warbonnet Outdoors and Dutchware gear.
As always, make sure you inspect your gear and ensure that it is safe to use and in proper working order..... and don't hang higher than you're willing to fall!!

**** The information presented in this video is for entertainment purposes only. I am not an expert. Please make sure to check your own gear to ensure it is in safe and in working order.

Helpful Links:

Grog Sling:

Amsteel 101 Tutorial:

Whoopie Sling Tutorial:
Рекомендации по теме
Комментарии
Автор

Very well done....no stories, no straight up education !!! Two thumbs up here 👍👍

oldgoat
Автор

Thanks for these clear instructions. The hardest part is fishing through the cord. I was fighting it and doing it wrong. Grab the tapered section to fold over and pull completely through, otherwise there is too much bulk if you try to fish the full cord folded over. After this revelation it was much easier.

shooeetz
Автор

Thanks a lot!! I persevered and finished two loops (after numerous trials). Was a breeze once you got the hang of it.

mathiashuffner
Автор

Hello Nick, I really like the way you laid everything out and made everything easy to understand...right up until you pushed the 2nd hole past the 1st hole and bent the line 180 degrees before burying it.

Have you found anyone doing a strength test using your 180 degree bend?

My best guess is that you reduce the loop strength by about 1/2 which is fine if you're not putting a heavy load or a shock load on it.

I understand the abundance of caution when people stitch a locked brummel with thread, but honestly the loop should never come loose unless you're picking at the crossover between the 2 bury points...if you worry about that and are lazy, you could use some shrink-wrap tubing.

By the way, if you want a strong splice, and you're using 1/8" rope, the bury should be about 9" (72 times the diameter, or ~3 1/2 fid if you have a full length fid).

Meanwhile, I "liked" and saved your video just because I like how you calculated the lengths, and how you showed everyone that you don't need to buy a $70 fid kit...just a "poker" (a marlinspike) and a piece of wire :)

I always wondered if the clamping shoelace threaders that look like fly-tying bobbins would work for larger diameters (1/4" or greater) of hollow core rope, for threading up the middle.

NulodPBall
Автор

Thank you, sir! Just made one for my Dream Freebird. I wanted to make my head end a different color, and 8" vs 12" to allow a little more tarp coverage past my carabiners. Easy peasy!

mattreaves
Автор

Great instructions, just made my first loop....awesome...very happy., many thanks

MartinHubbard
Автор

Great instructional video. Thank you. Doing my first time on 1/8 in Amsteel.

rickwagner
Автор

This will work good on a sailboat as well. Great video

jamesadams
Автор

Excellent demonstration, Thank you sir!

lawrencelewis
Автор

Coming from your previous video on this topic I really appreciate the research you've put into this and would like to thank you for this clear and concise tutorial. Very well done, helped me a lot.

Waldwaerts
Автор

Many thanks for a great tutorial on how to do this : )

UTFamilyLawAttorney
Автор

If anyone watching this is an arborist or rock climber this video is not for you. While this is an awesome video and has great uses the method of this brummel splice would significantly reduce the line strength due to the sharp bend radius and the direction of pull relative to the brummel itself. (consider it like a dead eye loop on the end of a rope, its stength is preserved in one direction but pulling the loop itself apart sideways would not do well due to the brummel orientation) I imagine that it will break test similar to a knot even though it is spliced. Not an expert but unless someone can reliable break test this I would not use it for anything that can shock load this loop. You can brummel splice a loop and retain its strength, but to orient the brummel correctly (along the loop itself) it involves unbraiding and rebraiding an end of the rope. Just my 2 cents.

TylerHope-jbvx
Автор

Great video. Thanks for showing. Best regards

SeidenraupenGewitter
Автор

Nice instructions! Is it possible to do smaller loops with shorter buries? Wouldn´t the loop hold its strength even with 1 inch bury since the brummel lock holds the loop together anyway?

beomaster
Автор

Very cool. I may have to get into this more. How small a Loop is possible? I’m looking for a couple of 4”ers. Great vid!

robpelton
Автор

Nice video! And a nice mug of my home country (Netherlands) :-)

luuk
Автор

Would be interesting to know how much the brummel will lower the breaking strength. Be course it will. Or the radical bend in the rope will. Better to just stich a normal loop.

andraxification
Автор

Thank you! A great tutorial, the best I saw so far.

Here in Russia the Amsteel isn't readily available, but there is a local production of good coreless polyester ropes by "Petrokanat". Did I understand right : when tapering the ends, you just cut a half of rope's strands 1" from ends? If I will try to taper the ends gradually (for 12 strands: 1.5 in: cut 3, 1 in: cut 3, 0.5 in: cut 3, and 3 are left), will it be better for my loop strength and/or aesthetics?

MrGdg
Автор

Great Instructional video. I am interested in the needle. Where might one get one of those?

meinuke
Автор

If you want a real nice wire for slicing, go to the hobby shop and get a piece of small diameter music wire. Less than $1.00. 36 inches long. Cut it in half and then fold it in half and you can get 2 splicing tools out of one piece of wire. Music wire is stiff and feeds through the center very easily.

artie