filmov
tv
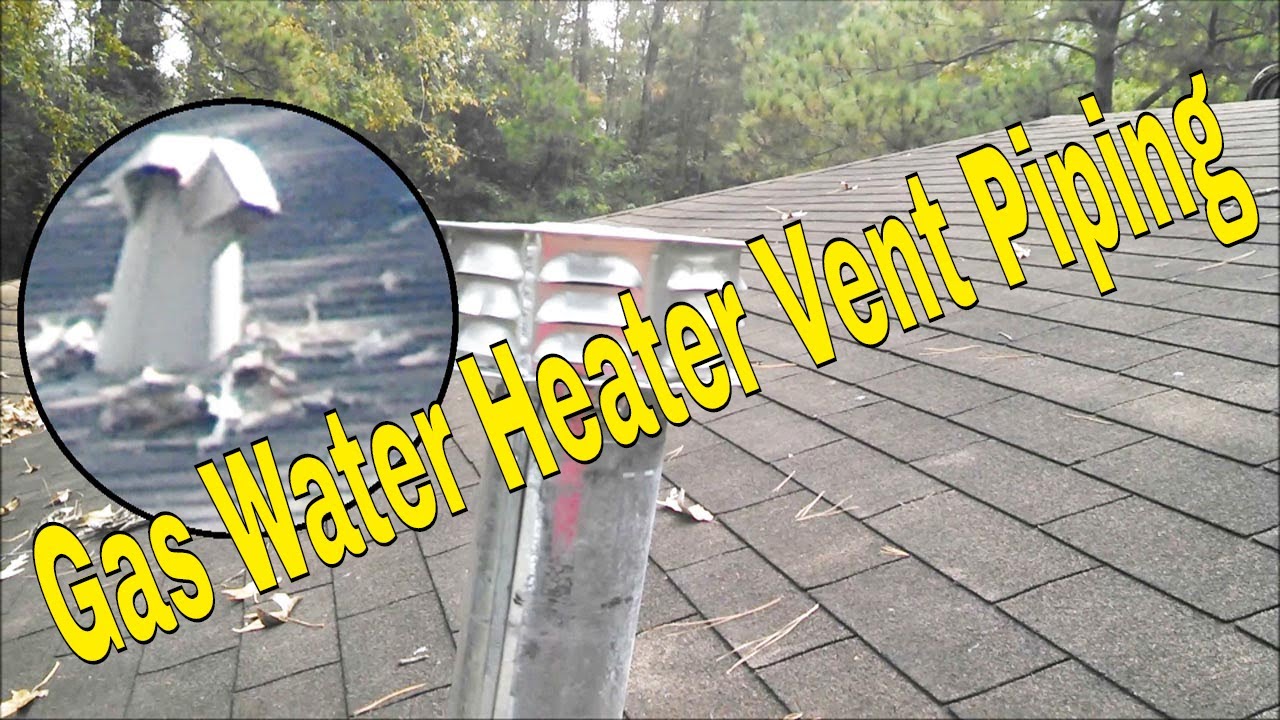
Gas Water Heater Vent Piping
Показать описание
Gas Water Heater Vent Piping
Welcome to our latest video: Installing a 3" Gas Vent Pipe for Your Water Heater! In this step-by-step guide, we're going to take you through the critical process of installing a vent pipe for your gas water heater safely and efficiently.
What to expect? Here's a breakdown:
1️⃣ We'll start by discussing how to choose the right type of vent pipe for your water heater. It's vital to select one specifically designed for gas appliances, and we'll help you understand the differences between materials like aluminum, stainless steel, and galvanized steel.
2️⃣ Next, we'll cover how to determine the correct vent pipe length. We'll show you how to take measurements from the top of your water heater to the point where the vent pipe will penetrate the roof.
3️⃣ Then, we'll demonstrate how to accurately cut a hole in the roof for your vent pipe, ensuring it's the right size and at the correct angle for optimal efficiency.
4️⃣ We'll guide you through installing the roof flashing around the hole, an essential step for preventing leaks and preserving your home's integrity.
5️⃣ Watch us as we install the vent pipe, showing you how to ensure it's straight, vertical, and properly supported. We'll also share tips on using clamps to secure the pipe to your water heater and the roof.
6️⃣ See how we connect the vent pipe to the water heater, adhering to the manufacturer's instructions and using the right fittings and sealant for a secure connection.
7️⃣ Lastly, we'll walk you through how to test your newly installed venting system, checking for backdrafts or other potential issues.
Remember, safety comes first! We urge you to follow local building codes and safety guidelines during installation. If you're not comfortable performing the installation yourself, we recommend hiring a professional plumber or HVAC technician.
Stay tuned to the end for some important maintenance tips to keep your venting system running smoothly! Be sure to LIKE, COMMENT, and SUBSCRIBE for more practical guides and tutorials. Thanks for watching!
#gaswaterheater #waterheaterventpiping #howtoventagaswaterheater #howtoplumbing #plumber #plumbing #40gallongaswaterheater
Mailing Address
Claude Taylor
B.O. Box 1251
New Waverly, TX 77358
 0:14:38
Gas Water Heater Vent Piping
 0:02:27
Hot Water Heaters : How to Properly Vent a Gas Water Heater
 0:01:37
Understanding Power Vent Water Heaters with Corro-Protec
 0:03:31
Watch this Before Buying A Gas Water Heater Tank
 0:02:13
Centrotherm InnoFlue Boiler and Water Heater Vent Pipe
 0:20:40
Atmospheric Direct Vent Water Heaters - English with French Subtitles
 0:05:56
3 Things They Don’t Tell You About Tankless
 0:00:31
Stainless Steel Venting Pipe,Gas Water Heater Exhaust Vent Pipe,Stainless Steel Gas Vent Pipe
 0:02:18
How to Differentiate Between 4 Types of Gas Water Heaters: Forced-Vent, Digital, Outdoor, and Flue
 0:00:58
A.O. SMITH Signature 500 Power Vent Natural Gas Water Heater 50 gal.
 0:01:20
Rheem 75 gal power vent
 0:21:00
Gas Water Heater B Vent
 0:01:00
PVC a vent pipes on a gas water heater??
 0:02:44
Side Wall GAS Vent Termination 5.12: Modifications-(signage height explained)
 0:05:11
Hot water heater vent pipe installation
 0:02:07
Unsafe Water Heater Flue Vent
 0:18:06
Water Heater Vent Pipe Inspection Failure and Fix
 0:02:42
Roofing B vent Flue Pipe installation / Bad flashing job!
 0:00:46
The AO Smith GDHE-50 Vertex Power Direct Vent Water Heater
 0:03:46
Vent Pipes and the 4 categories of heating appliance ventilation
 0:02:46
What is a Plumbing Vent? (and Why Do You NEED it?)
 0:02:09
Flexible Type-B Gas Vent Training Video
 0:14:04
sealing up hot water heater exhaust vent around chimney
 0:05:03
Flexible gas vent connectors vs. dryer transition ducts
Комментарии