filmov
tv
HyperCube Infinity Mirror DIY Project

Показать описание
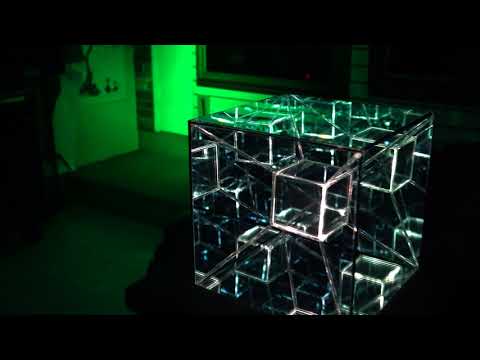
I'm so excited to share my HyperCube Infinity Mirror DIY project! What is a HyperCube? Also known as a tesseract or 4d cube, the hypercube is a really cool optical illusion reflecting light in all directions within a cube, creating reflections that appear to go on forever. I've included step-by-step instructions on how I built it using off the shelf parts.
// Table of Contents //
0:00 Introduction
0:41 The Definition of a HyperCube
0:52 The Glass Two Way Mirror
1:02 What Glass to Use
1:47 Directional Two Way Mirror Film
2:04 What type of LED Lights to Use
2:43 Bluetooth LED Lights
2:47 The Frame
2:55 The Build
3:16 How it all Fits Together
3:43 Inserting Parts into the Table
4:17 The Infinity Mirror Dress
4:45 The Finished HyperCube
4:50 Slow Motion HyperCube
Each side of the cube is a two way mirror--the reflective side is turned inward to trap the reflections within. LED light strips carefully positioned inside. The LED light strips are controlled via tablet or cell phone via a WiFi controller with light chasing capability (each LED is individually addressable).
In this video, we take you inside our shop to show how the HyperCube works and how you can easily make your own.
Questions? Leave a comment below or shoot me an email!
// Parts I Used
❤️ Glass Two Way Mirror (5 pieces, tempered):
❤️ Acrylic First Surface Mirror (bottom piece):
Don't forget to SUBSCRIBE to all the cool projects I want to share with you!
Parts for a DIY Teleprompter:
16"x16" Beamsplitter Mirror w/Rounded Corners
Neewer Heavy Duty Light Stand
Neewer 15 Pieces 1/4" 3/8" Metal Threaded Screw Converter Adapter
Nikon 7070 Binocular Window Mount
Laptop Tray (On-Stage MSA5000)
Tray Attachment (On-Stage MSA9508)
Tray Adapter (On-Stage Music Accessory (MM01))
Table for Larger Screens (PylePro PLPTS2)
Phone Clamp (That Rotates)
Studio Tools:
____________________________________________________________
Glass Tools:
 0:05:18
HyperCube Infinity Mirror DIY Project
 0:10:44
Infinity Mirror Icosahedron DIY Tutorial How To Make Your Own - Sacred Geometry Tesseract Hypercube
 0:00:54
15' Hypercube Infinity Mirror! The Ultimate Night Light! #shorts
 0:04:21
How to build a Hypercube and lose your sanity at the same time!
 0:03:25
DIY INFINITE MIRROR CUBE | HYPER CUBE
 0:00:24
Floor infinity mirrors❤️
 0:12:51
Make an EASY Infinity Mirror Cube | NO 3D Printing and NO Programming
 0:11:44
Make an infinity mirror cube | DIY Hypercube | Tahir Rihat
 0:00:35
Take a look at how easy it is to set up the HyperCube
 0:00:58
How To Make Infinity Mirror || Ankitjugadu
 0:00:45
DIY Infinity Mirror Coffee Table #shorts
 0:00:30
DIY HYPERCUBE. ( infinity mirror illusion cube)
 0:00:53
How to make INFINITY MIRROR lights
 0:08:06
how to build an infinity mirror
 0:00:55
Tesseract LED Infinty Mirror Art Sculpture by Nicky Alice 4K Hypercube
 0:07:15
Radioactive Tritium Tesseract Prototype
 0:00:54
DIY Infinity Mirror Table ⚒️ Step-by-Step
 0:06:25
Infinity Mirror Film for Hypercube & Dodecahedron Projects
 0:00:38
Mesmerizing!! The infinite light cube (HyperCube)
 0:12:33
DIY HYPERCUBE - CUT ON MY GLOWFORGE
 0:01:00
“Tesseract” Burning Man Art installation by Nicky Alice 2023 Hypercube Infinity Mirror 4th dimension...
 0:04:01
Infinity Mirror DIY Project [Step-By-Step Guide]
 0:00:25
The HyperCube Nano 🤩 www.hyperspacelight.com #setup #setupgamer #hypercube #rgb
 0:00:15
🔥 Infinity Mirror
Комментарии