filmov
tv
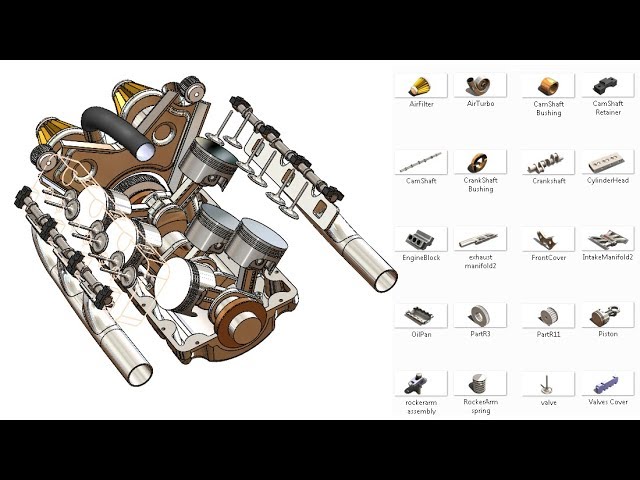
SolidWorks RE Tutorial #320 : Car Engine complete video (2 turbo V6) - (advanced assembly)
Показать описание
▬▬▬▬▬▬▬▬▬▬▬▬▬▬▬▬▬▬▬▬▬▬▬▬▬▬▬▬▬▬
All dimensions are in mm/g/s/ISO - Based on true dimensioning.
---------------------------------------------------------------------------------------------
Rating, commenting, subscribing and sharing are always appreciated!!
----------------------------------------------------------------------------------------------
The uploading of tutorials is based on an accumulated studied plan!
----------------------------------------------------------------------------------------------
New to SolidWorks?! Recommended to watch my earlier uploads.
----------------------------------------------------------------------------------------------
I will be thankful to you for replying whom are in need.
▬▬▬▬▬▬▬▬▬▬▬▬▬▬▬▬▬▬▬▬▬▬▬▬▬▬▬▬▬▬
Hello & Welcome to SolidWorks Tutorial Channel
This channel is dealing with EVERYTHING about SolidWorks aims to make the viewer a professional SolidWorks user! & to be helpful !
This Channel beside Tutorials Engineer contain topics about:
- SolidWorks Beginners Tutorials
- SolidWorks Sketching
- SolidWorks Surface
- SolidWorks Weldments
- SolidWorks Assembly
- SolidWorks Drawing
- SolidWorks Sheet Metal
- SolidWorks Mold Design
- SolidWorks Simulation
- SolidWorks Motion
And MORE
►►►SUBSCRIBE ?!◄◄◄
-------------------------------------------------------------------------------------------
GO PROFIST ...BE SOLIDWORKIST ◄ suggested words!
▬▬▬▬▬▬▬▬▬▬▬▬▬▬▬▬▬▬▬▬▬▬▬▬▬▬▬▬▬▬
----------------------------------------------------------------------------------------
★------ ART ENGINEERING CREATIVITY ------★
----------------------------------------------------------------------------------------
▬▬▬▬▬▬▬▬▬▬▬▬▬▬▬▬▬▬▬▬▬▬▬▬▬▬▬▬▬▬
Warm Thanks to them who supported and subscribed our channel in our very early start... All are nice but you are special!!
▬▬▬▬▬▬▬▬▬▬▬▬▬▬▬▬▬▬▬▬▬▬▬▬▬▬▬▬▬▬
Viewers can contribute translated titles, descriptions, and subtitles/CC (with different languages)
▬▬▬▬▬▬▬▬▬▬▬▬▬▬▬▬▬▬▬▬▬▬▬▬▬▬▬▬▬▬
OTHERS:
TO BE FILLED
▬▬▬▬▬▬▬▬▬▬▬▬▬▬▬▬▬▬▬▬▬▬▬▬▬▬▬▬▬▬
■ if you feel want to give something in back : the minimum : Rate, comment, subscribe & share!!
 3:44:27
SolidWorks RE Tutorial #320 : Car Engine complete video (2 turbo V6) - (advanced assembly)
 3:44:27
SolidWorks RE Tutorial #320 Car Engine complete video 2 turbo V6 advanced assembly
 0:00:11
V6 Engine in Solidworks #solidworks #3dmodel #freelance
 0:00:12
#husqvarna #stihl
 3:49:31
SolidWorks RE Tutorial # 335: Beginner Tractor complete video
 0:00:21
Solidworks Animation Tutorial (V6 Engine Assembly Animation)
 0:05:39
Turbo V6 Engine Model in Solidworks
 0:01:18
V6 ENGINE IN SOLIDWORKS
 0:00:46
NEVER buy from the Dark Web.. #shorts
 0:00:37
Solidworks 4 Cylinder Engine Assembly
 0:00:06
SolidWorks V8 Engine Working Model!
 0:02:49
SolidWorks tutorial_exercise 1
 4:04:00
SolidWorks RE Tutorial #334 : Beginner Forklift complete video
 0:40:14
SNIPER (GUN) DESIGN IN SOLIDWORKS #engineering #technology #gun
 3:44:27
SolidWorks Car Engine complete video 2 turbo V6 advanced assembly
 0:00:59
How to repair a lathe machine cack gear #shorts
 0:00:15
Growing up Pentecostal... #short
 0:00:54
Solidworks Tutorial Exercise #007
 0:18:38
4 STROKE ENGINE - ASSEMBLY - SOLIDWORKS
 0:00:36
Mi bici del alma!
 0:25:09
Tutorial de SOLIDWORKS en Español P46, SOLIDWORKS desde CERO
 0:26:12
Upper Block Assembly V6 Engine! SolidWorks Tutorial 2021! Learn from homee :D
 2:58:30
Solidworks tutorial | sketch Bobcat Loader in Solidworks
 0:10:18
Solidworks Basic Tutorial 46 | WIRE CLAMP | SOLIDWORKS |
Комментарии