filmov
tv
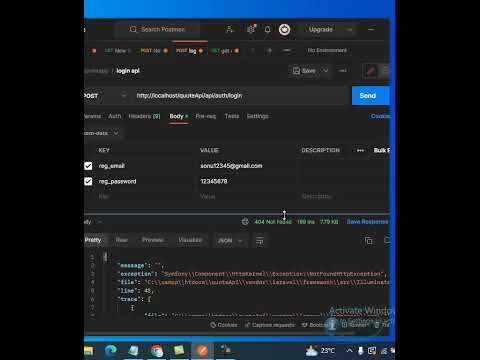
Resolving the 404 Not Found Error in Spring Boot REST API Calls

Показать описание
Learn the key steps to resolve the common `404 Not Found` error when working with Spring Boot REST APIs. Follow our guide to ensure your endpoints are correctly set up and functioning.
---
Visit these links for original content and any more details, such as alternate solutions, latest updates/developments on topic, comments, revision history etc. For example, the original title of the Question was: SpringBoot RestApi call 404 Not Found error
If anything seems off to you, please feel free to write me at vlogize [AT] gmail [DOT] com.
---
Troubleshooting the 404 Not Found Error in Spring Boot REST API
When developing applications using Spring Boot, encountering a 404 Not Found error can be frustrating and confusing. This error often indicates that the requested resource could not be found at the specified URL. Let’s dissect the issue, explore common pitfalls, and provide a step-by-step solution to help you fix the problem effectively.
Understanding the 404 Not Found Error
In a Spring Boot application, a 404 Not Found response typically means that the requested URL does not correspond to any available resource in your API. In this post, we will explore a scenario where a developer faced this issue while trying to access an endpoint in their Spring Boot application.
Scenario Overview
[[See Video to Reveal this Text or Code Snippet]]
Where Things Went Wrong
Endpoint Mapping: The first point of investigation is whether your endpoint is set up correctly. The @ RestController annotation coupled with a proper @ RequestMapping is crucial.
Header Configuration: The Content-Type header plays an essential role, especially in POST requests, which require a specific media type for the server to process requests correctly.
Solving the 404 Not Found Error
Step 1: Check Your Endpoint Configuration
Firstly, ensure that you have your endpoint annotations correctly defined in your REST controller. The following snippet demonstrates how the controller should be set up:
[[See Video to Reveal this Text or Code Snippet]]
Step 2: Specify Package Scanning
[[See Video to Reveal this Text or Code Snippet]]
Step 3: Set Content-Type Header
Since the endpoint you have defined expects JSON input, be sure to send requests with the correct content type. When using API testing tools like Insomnia, specify the following header:
[[See Video to Reveal this Text or Code Snippet]]
Final Step: Test Again
Once you’ve made the necessary adjustments:
Restart your Spring Boot application.
Retry sending the request to the endpoint you originally intended to call.
After making these changes, the previously troublesome request should now work smoothly, and you should see the execution reach your method's implementation, allowing you to debug as needed.
Conclusion
Dealing with a 404 Not Found error in your Spring Boot application can be a common hurdle, but with a systematic approach—focusing on endpoint definitions, package scanning, and header configurations—you can resolve the issue swiftly. Always remember to adjust your content types for POST requests, as these small details can make a significant difference.
By following the steps outlined above, you can ensure that your API endpoints are set up correctly, allowing for a smoother development experience. Happy coding!
---
Visit these links for original content and any more details, such as alternate solutions, latest updates/developments on topic, comments, revision history etc. For example, the original title of the Question was: SpringBoot RestApi call 404 Not Found error
If anything seems off to you, please feel free to write me at vlogize [AT] gmail [DOT] com.
---
Troubleshooting the 404 Not Found Error in Spring Boot REST API
When developing applications using Spring Boot, encountering a 404 Not Found error can be frustrating and confusing. This error often indicates that the requested resource could not be found at the specified URL. Let’s dissect the issue, explore common pitfalls, and provide a step-by-step solution to help you fix the problem effectively.
Understanding the 404 Not Found Error
In a Spring Boot application, a 404 Not Found response typically means that the requested URL does not correspond to any available resource in your API. In this post, we will explore a scenario where a developer faced this issue while trying to access an endpoint in their Spring Boot application.
Scenario Overview
[[See Video to Reveal this Text or Code Snippet]]
Where Things Went Wrong
Endpoint Mapping: The first point of investigation is whether your endpoint is set up correctly. The @ RestController annotation coupled with a proper @ RequestMapping is crucial.
Header Configuration: The Content-Type header plays an essential role, especially in POST requests, which require a specific media type for the server to process requests correctly.
Solving the 404 Not Found Error
Step 1: Check Your Endpoint Configuration
Firstly, ensure that you have your endpoint annotations correctly defined in your REST controller. The following snippet demonstrates how the controller should be set up:
[[See Video to Reveal this Text or Code Snippet]]
Step 2: Specify Package Scanning
[[See Video to Reveal this Text or Code Snippet]]
Step 3: Set Content-Type Header
Since the endpoint you have defined expects JSON input, be sure to send requests with the correct content type. When using API testing tools like Insomnia, specify the following header:
[[See Video to Reveal this Text or Code Snippet]]
Final Step: Test Again
Once you’ve made the necessary adjustments:
Restart your Spring Boot application.
Retry sending the request to the endpoint you originally intended to call.
After making these changes, the previously troublesome request should now work smoothly, and you should see the execution reach your method's implementation, allowing you to debug as needed.
Conclusion
Dealing with a 404 Not Found error in your Spring Boot application can be a common hurdle, but with a systematic approach—focusing on endpoint definitions, package scanning, and header configurations—you can resolve the issue swiftly. Always remember to adjust your content types for POST requests, as these small details can make a significant difference.
By following the steps outlined above, you can ensure that your API endpoints are set up correctly, allowing for a smoother development experience. Happy coding!
 0:00:22
 0:01:40
 0:05:45
 0:00:19
 0:06:27
 0:00:38
 0:04:32
 0:00:53
 0:06:13
 0:00:55
 0:01:37
 0:00:53
 0:01:56
 0:01:45
 0:01:22
 0:01:01
 0:01:25
 0:03:44
 0:00:48
 0:02:23
 0:01:30
 0:00:45
 0:02:08
 0:02:11