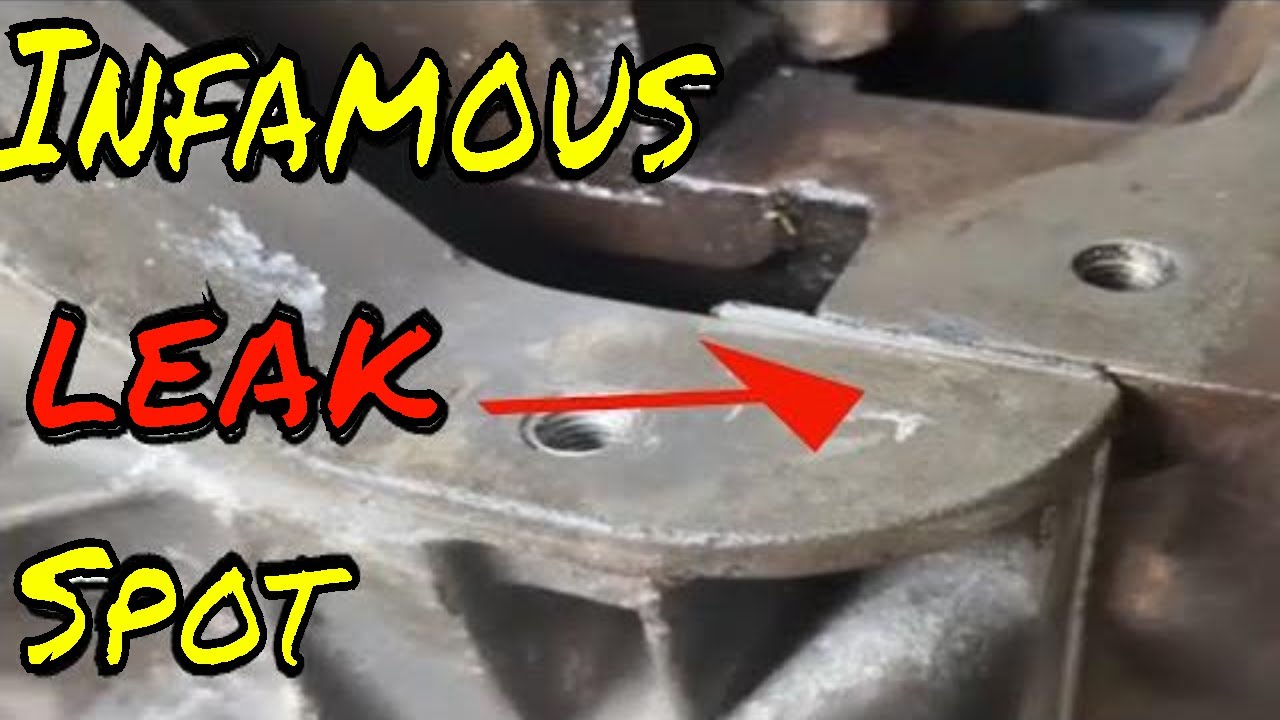
How to keep your oil pan and timing cover gaskets from leaking. Always do this trick.

preview_player
Показать описание
After working on a lot of engines I want to bring some tips t my veiwers. This is extremely important because not following these tips will have your gaskets leak.

Thank you for visiting my channel, Disturbing Kreationz Auto. If you have any questions please leave them below in the comment section and someone will get back to you promptly.

Links for the email and other channels are listed at the bottom of the description.

I want to thank everyone in advance for all the love and support by hitting the LIKE, SUBSCRIBE, and SHARE because it helps the channel which means I can make better content for you.

If you have a video suggestion or some helpful advice put it in the comment section or you can email me directly using the Email link below.

Thanks for the visit and support. God bless all of you and have a great day.

If you are local and want to make an appointment use the link for the Facebook (Meta) Business Page. Special videos will now be published for our members of this Youtube channel.

Disturbing Kreationz Auto:
Disturbing Kreationz Construction:
Disturbing Kreationz Business:
Рекомендации по теме
Комментарии
Автор

Great video - if I may add, in great detail, as someone who has swapped 10+ engines, 20+ headgasket jobs, and performed BILLIONS AND BILLIONS of other repairs & maintenence using rudimentary driveway tools such as breadknives, toothpicks, and the inside of my eyelids, to all ends including great failures requiring 200 mile flatbed trips for replacement engines to great success earning thousands of dollars when selling a vehicle for a profit after driving for 6-12 months hassle-free, and so, for free;

whenever I do this trick, I also add another couple tricks:

TRICK 1:

Whenever contacting aluminum surfaces with a razor blade, such as cleaning old gasket material off, and especially when trimming paper gaskets in unevenly joined surfaces such as this,

I stop, and I don't continue to do it, ideally before I start.

FIRST, I stop and think, is there a better way?

Such as: use a plastic razor blade or drywall scraper to safely get the surfaces clean, or

In this case, is it possible to easily remove the cover & gasket to trim the gasket off-vehicle on a different surface like wood/cardboard etc, or use scissors if won't deform it (since I know how much to trim now)? [Hold the cover snug to ensure alignment/overhang/measure against the block or cover with bolts or dowels in it/holes aligned/measure against old gasket/etc. Ideally off-vehicle if possible]

And if the answer is "No crap I gotta do it now Gramma needs her whiskey" then...

TRICK 2:

If possible without ruining a sealed or setting/curing surface, I'll loosen bolts to pull the cover back a bit to make a bit of room and GENTLY hold ANOTHER razorblade behind the gasket against the vertical block surface I'm cutting up against.

This will prevent that little un-repairable, gets-worse-every-time razor cut-line gouge into the back/side block surface which, especially in high-pressure systems like my 65psi oil system, can be a new source of seep leak!

Even RTV/sealant may not plug that small of a journal, over time it can "wash out" the contacting rtv surface and slowly grow larger, since all engines get a small amount of fuel in the oil over time, which is hecken no burrito on rtv/sealant in applications such as this where grey/black/ultra is typically used and the gasket may not be changed for years and BILLIONS AND BILLIONS of engine revolutions.

In other words:

Out of the frying pan and into the fire!

If cover is sealed at other spots w rtv/sealant or currently curing, don't remove it unless you (possibly have another gasket and) repeat cleaning/prepping that area again, can't pull currently curing rtv then put it back, can't just add more as it will not seal properly and most likely squish too much inside and deposit chunks inside and potentially ruin sensitive parts or plug small passages/drainbacks/block valves causing bent stems, possible head/shaft/bearing damage or misalignment causing internal oil leak, burning oil, ruining PCV/EGR/H02S systems, and eventually multiplying into the vehicle disintigrating into various parts in other people's cars after 6-12 long hard months spent in the sun and rain in a junkyard, aka you cannot remove a gasket or surface once rtv applied. Must re-clean and re-apply, possibly needed new gasket if squished or partially dried.

So, ultimately, always:

TRICK 3:

Always ALWAYS perform a dry-run when applying new aftermarket gaskets, as instructed in the 15, 000 page pdf oem service manuals I've purchased and painstakingly gone thru, at all times being gentle to avoid damaging the gasket or surfaces. Place dowels/clean un-threadlocked bolts and snug up by hand to ensure good threads, hole depth/lack of oil/water pressure locking, and size and shape of gaskets, etc. Be gentle don't damage anything, just put it flush and gently flatten out gasket to ensure proper fit (excluding embossed multi-layer steel gaskets), and identify any areas requiring off-vehicle manual editing. After the dry run and any edits, reapply with manufacture-specified rtv/sealant/suitable alternatives only to specified surfaces or locations, keeping in mind original documentation has been changed due to TSB's, aftermarket improvements such as felpro valve cover gaskets no longer requiring rtv in the corners due to the thickened gasket corners (ive done both with and without, the one with rtv leaked, the one without did not, rtv doesnt stick to rubber or some composite materials, fuel eats rtv, risk of contamination to engine or 02 sensors, etc. If part instructions don't specify, check forums, TSBs, updated service manuals, original docs, even call the manufacturer or a same-brand dealer and ask for the head smart guy who deals with all the toughest jobs in the area for a few locations, most times titled Regional Lead Service Advisor or similar. Offer donuts or cookies.

Ultimately, the key is to avoid RTV (read: silicone) if possible and 100, 000% avoid scratching/cutting/marring the block/head/covers/pans at ALL costs.

You can easily remove a cover and gasket you just positioned in order to more safely manually edit it off-vehicle. You cannot easily aluminum weld-fill then machine a surface flat to original

Be smart, think ahead.

DO's:

- DO be gentle, don't force anything, loosen the cover back a bit, insert backdrop razor (with tape attached for makeshift or a spatula or plastic drywall scraper or other such thin flat surface behind the gasket up against the vetical/side/backdrop surface of the block, then run your razorback along so the edge hits that other razor/spatula/scraper etc instead of the side of the block, even if cast iron block, altho less risky than today's aluminum blocks typically on the smaller 4-cylinder engines.

- DO slightly angle the razor, renember the razor edge isn't flush when the blade is flat; be extremely careful, hold it at the blade edge angle, zip it off slowly, by pushing the entire blade surface flat into the gasket softly then sliding sideways outwards, a few gentle times if needed. Avoid trimming any aluminum edges.

DON'T'S:

- DO NOT touch aluminum with razor blades unless unreasonable or infeasible to do it another way, such as losing another day on it, or if other rtv or sealant is already used in other places along that gasket or removal path, or the gasket would be at risk of damage if reversed out of there for off-engine manual editing.

- DO NOT use a dull or chipped/marred blade. Brand new only. At that point, I only use the smaller thicker trapezoidal blades that are one solid piece. Not the snap-off ones, altho if necessary the base of those can be used in a pinch as they have about a 1" solid piece with the attachment locking pin hole (snap that part off and use it.

- DO NOT hold razor at too steep an angle and cut into your horizontal surface you're trying to level the gasket to.

- DO NOT touch sealing surfaces with blade corners. Always keep the corners of the blade away from any finished flat aluminum surface. If you must use it for scraping, keep the edge horizontally perpendicular and centered to the flad edge you're cleaning so the corners are hitting nothing but thin air at all times. Be extemely gentle if surface wider than blade. Avoid embossed surfaces such as some block surfaces at all costs.

- DO NOT rush. This is a marathon not a sprint. Keep the blade angle just perfect at the edge angle, never too steep, always go slow and steady, even still, none with too much pressure or too many times as it can still dig in and cause surface divets. When going over bolt holes, cut/scraoe/clean around the inside edge first to remove any burs, hold on 45° angle, gentle, use finger to check, don't dig or cut, rather scrape or round, thin blade corner with steady hand, curving motion, pulling upward but not outward. Avoid dragging corner across surface as it pops out. Sandpaper/emery cloth may be better as long as you use a screwdriver or similar tool inside a small roll of the material to apply gentle pressure inside the hole, on a slight angle, spinning and slowly pulling outward, gently, avoiding the outer flat finished surface, and also avoiding cutting or sanding the inner thread especially the thread start where it meets the surface. Rotational movement according to thread pattern working typically counter-clockwise as if you are removing a bolt.

- DO NOT lose the blade inside the engine. Steel blades and tools win here, they can be easily retrieved with a magnet. Avoid anything getting inside anything by using blue shop towls or other fiber-free cloths to block Thoroughly clean afterwords first running a magnet along/inside close areas to pick up anything it can. Avoid touching sensors with magnet. Use cloth next to soak up any oils, particles etc. Use a shop vac or regular vac with tape-sealed smaller hose attachment to access smaller areas/holes/etc. Compressed air thru a thin straw to empty deeper holes. Remember vacuum exhaust can become somewhat compressed air, also remember tightly forced air will overheat vacuum motors, let cool, resume. Beware of plugging hose against places that could suck in other diaphrams or older gaskets. Try fashion a hose to smaller hose to straw type thing, leave hole by straw so dont wreck vacuum. Just need straw sucking any oil, water, or material from deep holes & crevices.

DO NOT get mad at me for writing this book of field-tested science-math. Get mad at gravity, friction, and dividends.

Good luck, and hope this helps some newbs get boobs and use lubes instead of doll tubes on scoob's doobs n jubes.

kanoroberto
Автор

All this knowledge through years of experience.

damienwolfe
Автор

When you can spot this stuff you are an expert.

jmoneylove
Автор

Please pay attention to this so you don’t get an oil leak

disturbingkreationz
Автор

Rvt is perfect for any oerfectionist.i use rtv myself....

jayhavey
Автор

That gasket moved when you cut it. Gonna be a bad leak

OffTheBeatenPath_