filmov
tv
How to download and install Git
Показать описание
To install Git on Windows, Mac, and Ubuntu, you can follow these instructions:
Windows:
1. Download Git for Windows:
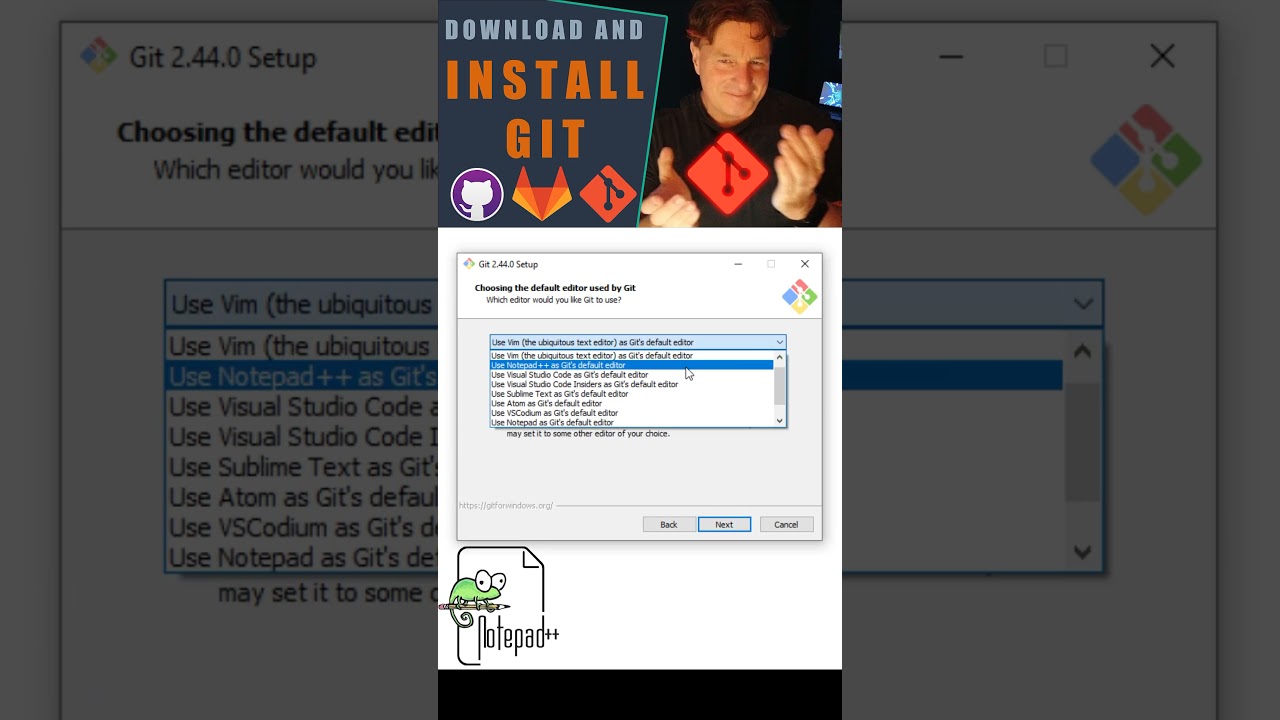
2. Run the Installer:
3. Configure Installation Settings:
During the installation process, you can choose the components you want to install and the default editor. You can typically leave these settings as default unless you have specific preferences.
4. Adjusting your PATH environment:
During installation, Git may offer to adjust your system's PATH variable to include Git for easier access from the command line. Make sure to select this option if available.
5. Complete the Installation:
Follow the prompts to complete the installation.
6. Verify Installation:
Open a command prompt and type 'git --version'. You should see the Git version information if the installation was successful.
Mac:
1. Install Git via Homebrew (Recommended):
If you have Homebrew installed, you can install Git via the terminal by typing:
brew install git
2. Install Git from the Git website:
3. Run the Installer:
Open the downloaded '.dmg' file and follow the installation instructions.
4. Verify Installation:
Open a terminal and type 'git --version'. You should see the Git version information if the installation was successful.
Ubuntu:
1. Install Git via APT (Advanced Package Tool):
Open a terminal and run the following command:
sudo apt update
sudo apt install git
2. Verify Installation:
After the installation is complete, you can verify that Git has been installed correctly by typing:
git --version
These steps should help you install Git on Windows, Mac, and Ubuntu successfully. Make sure to follow any additional instructions provided during the installation process.
Windows:
1. Download Git for Windows:
2. Run the Installer:
3. Configure Installation Settings:
During the installation process, you can choose the components you want to install and the default editor. You can typically leave these settings as default unless you have specific preferences.
4. Adjusting your PATH environment:
During installation, Git may offer to adjust your system's PATH variable to include Git for easier access from the command line. Make sure to select this option if available.
5. Complete the Installation:
Follow the prompts to complete the installation.
6. Verify Installation:
Open a command prompt and type 'git --version'. You should see the Git version information if the installation was successful.
Mac:
1. Install Git via Homebrew (Recommended):
If you have Homebrew installed, you can install Git via the terminal by typing:
brew install git
2. Install Git from the Git website:
3. Run the Installer:
Open the downloaded '.dmg' file and follow the installation instructions.
4. Verify Installation:
Open a terminal and type 'git --version'. You should see the Git version information if the installation was successful.
Ubuntu:
1. Install Git via APT (Advanced Package Tool):
Open a terminal and run the following command:
sudo apt update
sudo apt install git
2. Verify Installation:
After the installation is complete, you can verify that Git has been installed correctly by typing:
git --version
These steps should help you install Git on Windows, Mac, and Ubuntu successfully. Make sure to follow any additional instructions provided during the installation process.
 0:02:57
 0:03:51
 0:01:33
 0:02:38
 0:01:53
 0:01:45
 0:00:53
 0:13:45
 0:01:34
 0:03:50
 0:02:19
 0:01:33
 0:01:43
 0:06:01
 0:03:03
 0:02:21
 0:04:31
 0:02:46
 0:08:25
 0:05:58
 0:07:35
 0:02:33
 0:14:31
![[New Update] Delta](https://i.ytimg.com/vi/8UXeyA9n2Wg/hqdefault.jpg) 0:02:19
0:02:19