filmov
tv
How to create a Mail Merge in Microsoft Word 2010
Показать описание
In this tutorial you will how to create a Mail Merge in Microsoft Word 2010.
MS office 2010 has a wide range of features including Mail Merge functionality. This lets user create documents (i.e. Letter, Emails, and Fax etc.) that consist of unique elements i.e. Contact Details, Name, etc.
It allows you to create one document for multiple recipients as well. Document includes the personal detail of recipients, which saves a lot of time.
In this tutorial you will how to create a Mail Merge in Microsoft Word 2010.
Step # 1: Go to the Mail Merge option
Open up a document you want to apply the mail merge option to. Here we have opened a marketing letter. Go to 'mailing' menu in the ribbon and click on the 'Start Mail Merge' drop down arrow. Select the last option that is 'Step by Step Mail merge wizard'.
Step # 2 -- Select the document type
Once you have clicked on step by step Mail wizard, a 'Mail Merge' panel opens up at the right hand side of the page. It will proceed in a step by step manner. The first step is to 'Select the document type' you are working on. Select the "letters" option.
Step # 3 -- Use the current document
You can start from the existing document, a template or even use the current document. Let's say you have selected the current document because you want to send this letter to the multiple recipients.
Step # 4 -- Type a new list
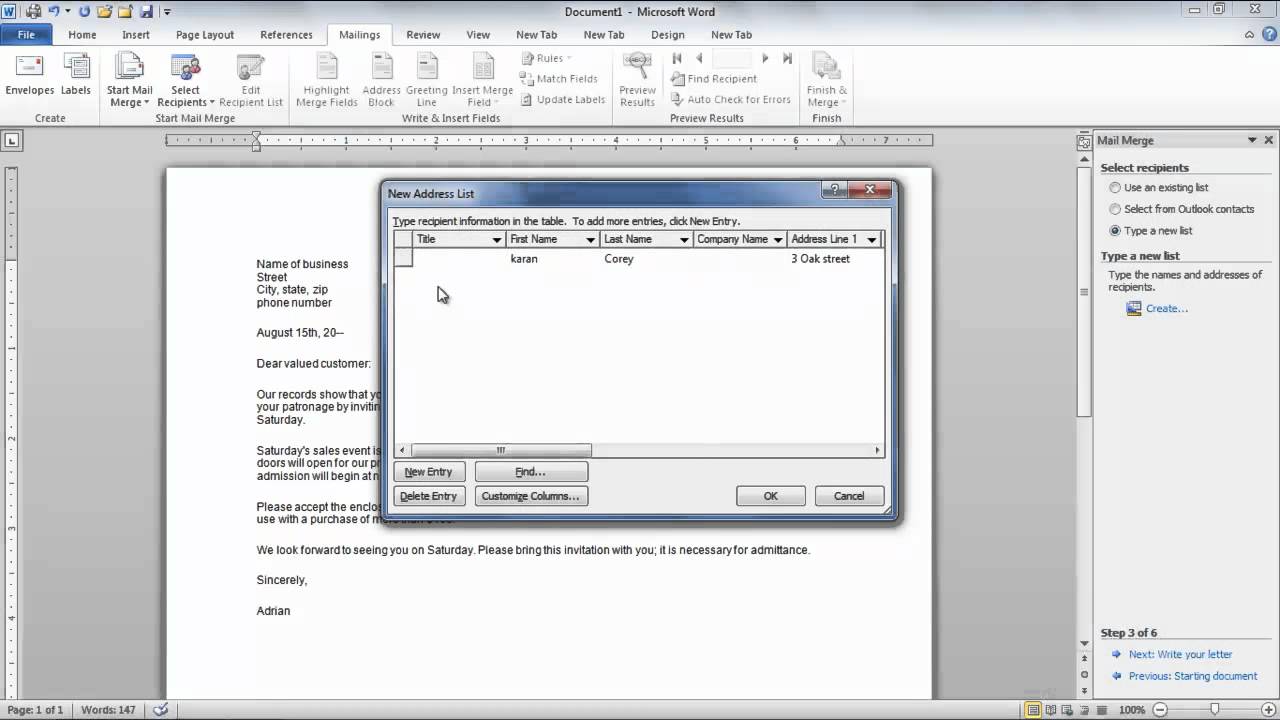
You can either select recipients from the existing list or type a new list. Let's create a new list, for this select the 'Type a new list' option under 'select recipients' heading. After this press the 'create' button. A 'New address list' dialogue box will appear on the screen. Fill the required fields then press "OK". You will have to save the list by assigning the name and selecting the format type and then click on 'Save'.
Step # 5 -- Insert information
The next step is to 'Write your letter'. Even if you have written a letter before still you will need to add some recipient information. To add the recipient information, click a location in the document and then select any of the items like 'Address block, greeting line, electronic postage etc. Once you click on any of these items, a dialogue box will appear where you will have to fill the preferences. For the 'Address box' you can put a 'check' sign to select the options that are required.
Step # 6 -- Preview your letter
After you are done with writing and adding recipient information at appropriate places in the letter, Microsoft Word allows you to preview it as to how it will look if you send it to an individual recipient. You can preview for more than one recipient by pressing the forward button under 'Preview your letters' option or press the 'Preview' button from the main ribbon.
Step # 7 -- Edit the individual letters
You can do further editing in individual letters, or leave it as it is. You may print the letter by selecting the option from the same panel.
Such options and more are available for your help and use in this feature of Microsoft Office 2010.
MS office 2010 has a wide range of features including Mail Merge functionality. This lets user create documents (i.e. Letter, Emails, and Fax etc.) that consist of unique elements i.e. Contact Details, Name, etc.
It allows you to create one document for multiple recipients as well. Document includes the personal detail of recipients, which saves a lot of time.
In this tutorial you will how to create a Mail Merge in Microsoft Word 2010.
Step # 1: Go to the Mail Merge option
Open up a document you want to apply the mail merge option to. Here we have opened a marketing letter. Go to 'mailing' menu in the ribbon and click on the 'Start Mail Merge' drop down arrow. Select the last option that is 'Step by Step Mail merge wizard'.
Step # 2 -- Select the document type
Once you have clicked on step by step Mail wizard, a 'Mail Merge' panel opens up at the right hand side of the page. It will proceed in a step by step manner. The first step is to 'Select the document type' you are working on. Select the "letters" option.
Step # 3 -- Use the current document
You can start from the existing document, a template or even use the current document. Let's say you have selected the current document because you want to send this letter to the multiple recipients.
Step # 4 -- Type a new list
You can either select recipients from the existing list or type a new list. Let's create a new list, for this select the 'Type a new list' option under 'select recipients' heading. After this press the 'create' button. A 'New address list' dialogue box will appear on the screen. Fill the required fields then press "OK". You will have to save the list by assigning the name and selecting the format type and then click on 'Save'.
Step # 5 -- Insert information
The next step is to 'Write your letter'. Even if you have written a letter before still you will need to add some recipient information. To add the recipient information, click a location in the document and then select any of the items like 'Address block, greeting line, electronic postage etc. Once you click on any of these items, a dialogue box will appear where you will have to fill the preferences. For the 'Address box' you can put a 'check' sign to select the options that are required.
Step # 6 -- Preview your letter
After you are done with writing and adding recipient information at appropriate places in the letter, Microsoft Word allows you to preview it as to how it will look if you send it to an individual recipient. You can preview for more than one recipient by pressing the forward button under 'Preview your letters' option or press the 'Preview' button from the main ribbon.
Step # 7 -- Edit the individual letters
You can do further editing in individual letters, or leave it as it is. You may print the letter by selecting the option from the same panel.
Such options and more are available for your help and use in this feature of Microsoft Office 2010.
 0:04:13
How to Create Email Account in 2024
 0:02:39
How To Create a Gmail Email Account
 0:02:31
How to Add / Set Up E-Mail on iPhone Mail App
 0:06:16
How to create gmail account in telugu, create google account, new gmail login, create gmail account
 0:04:38
How to Make Email ID in Malayalam / How to create a email id
 0:04:37
New Gmail Account Kaise Banaye | how to create gmail account | gmail id kaise banaye | email id
 0:01:57
Video Guide - Create Mail, Fast, Easy, Free with Mail.com, Fastest Way to Create a New Email Account
 0:03:24
How to create email id inTelugu ll how to create gmail id telugu
 0:01:54
How to create mail.com| Create Mail.Com 2024|
 0:05:47
How To Set Up Mail On Your iPhone (IMAP & SMTP over SSL)
 0:06:28
How to create gmail account in telugu, 2024, google account, email id, create new gmail account
 0:04:33
Mail Merge in MS Word|step by step process|how to create Mail Marge document in ms word
 0:06:41
How to create mail account how to create a mail com account create a mail account 2017
 0:09:45
How to Write a Perfect E-mail ? 🔥 Easy 1st Step to Get your DREAM JOB || Student Series by TS
 0:01:36
How To Make An Edu Email | Tutorial (2022)
 0:02:43
Create new Mail (outlook) profile Windows 10
 0:02:06
How To Setup iCloud Email On iPhone
 0:03:49
How to create gmail account/How to create gmail account in tamil/New gmail account Create
 0:04:56
How to create gmail account in mobile in telugu, create gmail account in telugu, Shiva tutorials
 0:06:01
How to Create a Gmail Account | Create an Email Address Sinhala
 0:04:09
Email id Kaise Banaye | Gmail id kaise Banaye.
 0:00:41
How to create folders in AOL Mail
 0:04:59
How to Create LETTERS in Microsoft Word Using Mail Merge | Use List From Microsoft Excel
 0:06:18
How to Create LABELS in Microsoft Word Using Mail Merge | Use Data From Microsoft Excel
Комментарии