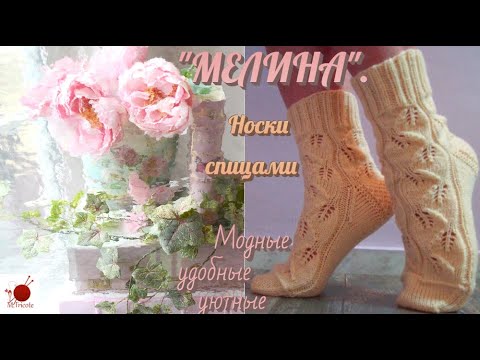
Носки спицами. 'ЭСТЕРХАЗИ'.#(2021)

preview_player
Показать описание
Если вы любите вязать носки так, как люблю я, вы обязательно оцените простоту и элегантность предлагаемой модели.Носки - это не просто теплая одежда на ноги. В условиях современной жизни теплой одежды для ног достаточно, но вязание носков своими руками это способ самовыражния и даже, в каком то смысле, культ. Многие из нас обожают роскошь в мелочах. Как раз для тех, кто внимателен к деталям и не прочь поломать голову над интересными задачками - носки спицами с очень интересной пяткой. Предлагаемая модель- из категории унисекс. Уровень сложности- для уже умеющих вязать носки пятью спицами. Расход пряжи 100гр - 200м.Спицы-комплект для ног обоюдоострый N 3,5. Две пары спиц на леске N 3.5., 4 маркера. Расчет сделан для размера 38-39.
Спасибо, что заглянули на мою страничку, не забудьте подписаться и поставить лайк.
#Πλεκτάπαπαλακια
#πλεκτες_καλτσες
#мкповязаниюспицами
#безплатныеописания
#knitting
#носкиспицами
#вязаныеноски
#knittedsocks
#knit_socks
#мастерклассыповязанию
#схемывязания
#идеивязания
#урокивязания
#Простыеноскинаспицах
#Учимсявязатьноскиспицами
#мкповязаниюспицами
#мастерклассвязание
#мквязание
Рекомендации по теме
Комментарии
Автор

Description in English under the video
She:
Fortunately, the principle can be applied to virtually any size of sock, although it has not been tested
comprehensively, and extremely small or large sizes may produce unexpected results. I will refer to
a sock with 64 sts throughout the instructions, but I will give instructions on how to calculate the
design for a different stitch count. Please note that your chosen number of stitches should be a mul—
tiple of 4. If you have knitted a well fitting plain stocking stitch sock before use that as your base.

Gauge:
I have knitted my sample with a gauge of 8 sts and 11 rows per inch, but I think it is more impor—
tant that you should create a fabric that you are comfortable with rather than trying to match my
gauge.

Material:
This is a perfect chance to use up lots of leftovers of as many or as few colours as you prefer (and
of as many ends as you are prepared to sew in afterwards...). However, a self striping yarn with a
strongly defined stripe will also highlight the construction very well and will not leave you with any
additional ends to dam in. My sample sock weighs 35 gr, but you can make yours longer in the leg
if you prefer. If you are using a self striping yarn 100 gr will be plenty for a pair of socks.

Needles:
2 circulars in 2.5 mm or size needed to achieve the required result. I would not suggest to use DPNs,
and I probably would also not do them on magic loop, but feel free to try it out...

Cuff:
Using your preferred method, cast on 64 sts (or the number needed). Although I worked a 64 st
sock I actually cast on 72 sts for my cuff, as I prefer more sts in that area. The sock you see on the
front page has a long cuff of 40 rounds, but you could do a shorther cuff and work the upper part
of the leg just in plain stocking stitch if you prefer.

Leg:
If you have worked the cuff with additional sts, K 1 round decreasing these. Since I have worked
my cuff with 72 sts, I worked 1 round [K7, k2tog] 8 times to bring me to 64 sts. If your cuff already
has the correct number of sts just knit 1 round.
Round 2: P6, k to end
Round 3: K all sts
Round 4: P6, k to end
Garter heel strap:
You will now work the narrow heel strap over the first 6 sts of the round. To calculate how many
rows you need to work of the strap you need two bits of information:

- a quarter of your total st count minus 3. In my 64 sts sock, this means 13 (64/4 -3=13).
- the number of sts you would pick up along the flap of a regular sock. I normally pick up 20 sts
either side on my socks. If you have a preferred alternative use that, otherwise work with 20,
it should be ok for most sizes.

Add these two together and double it. In my case, this was 66 ((13+20)x2=66). That’s the magic
number you need.
row 1: SH, K5.turn
Repeat this until you have worked as many rows as we have just calculated. You should be ending
after a WS row, ready to work on the RS, and you should have half your magic number in garter
rows showing on the strap.
Sll, K2. This is the centre of the strap and the new beginning of your rounds.

Gusset, part 1:
With your first circular needle, k3. Place your first heel marker. Pick up a st in each of the slipped
stitches along the side of the strap, until you have picked up half your magic number of sts (33 in my
sample). Mark the next st with a piece of waste yarn. (This st will become very easy to identify after
a few rounds, as it forms the centre of the centred double decreases, but it helps to mark it in the
first few rounds.) Including the st you have just marked, K half the sts remaining from the leg. With
needle 2, K the remaining half of the leg sts and mark the last of these sts also with a piece of yarn.
Along the second side of the strap, pick up one st in each slipped sts, taking care you get the same
number as on the opposite side, i.e. half your magic number. Place your second heel marker, K3.
If you are working your socks in leftover stripes, the next round is the point to start working in
stripes. The width is totally up to you, but I worked my sample sock in stripes of 5 rounds. Continue
striping all through the gusset and the foot.

You will now increase between the heel markers in every other round, and perform a CDD for the
gusset in two out of three rounds. This will work as follows:
Round 1:
Round 2:
Round 3:
Round 4:
Round 5:
Round 6:
K to first heel marker, M1, sl marker, K to 1 st before first marked st, CDD, K to 1
st before second marked st, CDD, K to second heel marker, sl marker, M1, k to end.
K to 1 st before first marked st, CDD, K to 1 st before second marked st, CDD, K to
end (slip markers as you come to them)

K to first heel marker, M1, sl marker, K to second heel marker, sl marker, M1, k
to end.
as round 2
as round 1
K to end (slip markers as you come to them)
Work according to this 6-round repeat until you have reached 18 sts between your heel markers (or
2 more than a quarter of your original st number).
Continue in the sequence, but do not increase any further. You can discard the heel markers as well.
Effectively, you will work Round 2 twice, followed by Round 6 once. Do this until you have decreased
your instep sts to half your desired total number. This means the sts in between and including the
marked sts either side. By now, these will stand out prominently as ridges, so they should be easy
to identify. In my example I have worked until I had 32 sts over the instep including these two ridge
sts.

Gusset, part 2:
You will now work a classic sock gusset that will line up with the decreases formed in part 1.

Round 1: K to prominent ridge st. K that st, place first gusset marker, K to second ridge st,
place marker, K ridge st and K to end.
Round 2: K to 2 sts before first marker, K2tog, sl marker, K to next marker, sl marker, SSK, K
to end
Round 3: K to end
Repeat rounds 2 and 3 until you have decreased your sts to the number desired, Le. 64 or whatever
number you have decided on at the beginning.

Work the rest of the foot in plain stocking stitch, until you have about 2 inches/ 5 cm less than your
required foot length. I have stopped my leftover stripes 20 rows after the gusset decreases, but feel
free to stripe all the way to the toe or even through to the end of the sock.
Toe:
To place your markers for the toe decreases (if you prefer to use them), work first round as fol-
lows:
K 13 (or a quarter of your total minus 3), K2tog, K1, place marker, K1, SSK, K 13 (as before). Repeat
on Needle2
Round2: K
Round3: K
Round4: K
RoundS: [K to 3 sts before marker, K2 tog, K1, 5! marker, K1, SSK, K to end] on each needle
Round6: K
Round7: K
Round8: as Round 5
Round9: K
Round10: K
Roundllz as Round5
Round12: K
Round13: as Round5
Round14: K
Round15: as Round5
Round16: K
Round17: as Round5
Keep working Round 5 until you have a total of 16 sts. With a DPN, K 4 sts from needlel. Move the
remaining 4 sts from needlel and the first 4 sts from needle2 onto a second DPN. Move the last 4
sts from needle2 onto the first DPN. Cut yarn, leaving about 10 inches / 25 cms and graft the toe
closed. Turn sock inside out and dam in all loose threads.
. As I said before, the sequence and width of your stripes is up to you, they don’t even
have to be the same throughout the sock.
. You could work a regular cuff and work a bit of regular leg already in stripes, but keep
the first 6 sts in garter st to retain the coherence, and work the strip in the same colour
as the last stripe worked.


Glossary:

St, sts stitch, stitches
K knit
P purl
SI slip
M1 make 1 st by picking up the loop in between sts and knitting it through the back
K2tog knit 2 stitches together
SSK slip, slip, knit. Slip 2 stitches separately as if to knit, insert left needle into these two
stitches from the right and knit onto right needle.
CCD centred double decrease. Slip 2 stitches together as if to knit, knit next stitch and
pull slipped stitches over this stitch.

mtricote
Автор

Спасибо Вам, Ирина! 2 года назад наткнулась на Ваше видео, очень загорелась и связала такие носочки! Вязать очень увлекательно!Хочется экспериментировать. Связала и крошечной внучке - маленькие тоже получаются очень симпатичными.Попробовала и из пряжи секционного крашения - тоже замечательно!
Сейчас снова нашла Ваше видео и очень рада встрече!По Вашему МК учиться легко. Спасибо Вам!
Расчёт петель, правда, я на третьей или четвертой паре ввела свой, который мне показался проще.Но основательно всë, конечно, у Вас.И кстати, за эти годы по этим носочкам МК только у Вас!
Ещё раз благодарю! ❤

swgytng
Автор

Увидела ваши носки обалдела, таких ещё не встречала.Класс.Попробую связать .

sv_marina
Автор

Благодарю вас, очень понравился ваш мастер-класс и конечно сами носки 🎉!

userNika
Автор

Я в восторге от Ваших носочков! Очень рада, что встретила Вас на своём пути! Спасибо, что делитесь мастерством!

tlzkejc
Автор

Спасибо за эти необычные МК по носочкам, хочется сделать расчёт и связать эту красоту внуку на 3 годика.

sjwfptz
Автор

Добрый день Ирина, огромное Вам спасибо за МК!!!Красивые, необычные.🥰🥰🥰

radygadesign
Автор

Благодарю! Модель очень интересная и элегантная!🤗🤗🤗💓💓💓💓🌷🌷🌹🌹🥀

ivankavtsevich
Автор

Безусловно красивая модель! Единственный недостаток пятка не укреплена.

evdokija
Автор

Необычные, красивые, ждëм с нетерпением.

Milamunwndb
Автор

Необычная модель очень интересная обязательно попробую связать огромное спасибо вам супер

plgmfpw
Автор

Очень интересные и необычные носки! Спасибо! Обязательно попробую!

niqxwsl
Автор

Какие интересные носочки! Это нужно попробовать!!! Спасибо

bvjpszp
Автор

Огромное вам спасибо за такой прекрасный мк.🤩🧶 Всё понятно и ясно. Удачи вам в дальнейшем. 🧶

marutadreimane
Автор

Большое Вам СПАСИБО за мастер-класс вязания носочков!!! Давно искала описание именно такого вязания носков!

ndeyppb
Автор

Очень интересный способ вязания, надо попробовать

ixcsixh
Автор

Спасибо, очень красивые носочки, и процесс вязания очень интересный

elenaelena
Автор

Всегда жду ваши МК и часто и вяжу что то новое для себя. Спасибо вам за это

khygvdv
Автор

Очень хочется себе связать такие красивые носочки.

maraby
Автор

Спасибо. Красивые, попробую вязать. Всегда восхищаюсь Вашими работами.

tmhlzvq