filmov
tv
DIY Vacuum Forming - Everything you need to know
Показать описание
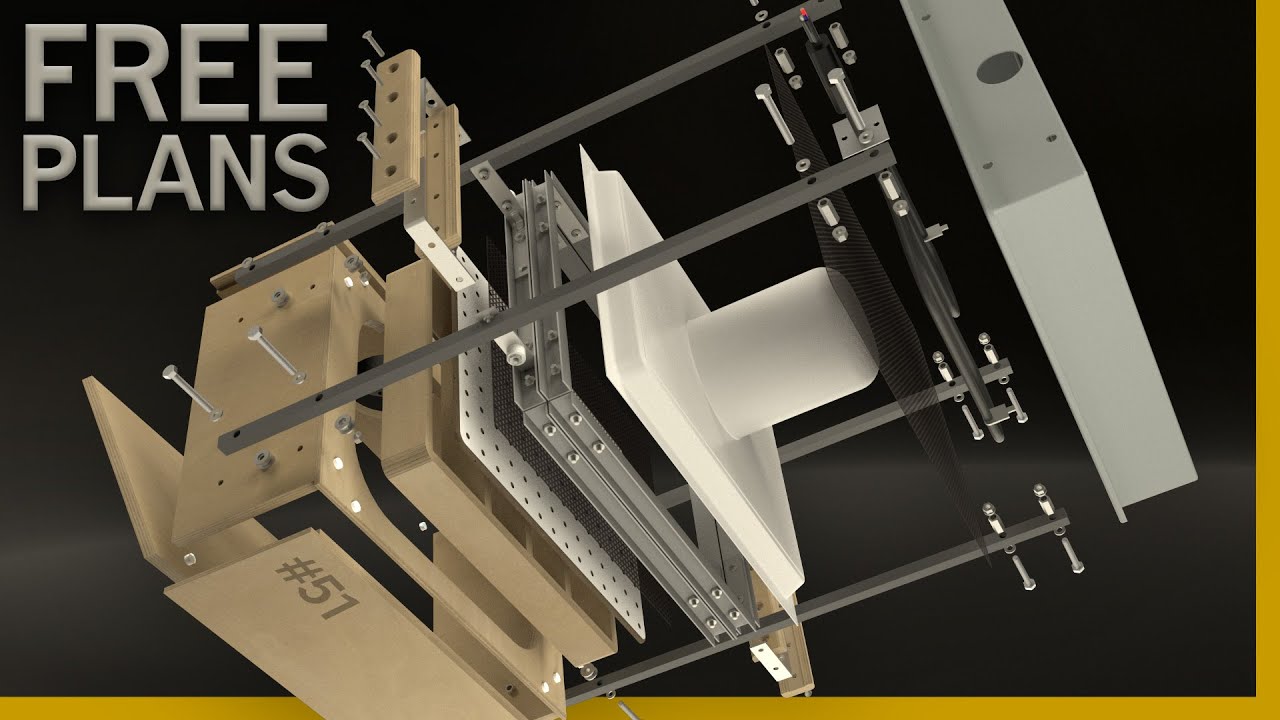
Years ago I built vacuum formers as a summer job. Today I try to improve on my old designs with Former #51! Once we build the machine we will test it and then tune it for the best possible performance. If you have any questions about building your own vacuum former, I will attempt to answer all of them in this video. If there is anything that wasn’t covered or if you would like to know more, let me know in the comments!
0:00 - Intro and Design Process
3:35 - Build
12:05 - Testing
19:37 - Conclusion
I'm now on Patreon!! The reward levels are very basic for the time being but I promise to bring merch and other perks in the future.
Buy Prebuilt Vacuum Forming Machines (these links help support the channel)
--------------------------------------------------------
SHOPPING LIST: (some links help support the channel)
If any of this is wrong or if something is missing from the list let me know and I will correct it.
METAL
½” square steel tubing – 96” (1/16" wall thickness)
Lincane perforated AL sheet 36x36
¾” C-Channel 1/16” thickness (104” length needed)
WOOD
24x48 peg board (unless a smaller sheet is available)
1/2” or 12mm plywood or MDF
FASTENERS
7/8” ¼-20 couple nuts X8
2” ¼-20 bolts and nuts X16
4” ¼-20 eye bolts X2
3/8” or ½” 10-24 bolts X40
1” 10-24 bolts x4
5/8” 10-24 nuts (box of 50?)
5/8" Flat head 10-24 bolts for handle x8
3” L-Brackets X16
½” 4-40 bolts and nuts (for heat spreader) X14
(4) NYLON wheels at least .2ID - .75OD
1/4"? Retention rings X2
OTHER
Heat hood pan:
Heat element:
On/Off Foot Pedal
Small Felt Pads
--------------------------------------------------------
Plans:
BUILD AT YOUR OWN RISK! Vacuum formers are dangerous industrial machines. Use caution! By downloading these plans you recognize that The 3D Handyman and 2 Point Media are not liable for any resulting injury, property damage, or death caused by the use of this machine or the building of this machine. Build at your own risk!
 0:22:31
DIY Vacuum Forming - Everything you need to know
 0:12:32
Building a Vacuum Forming Machine with a Room Heater and Vacuum Cleaner
 0:00:57
DIY Vacuum Forming Machine
 0:00:20
Homemade vacuum forming (SUCCESS)
 0:18:56
Why I got a Vacuum Former, What Can it Do
 0:00:52
I made a vacuum former out of scraps! #diy #vacuumforming
 0:00:26
Vacuum Forming is So Quick
 0:00:26
DIY Vacuum form box part 4
 0:17:41
How to Make a Larger Vacuum Former | I Like To Make Stuff
 0:00:37
Home vacuum forming machine B-series 12'x18' (305x460mm)
 0:00:50
Making a Master Chief Visor Pt 3
 0:08:00
Prop: Shop - How to Make a Vacuum Forming Machine
 0:00:30
DIY Vacuum forming
 0:06:23
EASY VACUUM FORMER - Chocolate NOKIA
 0:00:19
Vacuum Forming a custom ABS Drip Tray
 0:16:02
Testing an $88 Vacuum Former
 0:00:50
Vacuum forming RC body 1/10
 0:00:23
I built my own vacuum former! #aviation #diy #3dprinting
 0:00:24
How To Use Dental Lab Vacuum Molding Forming Machine
 0:10:36
DIY Vacuum Formed Replacement Window Parts
 0:00:46
Vacuum Forming #shorts
 0:00:11
Vacuum forming #holster #handmade
 0:00:14
Fizemos uma máquina para fazer embalagem, vacuum forming
 0:00:08
equipment shell vacuum forming custom#vacuumforming #thermoforming #Chinaindusty
Комментарии