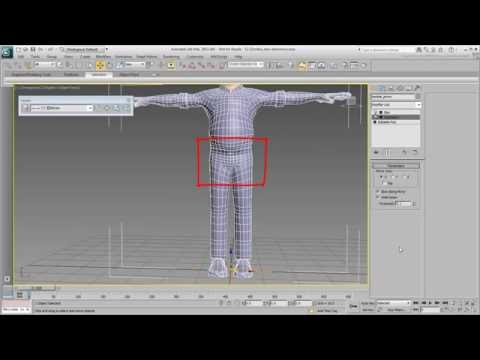
Skin Morph in 3ds Max

preview_player
Показать описание
This is a video I put together on how to use the Skin Morph modifier in 3ds Max to fix skinning problems. Skin Morph tools are not great for re-modelling joints so I show you how to import morph targets which you can model using all the normal tools. Also where you can use Skin Morph to fix common skinning issues. I hope you find it useful...
Рекомендации по теме
Комментарии
Автор

This is a great tutorial, but one very, very important detail about this process that must be pointed out is that the mesh representing the morph target must not be moved until its modifier stack is collapsed to the desired skin pose. I had discovered by chance that not heeding this screws up the pivot point of the morph target mesh, and this will show up as a "jumping vertices" mess when you apply the target to the morph.

crollwtide
Автор

Just had to login and comment: THANK YOU. This tutorial was my breakthrough in rigging, after 5 years of futile test I managed to get something that looks and works good! Again, thank you. :)

pandoramail
Автор

Wow! Absolutel bloody excellent tutorial sir! Straight quick to the point. It didn't even occur to me that you could use dummy geometry as you would a traditional morph target. Thank you!

Charlie_Alpha_Lima
Автор

Man of the Year! I have been stuck for so long with those deformations, now this solves it :)

AlekseiMaide
Автор

Very cool. I've never thought of using morphing and bones simultaneously.

artnovikovdotru
Автор

This was a far, far better introduction than the 3DsMax help guide :) Thanks so much! 

KieranGatestormer
Автор

your the only teacher that knows anything at BPC

DSgeek
Автор

2018, still refering to this video! thank you sir!

philbertmill
Автор

I have a problem, when i do these steps and pick an external mesh, that part of mody leaves eveything and going away. Any idea ?

(i believe i have same number of verticles at both side
)

Niaziy
Автор

Since the elbow is flexed by compressing the bicep and extension of the tricep, you'd really want to sculpt the entire upper arm as well.

RM_VFX
Автор

Do you know how to do it in a way that will be exportable to FBX? I need to import animations into game engines ( example: unity ) and i can't export the "Skin Morph" modifer, Only the normal "Morpher". Any idea how it can be done?

SahkanISR
Автор

A great tutorial just gutted they didn't let you keep the tony heart music during the speeded-up section.

ChooperOnly
Автор

Thank you for this overview / tutorial very helpful for  me 

Hereford
Автор

Very useful. Thank you!

I'm not entirely sure how this works together with a rig though, for example. Do you just add a rig, animate it, and while you're doing that use the skin morphs to apply local fixes?

konraddobson
Автор

Nicely done video. I have a question unrelated sort of. How did you make your panels wider? It's always bothered me that Max truncates so many things and they can't be made wider. It  looks like you panels are wider than the default. I'd love to know how you set it.

NVisionD
Автор

Hi there, great video :)

I have a question about armature pose(editable mesh pose) and the skin pose.

I was curious are you able to re-save the editable mesh pose as the current rigged pose? For example say the editable mesh pose is a default T-pose, what I want to do is change that T-pose default to the current rigged skin pose. Is there a transform armature option or script to change it the editable mesh pose?

Thanks in advanced!

The type of rig is a FBX pose btw.

Orcband
Автор

Hello and thanks for a great tutorial. Been following along and getting some great angle driven morphs. I have a few questions for you though.
1. When I tie in multiple morphs on more than 1 axis I start getting values on the morphs even when my character is in its default state. Shouldn't they all be 0? I can tie in multiple morphs on 1 axis and they zero out at the default state but when I tie in an additional axis the morphs all carry a small value in the default state.
2. I tried applying the same technique to facial morphs for my character and the morph is not going back down to 0 when at the default state, its staying at about 65 so the shape is still being triggered quite a bit at default. Not sure why it is doing that. The previous skin morphs were on bones that were generated with an auto rig. Is there something I need to do to the bone to prepare it for skin morphs? Like zero it out or align the pivot or something like that? In the meantime I just dialed down the influence angle until it looked ok but I was curious why it hadn't worked as well as the previous attempts.
Anyway, sorry for long post and thanks again for a helpful tutorial.

HellzMajik
Автор

Now if you are already using a morpher for the character's facial animation can you use a second morpher on top of the stack to fix the model's joints? I'm guessing you have no choice to use a second morpher since the first morpher is before the skin modifier.

pat
Автор

Great tutorial but need help furthermore. Suppose, I skinned the left hand with skin morph and it has only one side, right hand is not created. Now, I created one more hand with both side by using that left hand which I have already skinned. I want transfer the data from that old model to the new model with all skin morph data. How can I transfer that data and save my time to recreated all skin morph targets?I tried to copy paste skin morph modifier, its not working. I use skin wrap modifier, its not working. I use 3ds max learning channel technics that extracting skin data, its not working. Please guide.

crickhiren
Автор

I love this tutorial, but question, hope you guys could answer, Does Cinema 4d also have something like this? And can I actually export these sets of 3ds morph along with the object to other 3d softwares, or can cinema 4d objects with pose morph tags be exported to 3ds max? I know some of you may not be a fan of c4d, but yeah I hope that someone could answer one or some ^-^

Skycube