filmov
tv
How To Install @Creality3D Sonic Pad on Cr-10 Smart Pro 📱 #crealityvidschallenge - 3D Print

Показать описание
In this video, I’ll show you how I installed the Creality Sonic Pad on my Cr-10 Smart Pro 3D printer. The @Creality3D Sonic Pad is a powerful and versatile device that can control up to four printers at the same time, speed up printing while keeping the quality, and offer an intuitive and user-friendly interface using Klipper Firmware.
I decided to try the Sonic Pad because I had problems with the automatic level of the Cr-10 Smart Pro since the beginning. The compensation made one of the sides always be too close to the bed and the other side too far. I had it working with manual level for four months without problems, but I wanted to make my printer faster and try to fix the auto level problem.
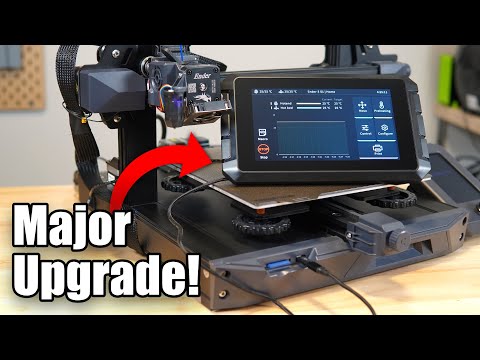
In the video, you’ll see how I unboxed the Sonic Pad, connected it to the printer, started it and upgraded it to the latest version. Then I chose the printer model, flashed the firmware and connected via USB. After that, I started the initialization process, checking that the fans were working and tightening the bed level screws at max. I had installed silicone spacers but I had to replace them for the original springs because they didn’t have enough height to reach the lower part of the Z rods. After that, I calibrated the Z probe offset and the screws corners. Finally, the machine started the automatic level calibration.
After that, I could explore the interface of the Sonic Pad, which is very intuitive and easy to use. I made two prints to test it out. The first one was a first layer test to finally adjust the Z offset distance during the process. Then I printed two personalized keychains that I had to 3D Print for a commission. The results were stunning: the movement of the printer was smoother and faster than before.
Now I need to check some other things like a speed test, resonance calibration, PID tune, Creality Cloud synchronization, etc. Let me know in the comments what you think I should do next!
You can read my blog post here:
You can get more information about the Creality Sonic Pad at their official website:
You can also download their software and firmware here:
Also, feel free to leave a comment💬 below if you have any questions or suggestions for me. I'd love to hear from you!
Thank you for watching👀 and see you next time!😊
Follow me on my Social Networks and 3D Models platforms here:
Frikarte3D © 2023
#3dprinting #creality3d #3dprint #3dprinter #3dprinter #creality #Crealityvidschallenge #timelapse #CrealitySermoonV1Pro #Cr10SmartPro #SonicPad #klipper #firmware #firmwareupdate
I decided to try the Sonic Pad because I had problems with the automatic level of the Cr-10 Smart Pro since the beginning. The compensation made one of the sides always be too close to the bed and the other side too far. I had it working with manual level for four months without problems, but I wanted to make my printer faster and try to fix the auto level problem.
In the video, you’ll see how I unboxed the Sonic Pad, connected it to the printer, started it and upgraded it to the latest version. Then I chose the printer model, flashed the firmware and connected via USB. After that, I started the initialization process, checking that the fans were working and tightening the bed level screws at max. I had installed silicone spacers but I had to replace them for the original springs because they didn’t have enough height to reach the lower part of the Z rods. After that, I calibrated the Z probe offset and the screws corners. Finally, the machine started the automatic level calibration.
After that, I could explore the interface of the Sonic Pad, which is very intuitive and easy to use. I made two prints to test it out. The first one was a first layer test to finally adjust the Z offset distance during the process. Then I printed two personalized keychains that I had to 3D Print for a commission. The results were stunning: the movement of the printer was smoother and faster than before.
Now I need to check some other things like a speed test, resonance calibration, PID tune, Creality Cloud synchronization, etc. Let me know in the comments what you think I should do next!
You can read my blog post here:
You can get more information about the Creality Sonic Pad at their official website:
You can also download their software and firmware here:
Also, feel free to leave a comment💬 below if you have any questions or suggestions for me. I'd love to hear from you!
Thank you for watching👀 and see you next time!😊
Follow me on my Social Networks and 3D Models platforms here:
Frikarte3D © 2023
#3dprinting #creality3d #3dprint #3dprinter #3dprinter #creality #Crealityvidschallenge #timelapse #CrealitySermoonV1Pro #Cr10SmartPro #SonicPad #klipper #firmware #firmwareupdate
 0:05:29
How To Connect A Creality 3D Printer To A Sonic Pad - Sonic Pad Basics Part 1
 0:09:11
How To Install @Creality3D Sonic Pad on Cr-10 Smart Pro 📱 #crealityvidschallenge - 3D Print
 0:36:09
Creality Sonic Pad Setup Guide, Review, Slicer Settings and Printable Mount!
 0:11:17
Best Upgrade For Creality 3d Printers? Sonic Pad
 0:11:29
Model File to 3d Print - A Beginners Guide to Using Cura (3d Printer Slicer Software)
 0:10:16
Is Klipper Easy Now? | Creality Sonic Pad Setup and Review
 0:37:45
CREALITY SONIC PAD UNBOX & TUTORIAL
 0:00:24
The Creality Sonic Pad now supports... #creality #creality3d #sonicpad #3dprinting
 0:12:36
Ender-5S1 Mods and Klipper Install With Creality Sonic Pad
 0:09:40
Creality Sonic Pad Install On CR-10 Max Klipper
 0:10:17
How To Connect A Non-Creality 3D Printer To A Sonic Pad - Sonic Pad Basics Part 1a
 0:05:54
Creality Sonic Pad installation and printing process timelapse
 0:37:48
Creality Sonic Pad - Ender-3 V2 Neo - Unbox & Setup
 0:00:16
Klipper on the Kobra Max using a Sonic Pad
 0:00:41
Upgrade the Creality CR-10 SE for 4 Colors Printing | Co Print KCM Installation
 0:10:32
Creality Sonic Pad Connection Tutorial & Print Comparison & Advanced Functions
 0:04:14
Stop 3d printing so slow!!! 🤯 (how to print faster)
 0:12:05
Upgrade the Creality Ender 3 v3 SE for 4-Colors Printing | Co Print ChromaSet Installation
 0:00:32
Creality sonic pad. A brief update! More videos to come!
 0:06:18
UPGRADE YOUR 3D PRINTER WITH THE CREALITY SONIC PAD
 0:07:47
Slicer Settings and Profiles With Cura - Sonic Pad Intermediate Part 3
 0:00:16
CR10 Smart running klipper #3dprinting #3dprinter #cosplay #hobby #creality #3d #creality3d #speed
 0:00:30
Bring Classic Character with 3D Printing! ✨ #3dprinting #3dprinted #phrozen
 0:00:35
creality sonic pad has entered the chat 🥵 #3dprinting #creality #3dprinter #shorts
Комментарии