filmov
tv
How to Backup Windows Drivers using PowerShell

Показать описание
Did you know that you can use the built-in DISM tool on Windows PCs to export (backup) drivers?
Windows comes with a set of drivers to make sure that most hardware devices work out of the box. Manufacturers create drivers for their devices that users may install; these may add support for additional functionality.
If you plan to migrate to a new Windows PC or you want to set up the current one from scratch, you may be interested in having these custom installed drivers at hand to install them later on.
HOW TO EXPORT DRIVERS USING POWERSHELL
With DISM, it takes one command to export drivers on the current Windows system. Here is how that is done.
1. Open Start.
2. Search for Windows PowerShell, right-click the top result, and select the Run as administrator option.
3. Type the following command and press Enter:
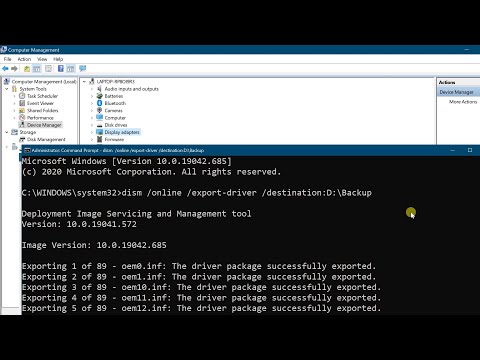
Export-WindowsDriver -Online -Destination C:\DriverBackup
PLEASE NOTE that the folder needs to exist, otherwise you'll get an error and no export.
IMPORTANT NOTE: This will only make a backup of the .inf drivers. Other drivers installed using an .msi or .exe package won’t be backed up.
Once you complete the steps, DISM will look for and make a copy of all the drivers stored in C:\Windows\System32\DriverStore.
The command exports all third-party drivers to the destination folder. Note that you may also use it to export drivers from an offline image using the following command (run from an elevated PowerShell prompt):
Export-WindowsDriver -Path c:\offline-image -Destination d:\drivers
The process may take a while to complete. A test on my new MSI AIO PC resulted in 57 exported drivers. The process took about 5-8 minutes to complete.
The exported drivers will be placed in your specified location, with each driver put in a separate folder. As a result, it may be difficult to find which driver is which, as folder names may not reveal much about themselves. So, just open the .inf file in a plain text editor to look up additional information.
IMPORT THE EXPORTED DRIVERS
Importing can be done for individual drivers or for all drivers.
You may right-click on an .inf file to install the driver. Another option that you have is to open the Windows Device Manager and use the "Update driver" button. Using it, you get an option to pick a driver from the local system. Just pick the exported driver and wait for the process to complete.
However, after reinstalling Windows 10, it’s likely that you’ll only need to install a few drivers as the operating system will detect most of them automatically (even without checking for updates), as such you can install the remaining drivers using Device Manager.
Either way, this is one of those must-use commands that every Windows should know. Besides, it's always handy to have a driver backup! :)
➤ MORE INFORMATION & RESOURCES:
#Drivers #Backup #Restore #Windows10 #Windows11 #WindowsInsider
Windows comes with a set of drivers to make sure that most hardware devices work out of the box. Manufacturers create drivers for their devices that users may install; these may add support for additional functionality.
If you plan to migrate to a new Windows PC or you want to set up the current one from scratch, you may be interested in having these custom installed drivers at hand to install them later on.
HOW TO EXPORT DRIVERS USING POWERSHELL
With DISM, it takes one command to export drivers on the current Windows system. Here is how that is done.
1. Open Start.
2. Search for Windows PowerShell, right-click the top result, and select the Run as administrator option.
3. Type the following command and press Enter:
Export-WindowsDriver -Online -Destination C:\DriverBackup
PLEASE NOTE that the folder needs to exist, otherwise you'll get an error and no export.
IMPORTANT NOTE: This will only make a backup of the .inf drivers. Other drivers installed using an .msi or .exe package won’t be backed up.
Once you complete the steps, DISM will look for and make a copy of all the drivers stored in C:\Windows\System32\DriverStore.
The command exports all third-party drivers to the destination folder. Note that you may also use it to export drivers from an offline image using the following command (run from an elevated PowerShell prompt):
Export-WindowsDriver -Path c:\offline-image -Destination d:\drivers
The process may take a while to complete. A test on my new MSI AIO PC resulted in 57 exported drivers. The process took about 5-8 minutes to complete.
The exported drivers will be placed in your specified location, with each driver put in a separate folder. As a result, it may be difficult to find which driver is which, as folder names may not reveal much about themselves. So, just open the .inf file in a plain text editor to look up additional information.
IMPORT THE EXPORTED DRIVERS
Importing can be done for individual drivers or for all drivers.
You may right-click on an .inf file to install the driver. Another option that you have is to open the Windows Device Manager and use the "Update driver" button. Using it, you get an option to pick a driver from the local system. Just pick the exported driver and wait for the process to complete.
However, after reinstalling Windows 10, it’s likely that you’ll only need to install a few drivers as the operating system will detect most of them automatically (even without checking for updates), as such you can install the remaining drivers using Device Manager.
Either way, this is one of those must-use commands that every Windows should know. Besides, it's always handy to have a driver backup! :)
➤ MORE INFORMATION & RESOURCES:
#Drivers #Backup #Restore #Windows10 #Windows11 #WindowsInsider
 0:03:47
How to Backup and Restore Drivers in Windows 10
 0:06:17
Backup And Restore Windows Drivers Before Formatting 2019
 0:04:06
Backup Windows Drivers Without Any Additional Software
 0:02:43
How To Backup And Restore Windows Drivers Without Any Software
 0:07:46
How To Backup Your Drivers in Windows 11 and Restore Them - No Software Required!
 0:07:06
HOW TO BACKUP AND RESTORE DRIVERS ON WINDOWS 7, 8, 10
 0:07:59
How to backup all Hardware Drivers and later use them again in Windows computer ?
 0:05:22
Windows Drivers BackUp and Restore || How To BackUp And Restore Windows Drivers
 0:07:59
Fix WiFi Keeps Disconnecting on Windows 11 | Unstable WiFi & Internet
 0:02:41
★How to backup drivers in Windows 10★
 0:02:06
How to Backup Your Windows Drivers (2018)
 0:02:46
How to Backup and Restore Windows Hardware Drivers - AvoidErrors
 0:07:09
How to Backup and Restore your Windows Drivers by Britec
 0:06:26
How to Backup Your Windows 11 to an External Hard Drive #windows11
 0:03:25
How to Backup All Drivers for further Use in Windows 10/8.1/7 (Easy)
 0:04:37
How to backup and restore updated Windows 10 drivers
 0:10:11
How To Backup And Restore Windows Drivers Without Any Software
 0:08:04
How to Back up Drivers and Restore on Windows 11 & 10 for Beginners
 0:04:03
How to Backup and Restore All Drivers for further Use in Windows 11/10/8.1/7 (Easy)|| Copy Paste
 0:04:06
How to Backup & Restore Drivers in Windows 11 or 10 with Double Driver?
 0:07:37
Managing Drivers in Windows
 0:04:36
How to Backup and Restore All Windows10 Device Drivers
 0:03:28
How to Backup and Restore Windows Drivers using DISM
 0:03:42
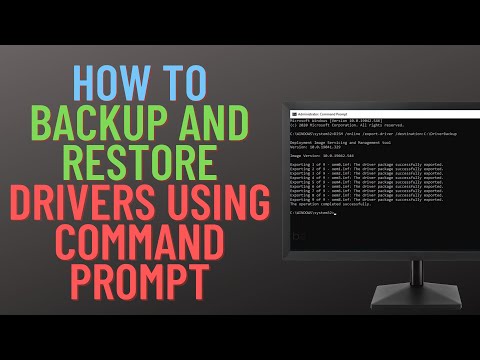
How to Backup And Restore Drivers Using Command Prompt
Комментарии