filmov
tv
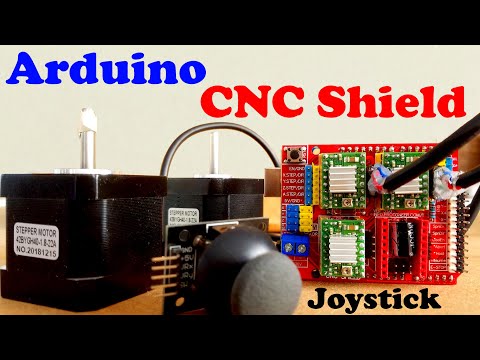
Arduino CNC Shield V3 and A4988 Hybrid Stepper Motor Driver, CNC Shield pinout, wiring, code, DIY

Показать описание
Download Programming and Other data:
Subscribe to my New YouTube Channel, if you want to watch my videos in Hindi/Urdu
Arduino Joystick getting started tutorial:
Wireless Bluetooth Controlled stepper motor using Android app and Arduino Nano:
IoT CNC Shield using Nodemcu ESP8266:
CD ROM stepper motor Arduino L298n + Joystick controlled speed and direction Control
Support me on Patreon and get access to hundreds of projects:
Project Description:
***********
This is a basic getting started tutorial in which you will learn how to use the Arduino CNC Shield V3.0 and A4988 Stepper Motor Driver to control a Hybrid Stepper Motor. This video is sponsored by DFrobot and Digit Space. I will start with the very basics explaining how to control the direction of Stepper Motor using a very simple Arduino program, and then I will make it a little bit complex by adding a Joystick which can be used to control the stepper Motor. I will also explain how to use these male headers in custom made projects.
In this tutorial, we will cover,
1. A4988 Stepper Motor Driver Pinout and technical specifications
2. Arduino CNC Shield V3.0 Pinout and technical specifications
3. Hybrid Stepper Motor wires and technical specifications
4. Interfacing and finally
5. Arduino programming
Without any further delay, let’s get started!!!
**********
Amazon and Banggood Purchase links:
*******
Arduino Nano USB-C Type ( recommended):
ESP32 WiFi + Bluetooth Module for iOT Projects (recommended), more IO pins, improved speed, and supports a Lipo Battery:
Arduino CNC Shield V3.0
Hybrid Stepper Motor Nema17:
2-Axis Analog Joystick
Other Must-Have Tools and Components:
Top Arduino Sensors:
Super Starter kit for Beginners
Top Oscilloscopes
Variable Supply:
Digital Multimeter:
Top Portable drill machines:
Jumper Wires:
3D printers:
CNC Machines:
Electronics Accessories:
Banggod Product links:
Arduino Uno R3:
Hybrid Stepper Motor:
Joystick:
Arduino Mega R3:
Arduino Nano:
Complete Soldering Iron Kit:
Digital Multimeter:
The most complete starter kit for beginners:
Drill Machine for PCB:
Solder wire:
Wirecutter, stripper complete set:
DISCLAIMER: This video and description contain affiliate links, which means that if you click on one of the product links, I will receive a small commission. This helps support the channel and allows me to continue to make videos like this. Thank you for your support!
****************
Follow me on Facebook:
About the Electronic Clinic:
Electronic Clinic is the only channel on YouTube that covers all the engineering fields. Electronic Clinic helps the students and other professionals to learn electronics designing and programming. Electronic Clinic has tutorials on
Arduino
Raspberry PI
image processing
gsm based projects
Bluetooth based projects
esp8266 projects
Nodemcu projects
robotics
desktop application designing and programming
Project Related Tags:
Arduino CNC Shield V3.0 and A4988 Hybrid Stepper Motor Driver, CNC Shield Jumpers and pins
#Arduino CNC shield
Arduino CNC shield stepper motor code
Arduino CNC shield v3 wiring
Arduino CNC shield v3 pinout
Arduino CNC shield wiring
Arduino CNC shield v3 wiring
Arduino CNC shield code
Arduino CNC shield setup
Arduino CNC shield a4988 code
Arduino CNC shield a4988
Arduino CNC shield a axis
Arduino CNC shield a4988 datasheet
Arduino + CNC shield + a4988
A4988 with Arduino
A4988 stepstick shield
A4988 datasheet
A4988 stepper motor
A4988 stepper motor driver
A4988 pinout
A4988 pin configuration
Hybrid stepper motor driver
Hybrid stepper motor Arduino
Hybrid stepper motor price
Hybrid stepper motor applications
Hybrid stepper motor NEMA 17
Joystick controlled Stepper Motor
#a4988
#cnc
 0:04:33
Arduino CNC Shield V3 + DRV8825 - ZoneMaker
 0:04:39
Arduino CNC Shield Tutorial - Control Stepper Motors using CNC Shield V3.0
 0:11:26
Arduino Uno + CNC Shield V3
 0:03:48
Arduino CNC shield v3 a4988 stepper motor drivers
 0:07:31
Arduino CNC Shield Overview
 0:00:39
arduino mega 2560 + CNC Shield V3.0 and arduino driver a4988
 0:04:02
Nema 17 Stepper Motor with Arduino CNC Sheild V3 (A4988 Driver) | 100% Working Arduino Code
 0:00:17
CNC shield V3 - Shield for Arduino
 0:13:31
Setup Arduino UNO, CNC Shield v3, GRBL, and related CNC motion components and electronics.
 0:02:21
Arduino CNC Shield V3.0 Wiring and Pinout
 0:29:57
Stepper Motors and Arduino - The Ultimate Guide
 0:18:11
Arduino CNC Shield V3 and A4988 Hybrid Stepper Motor Driver, CNC Shield pinout, wiring, code, DIY
 0:01:25
Arduino CNC shield v3 clone Axis
 0:31:36
GRBL with Arduino CNC Shield – Complete Guide
 0:00:14
test Arduino Uno + CNC shield V3 avec EstlCAM
 0:08:55
How to Control Stepper Motors with Arduino using a GRBL CNC Shield!
 0:08:02
CNC Shield, Arduino UNO, DRV8825 - Tips for success!
 0:03:50
Drawbot coreXY bluetooth - arduino & CNC Shield
 0:06:26
GRBL vs Mach3: Which is better? CNCSourced
 0:03:12
Arduino CNC Shield V3 Điều Khiển 3 Động Cơ Bước | Linh Kiện Điện Tử Nshop
 0:01:07
Test shield CNC con Arduino
 0:00:15
Arduino CNC Shield | CNC Machine Motor Controller | Best Arduino Shield | #shorts
 0:08:57
All about Arduino CNC Shield V3.0 and A4988 Stepper Motor Driver
 0:00:36
Arduino+Cnc shield case
Комментарии