filmov
tv
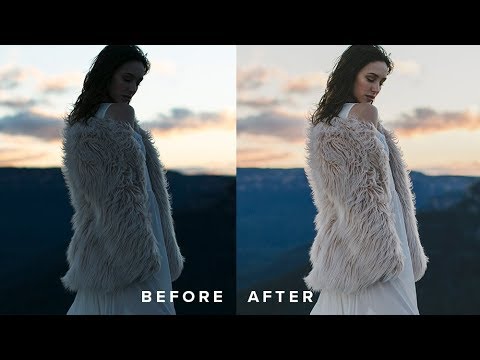
How to Edit Underexposed Photos in Lightroom Tutorial

Показать описание
Hey guys! In today's video I'm sharing with you how to brighten and balance the lighting in dark photos with a bright background in Lightroom. I shot this image in RAW format which gives your photos more information to work with, that's how I am able to lift the shadows and save the highlights :)
I'm soo excited to be sharing some new photoshoot behind the scenes in the next few weeks, first one is going up this Saturday!
--
FIND ME ON //
Dan @ I Make Films
--
MUSIC //
X by X
Soundcloud - X
Twitter - X
--
VLOG CAMERA SETUP //
Sony RX100iv
Sony a7s mkii + Sigma 24mm f1.4
PHOTOGRAPHY CAMERA SETUP //
Canon 5dmkiii
Sigma 24mm f1.4
Canon 35mm f1.4
Canon 50mm f1.2
Canon 85mm f1.2
Canon 135mm f2
--
Thank you so much for watching! xx
 0:02:50
How to Fix Underexposed Photos in Photoshop CC #2MinuteTutorial
 0:09:00
How to FIX UNDEREXPOSED PHOTO in LIGHTROOM TUTORIAL
 0:04:05
How to fix underexposed image in less than 1 minute | Adobe Photoshop | Lightroom | Photography
 0:05:52
How to Edit Underexposed Photos in Lightroom Tutorial
 0:04:15
How To Process an UNDEREXPOSED Photo in ANY APPLICATION
 0:04:23
How to Edit Over & Under Exposed Images
 0:16:00
How to recover an underexposed photo to maximize dynamic range - Adobe LightroomTutorial 4k
 0:07:30
How to Fix an Underexposed Photo in Photoshop
 0:00:23
Quick Lightroom Tips: Brighten Dark Photos #shorts
 0:03:44
How to Edit Underexposed Photos | Lightroom CC Mobile Tutorial | Pixeleyes
 0:09:18
How to pull detail out of severely underexposed photos
 0:12:24
How to Edit DARK MOODY TONES in Lightroom (Full Tutorial)
 0:01:17
How to Edit Underexposed Photos in LightroomMobile |tutorial | lightroom editing.
 0:03:06
HOW TO EDIT UNDEREXPOSED PHOTOS
 0:00:47
3 Lightroom Mobile Tips
 0:02:56
Edit Underexposed Photos Using Lightroom
 0:12:53
How To EDIT UNDEREXPOSED PHOTOS In Photoshop | Camera Raw & Lightroom Tutorial
 0:11:44
How To Edit Dark and Underexposed Photos In Photoshop
 0:05:56
How to Edit Underexposed Photos in Lightroom
 0:12:19
How To Edit Underexposed Photos in Lightroom - Lightroom 5/6 cc 2015 Post Processing Tutorial
 0:11:01
How to Edit Underexposed Photos in Lightroom Mobile | Dodge & Burn in Snapseed
 0:03:33
Edit underexposed/Dark photos in your mobile || How to edit underexposed photos || 2018 ||
 0:04:32
How to Edit Underexposed Photos in Lightroom | Lightroom Tutorial
 0:03:28
How to Brighten Dark Photos in Lightroom // tutorial
Комментарии