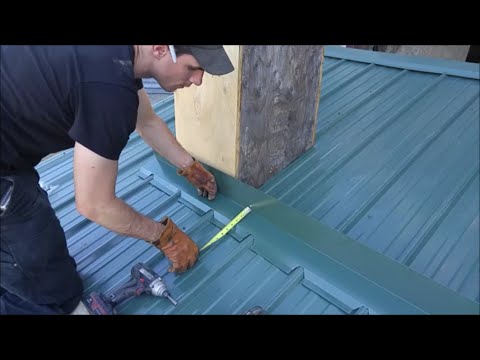
Chimney flashing on a metal roof.

preview_player
Показать описание
Have you ever scratched your head trying to figure out how to flash a masonry chimney on a metal roof? In this video we demonstrate how it can be done, this is how we like to do masonry chimneys and it works great for us, you probably will need to find a metal roofing supplier who can make custom trims, if you do not have one already, so you can order your trim with at least a 5/8’ bend for brick and block chimneys, and 3’ for stone chimneys. Enjoy!

Here are some of the tools we like to use, these can be found on amazon via the following links;

You can also get this in a 24” length for Hemming the bottoms of valley angles on standing seam.

(AKA) Hiking Boots)

I am an Amazon associate, and may earn a commission if you purchase any of the products using the links I have listed in the description.
Рекомендации по теме
Комментарии
Автор

Tim needs a raise. Thanks for the great post! Now I need to be like Tim! Easier said than done.

markmurillo
Автор

I’ve done a ton of metal and shingle roofing but never flashed a chimney. I’m quoting my first roof for a friend of mine that’s going to need 2 chimneys flashed. Watching this I feel 100% confident I can do this. Thanx for the detailed video!!

ManChildMaineiac
Автор

Amazing man. Beautiful work. Ignore the haters

loganmccallum
Автор

ok I got a few pointers for you cuz, i know but I just couldn't help it:
1. its an apron flashing, and that cut in the brick is called a 'chase' this is a chased apron.
2. when you cut the upstand back for the tabs (only need to be 50mm) on the sides, do it on a 45 instead of along the fold as you did (and cut it off here 1:45 ) and then bend this bit down flat, it helps give a little more coverage but most important this holds the silicon at the corner much better.
3. This is harder to explain without a pic but when you trim the side aprons to suit the folded tabs on the front apron, you need to stop the cut about 20mm above the fold then cut down on 45 degree to give a tab at the bottom, this leads the water away from the tiny gap in the join at centre. Also, dont cut 90 straight down to the front apron, this looks super ugly we always run down on an angle to the side.
4. when you do your side aprons at the top, fold tabs same as the front apron, I can tell you cut that and needed to put tabs on the back tray to make it work. 😉
5. we always use rivets here in nz tech screws for flashings looks rough af and def not as robust
6. We always flash up after sheets, the side aprons are then measured to suit the ribs, we always give an extra pan (dry pan) so if water ingresses the flashing it has another rib or upstand to get over before it gets in building. 
7. I would have made the back tray the same profile as the ridge cap that way it would have tied in better

looks like it should be watertight though which is the main thing 👌just a bit rough 😂

zweed
Автор

Roofers take notice this is the only way to do the job I was doing this type of flashing 60 years ago I see here on you tube some fools do not cut into the brickwork and rely on sealents to prevent water penetration. When I first started doing this type of flashing around chimneys we did not have reliable sealants so we used to roll up small pieces of lead and drive the lead into the cut bricks with a bolster for a good water penetration and 60 years later it is still the only way to go.

robertbutler
Автор

Can I ask a dumb question? (Ty so much for this video, btw!)
At 6:48, we're seeing the lower section of flashing where it overlaps the roofing sheet.
The large gap caused by the ribs in the roofing- what is preventing a nearly horizontal driving rain from blowing water up and under that gap on a roof with a less steep slope?

gertiecraign
Автор

That is great looking flashing work. But does it keep the water out if the aluminum enters horizontally and not angled? Too bad they couldn't fix that chimney first!

juliedolesh
Автор

In Poland, and probably in Europe in general, flashings are performed on a completely different level. As you present it, it was done 15 years ago.

dekergda
Автор

Awesome video how d you do plumbing stacks

nicejunk
Автор

I always wondered how to prevent water from getting behind the flashing, cutting the brick is a good idea.
but I would angle the cut slightly upwards to prevent water from draining backwards off the flashing face into the freshly cut porous brick.

halleffect
Автор

You mean to tell everyone that you are not fastening that chimney flash to the brick or rock??
F$@#ing Hilarious!!

traceyjscott
Автор

Awesome job' question. how would you do this for a woodturning stove insulated chimney using the metal sheets

horticultureing
Автор

How do you put trim flashing next a roof that touches a wall made from stucco? I don't think Stucco has enough depth to allow a circular cut. Any idea?

pingpong
Автор

Leaks in the chimney in the future thank you for the future work 😂😂😂

cuentaglock
Автор

Really nice work. That river rock is the worst.

kevindowner
Автор

How do I order that exact material?
Thank you.

elmerreynosoreynoso
Автор

An expensive brand new roof, built over an old rotten shingle roof. Brilliant !
The world of half a$$ contractors always cutting corners on the core, to make the surface look nice. AT least your chimney flashing looks nice, but will leak if you do not Polyurethane around the flashing touching the stone or brick. I have watched dozens of these so called "professional" roofers put a $40k new steel roof over an old rotten, multi layer shingle roof everytime. I would say only two home owner builders took the time to strip off the old roof, restructure it if needed, add a synthetic water proof layer and then proceed to do the job right.

Most contractors are lazy and do not care about the foundation of a good installed steel roof. They have no problem going over a crappy old roof, which says everything about their work.

m.weston
Автор

Wow I will do something else, it seems you forgot about the rain.

mrlarrybobjr
Автор

I live in PA in a house that was made in 1930. How do you do around the plumbing air vents? Do I use flashing?

devinburk
Автор

Metal roofs are a lifelong investment, sometimes double or triple the cost of a shingle roof.
It never ceases to amaze me at how lazy or short sighted most roofers are to leave the existing old shingle roof/s, layers under neath the new metal roof. Your metal roof will out live you, so why not remove the old roof, add a synthetic water proof barrier under the new steel roof? It creates numerous irritations or problems. #1 the unknown condition under the old shingles, is there rotten boards, plywood, mold, etc? #2. It creates another barrier to collect moister and or preventing house to breath easier. #3. It adds weight to the roof as long as the metal one is there. #4 what are you fastening the new roof too, old weak structure, etc? #4 if you ever want to do repairs or remodels, your fighting an old roof wile doing those repairs. #5 how do you know the roof condition underneath where you are screwing on boards for the new roof, which you might be screwing into rotten joists or wood under layment. #6 Its very unprofessional !!!

I would never suggest to any home owner to leave the old roof even at their request. How can you warranty a roof where it is fastened to layers of old asphalt that cover possible rotten wood? For very little extra money, remove the old roof, repair any flaws in the old under layment if needed, add a synthetic water proof layer and do it right. top being a lazy a$$ contractor because "you feel" it is unnecessary" because it is very necessary! I call it cutting corners.

m.weston
welcome to shbcf.ru