filmov
tv
How to Make a Reversible Bucket Hat DIY

Показать описание
PATTERN ONLY - NO WRITTEN INSTRUCTIONS
*** Print at 100% Letter Size***
In this video, I show you how to make an Easy Bucket Hat that’s fully reversible. With a few extra steps, sewing will be easier with professional results. No hand stitching needed.
This Bucket Hat Pattern fits Head size 22.5” (57cm) - one size only
The brim is sandwiched between the crown sides for a quality finish.
Quilting cotton and non woven fusible interfacing used.
Help support my channel
Copyright 2021 by Notches Sewing.
All rights reserved.
No part of this video may be reproduced or transmitted in any form or by any means, electronic or mechanical, without the written permission of the copyright holder
** BROTHER NV50S sewing machine is exclusive to ECHIDNA SEWING **
Make sure to use COUPON Code "NOTCHESNV50S" to receive a FREE pair of Echidna Fabric Scissors valued at $29.95 when your purchase this SEWING MACHINE ( used in this video)
Purchase Machine in AUSTRALIA:
FREE scissors with PURCHASE of MACHINE (Australia ONLY):
To purchase SIMILAR machine in North America:
**Tools I use****
DISCLOSURE: If you buy something through one of those links, I might get a small commission, without any extra cost to you.
#diybuckethat#buckethat#reversiblebuckethat,
Please LIKE, SHARE, COMMENT and SUBSCRIBE 🙏
Music :
Perfect Morning and Suburban Morning by Gold in June
Chapters:
00:00 Introduction
00:19 pattern placement on fabric
00:38 cutting out pattern on fabric and notches
01:10 interfacing for one side of hat
01:38 joining crown and brim at sides
02:27 pressing seams open
02:38 stay stitching and notching top edge of crowns
03:15 attaching top to crown
04:32 sewing brim and topstitching rows
06:08 attaching brim to crown lining
06:41 attaching hat to lining and brim
07:25 closing the opening of bucket hat
 0:37:23
How To Make A Reversible Collage Jacket From Two Shirts NO PATTERNS
 0:10:10
A Quick Way to Make Reversible/Lined Pants // Sewing DIY Tutorial
 0:11:01
How To Make a Reversible Top| Mix and match ankara
 0:05:26
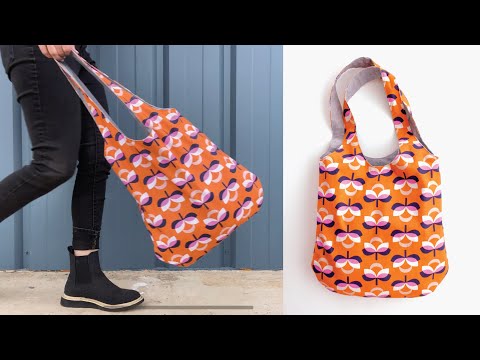
DIY reversible tote bag tutorial // @conceptsbynikki
 0:06:10
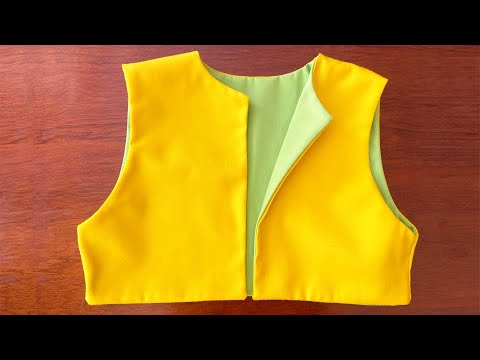
The Way To Sew A Reversible Vest Easily
 0:01:26
How to make a reversible bag. Quick and Easy Tutorial-DIY sewing
 0:08:07
How to Make a Reversible Bucket Hat DIY
 0:21:45
Diy How to make a reversible sling bag. Sewing Tutorial.
 0:00:27
Premium Italian Reversible Leather Belts 🕴️ | Celebrity Collection by Hayes London
 0:17:47
Learn how to sew a reversible fabric basket.
 0:08:24
Reversible Bag Tutorial | Pattern and Sewing
 1:19:46
How To Make A Reversible Handbag - In 5 Easy Steps!
 0:10:43
DIY - Don't Throw Away Leftover Fabrics | Make Reversible Drawstring Bag | Step By Step Tutoria...
 0:20:23
DIY // Reversible Padded Vest (Free Self Drafting Tutorial)
 0:22:55
DIY REVERSIBLE BAG + FREE PATTERN • BOHO BAG • Beginner
 0:08:07
Let's make a reversible Japanese knot bag | STAPLE SPACE STUDIO
 0:21:54
How to make a reversible heavy duty tote Strong upholstery fabric shopping bag Sew to Sell or gift
 0:18:26
How to cut and sew a Reversible Jacket ll style in 5 different ways
 0:17:53
How to make a reversible Japanese knot bag with a boxed bottom.
 0:10:15
DIY: HOW TO MAKE A REVERSIBLE ELASTIC HAIR BONNET WITH REVERSIBLE BAND.
 0:27:24
How to Make a Reversible Jelly Roll Bag | A Shabby Fabrics Sewing Tutorial
 0:12:03
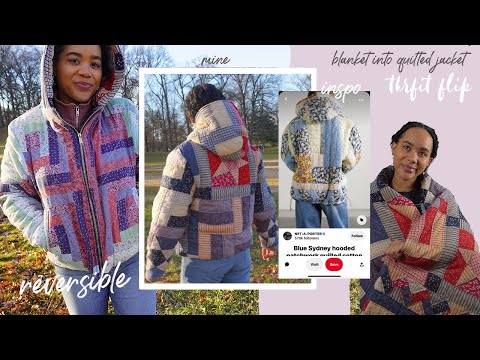
Thrifted Quilt Blanket Refashion into Reversible Quilted Jacket/Coat: Thrift-flip
 0:20:43
How to sew a reversible shopping bag that folds away. Make a reversible tote bag/grocery bag.
 0:22:43
How To Make A Reversible Dress (with pockets!) | Sewing Tutorial | Alice Dress
Комментарии