filmov
tv
How to install Chrony NTP Server on Linux | Complete NTP Configuration in Linux

Показать описание
Learn how to install and configure Chrony NTP Server on Linux. Set up accurate time synchronization for your system and network with this step-by-step guide.
To install the Chrony NTP Server on CentOS/Rocky Linux 9 and ensure precise system time synchronization, follow these steps. Begin by opening your terminal and updating the system's package repository with the command 'sudo dnf update'. This ensures you have the latest package information. Next, install the Chrony package by running 'sudo dnf install chrony'.
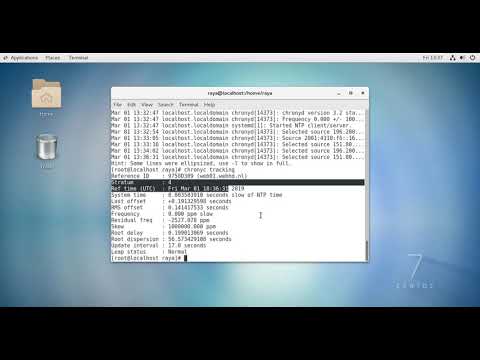
Once the installation is complete, start and enable the Chrony service using the commands 'sudo systemctl start chronyd' and 'sudo systemctl enable chronyd'. This ensures that the Chrony service starts automatically upon system boot. To verify the status of Chrony and check for synchronization, use the command 'chronyc tracking'.
Additionally, if your system is behind a firewall, ensure that UDP port 123 is open to allow NTP traffic. Adjust your firewall settings accordingly with the appropriate commands. With Chrony successfully installed, your CentOS/Rocky Linux 9 system will maintain accurate time synchronization, critical for tasks that require precision timing. Elevate your system's timekeeping capabilities with this reliable NTP server.
#centlinux #linux #linuxserver
Subscribe us for more Linux Tips & Tutorials, it is free:
Chapters:
00:00 Intro
00:05 Install Chrony NTP Server
01:10 NTP Configuration in Linux
To install the Chrony NTP Server on CentOS/Rocky Linux 9 and ensure precise system time synchronization, follow these steps. Begin by opening your terminal and updating the system's package repository with the command 'sudo dnf update'. This ensures you have the latest package information. Next, install the Chrony package by running 'sudo dnf install chrony'.
Once the installation is complete, start and enable the Chrony service using the commands 'sudo systemctl start chronyd' and 'sudo systemctl enable chronyd'. This ensures that the Chrony service starts automatically upon system boot. To verify the status of Chrony and check for synchronization, use the command 'chronyc tracking'.
Additionally, if your system is behind a firewall, ensure that UDP port 123 is open to allow NTP traffic. Adjust your firewall settings accordingly with the appropriate commands. With Chrony successfully installed, your CentOS/Rocky Linux 9 system will maintain accurate time synchronization, critical for tasks that require precision timing. Elevate your system's timekeeping capabilities with this reliable NTP server.
#centlinux #linux #linuxserver
Subscribe us for more Linux Tips & Tutorials, it is free:
Chapters:
00:00 Intro
00:05 Install Chrony NTP Server
01:10 NTP Configuration in Linux
 0:13:25
Chrony NTP Service [ Local Server ] and Client
 0:06:14
How to install Chrony NTP Server on Linux | Complete NTP Configuration in Linux
 0:10:18
Setup a Ubuntu NTP Server Using Chrony
 0:04:04
how to Install Chrony and Configure NTP server for time adjustment
 0:18:05
Configure NTP (Chronyd) Server & Client in Linux | Setup Chronyd Server in RHEL 8 |Sync System C...
 0:01:43
Install Chrony on CentOS and Ubuntu Linux
 0:03:43
How To install And configure Chrony as NTP Server And Client On Ubuntu 20.04
 0:09:51
RHCSA - Configure NTP With Chrony
 0:02:00
AlmaLinux 8 - installing Configure Chrony NTP Server
 0:02:03
Setup NTP Client, Chrony | CentOS 8 Server Setup Part #5
 0:07:19
How to Install and Configure chrony NTP in RHEL 9
 0:11:56
How to Install And Configure an NTP server and client on Linux
 0:03:08
How To ADD NTP Server Using Chronyd || LINUX
 0:02:41
Set up Chrony NTP Server | NTP Server & Client
 0:04:07
Install Chrony and Configure NTP server for time adjustment in ubuntu 16.4
 0:14:54
Network Time Server - NTP(Chrony) installation on linux
 0:03:00
Chrony NTP on OpenShift
 0:08:08
3 - Configure NTP SERVER NTPd & Chrony Debian 11
 0:09:37
How to configure NTP server & client using chrony on Rhel 8 / Centos 8
 0:09:43
Synchronizing the system clock with NTP and the chrony suite || Centos7
 0:17:39
How to configure NTP server | client using chrony on RHEL 8 in hindi
 0:07:51
How to setup a NTP server on Ubuntu
 0:03:12
CentOS 8 Server - #3 Setting NTP Client (Chrony)
 0:03:18
How to Sync Linux Time With NTP Server ✔️
Комментарии