filmov
tv
Solved : Virtualized Intel VT-X/EPT is not supported on this platform

Показать описание
In this video I am going to show How to Solved Virtualized Intel VT-X/EPT is not supported on this platform for Windows 11.
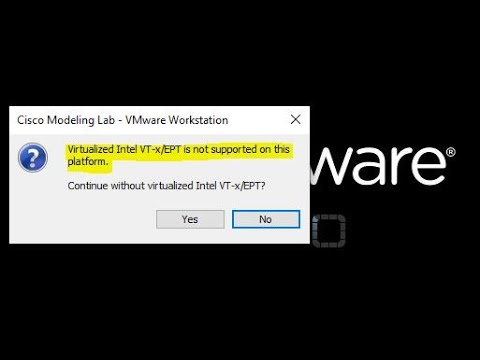
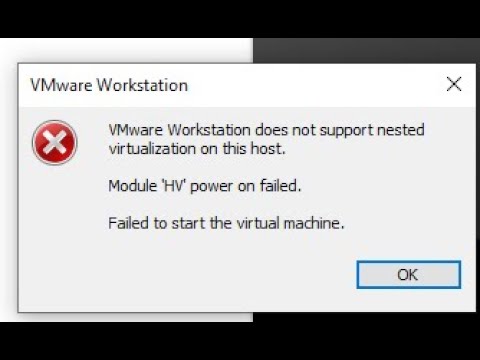
VM Power ON failure: This platform does not support virtualized Intel VT-X/EPT.
This video explains the steps taken in the waterspider lab to resolve. The VM power ON was failing with the message "Virtualized Intel vt-x/ept is not supported on this platform". More information is provided below:
VMware Workstation as a hypervisor Operating System: Windows 11
Procedures followed:
1. Disable Hyper-V via the GUI and restart the system.
2. Use systeminfo and msinfo32 to check the status of Hyper-V.
3. Deactivate the hypervisor launch type.
Command: bcdedit /set hypervisorlaunchtype off”
4. Using PowerCLI, remove all Hyper-V features.
Disable-WindowsOptionalFeature -Online -FeatureName Microsoft-Hyper-V-All
This instructions in this video tutorial can be applied for laptops, desktops, computers, and tablets which run the Windows 11 operating system like Windows 11 Home, Windows 11 Professional, Windows 11 Enterprise, Windows 11 Education. This tutorial will work on all hardware manufactures, like Dell, HP, Acer, Asus, Toshiba, Lenovo, and Samsung.
#ProgrammingKnowledge #Windows11 #vmware #vmwareworkstation #Windows11 # BootableUSB #UpdateDrivers #ChangePCName #Android
DISCLAIMER: This video and description contains affiliate links, which means that if you click on one of the product links, I’ll receive a small commission. This help support the channel and allows us to continue to make videos like this. Thank you for the support!
Topics addressed in this tutorial:
Creating a Bootable USB Drive to Install Windows 11, 10 or 8
How to Run Windows 11 From a USB Drive
 0:05:20
Solved : Virtualized Intel VT-X/EPT is not supported on this platform
 0:06:03
Virtualized Intel VT x /EPT is not supported on this platform. Fixed !!
 0:04:16
Virtualized Intel VTX or EPT is not supported on this platform
 0:09:52
How to fix Virtualized Intel VT xEPT is Not Supported on this Platform ? - step by Step Guide
 0:00:34
Virtualized Intel VT-x/EPT is not supported on this platform - Windows 11 Fix
 0:07:39
Virtualized Intel VT-x/EPT is Not Supported on This Platform - Solved
 0:02:31
Virtualized Intel vt-x /ept is not supported on this platform. Fixed!!!!
 0:05:09
Virtualized Intel VT-X/EPT is not supported on this platform
 0:03:07
Virtualized Intel VT-x/EPT is not supported.VMware does not support nested virtualization #Infomaths
 0:04:53
Fix VMware virtualization errors 'intel vt-x/ept is not supported / module hv power on failed&a...
 0:05:11
How to Fix Virtualized Intel VT x EPT is not supported on this platform
 0:01:03
Solved : Virtualized intel VT-X/EPT is not supported on this platform. VMware
 0:04:38
Virtualized Intel VT xEPT is not supported on this platform solved
 0:01:25
Virtualized Intel VT-x/EPT is not supported on this platform. FIXED!!!!!
 0:06:20
Solved !! Virtualized Intel VT x /EPT is not supported on this platform.Part 2.
 0:01:44
How to Fix Virtualized Intel VT/x EPT is Not Supported on this Platform
 0:03:50
Vmware ESXi Module 'HV' power on failed. Virtualized Intel VT-x/EPT is disabled solution
 0:04:43
🔴 Vmware : Solution de l'erreur VIRTUALIZED INTEL vt-x/ept is not supported on this platform
 0:03:04
Solution of VmWare does not support nested virtualization on this host. Module hv power on fail.
 0:01:26
How to Enable VT feature in BIOS | Intel VT-x/EPT or AMD-v/RVI
 0:01:56
Fix VMware 'This host supports Intel VT-x, but Intel VT-x is disabled' in Windows 11 / 10 ...
 0:05:18
How to solve virtualize intel vt-x/ept or amd-v/rvi
![[FIX!!] Virtualized Intel](https://i.ytimg.com/vi/iP2_Ms1V4zo/hqdefault.jpg) 0:00:55
0:00:55
[FIX!!] Virtualized Intel VT-x/EPT Error
 0:05:33
Virtualized Intel VT-X EPT is not supported on this platform
Комментарии