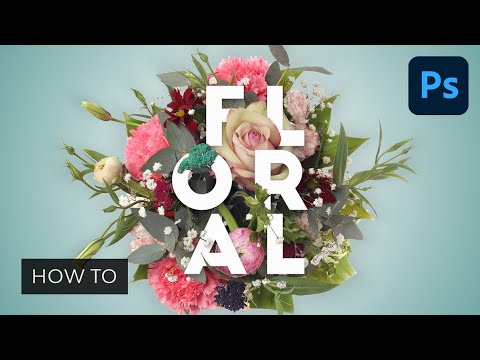
Create a Floral Typography Text Effect in Photoshop CC

preview_player
Показать описание
This Photoshop tutorial is all about how to create a cool effect where type is intertwined through a floral bouquet. We’ll cover how to layer masks and shadows to build a complex effect that has depth and shape. We will also create a type of parchment paper beneath the floral design to make sure the whole effect sits on a beautiful background.

🔥 ↓ VIDEO GUIDE ↓ 🔥
00:31 Getting started
02:09 Extending the canvas
02:56 Adding the background first
03:34 Making the border
06:00 Masking away the overlapping flowers
09:51 Adding the letters
12:44 Making the border and flower shadow
14:54 Adding shadows to overlapping flowers
20:45 Adding shadows to overlapping text
23:07 Tucking the text into the flowers/bouquet
26:08 Adding more shadow to the text to blend it in
29:05 Adding the accent text
32:07 Sharpening effect
33:44 Adding grain to create a paper texture

INSTAGRAM, SNAPCHAT, & MORE:

CREDITS:

Рекомендации по теме
Комментарии
Автор

8:15- instead, use the quick mask tool to select the bits of flower then paint on the layer mask outside of the flower selection. much quicker and cleaner then manually painting in a mask.

yoyoz
Автор

Your creation and skill are just wonderful.I wanna learn more.

kaungthantthu
Автор

While I’m not a Photoshop person, this has given me mad inspirational ideas to try out in Affinity Photo! I’ve been watching a lot of your tut’s on both Photoshop as well as Premiere pro and appreciate the level of in-depth that you go into!

greghyatt
Автор

This tutorial has been an absolute game changer for me, I was stuck not knowing how to create this effect for some projects I was working on until I found this video. I've watched this a number of times, easy to follow and packed full of useful tips and tricks. Made a massive difference with how I use Photoshop! Thanks so much

elysepryor
Автор

These are the kinds of tutorials I like! I love this kind of design

razzerraw
Автор

This tutorial was well detailed. Earned a sub. I can confirm this is legit.

kabulique
Автор

Hey ! I really like your channel and all of the tutorial. It's easy to understand and very detail.

sifrazipora
Автор

Thank you for your complete and comprehensive training. Very good!

forbiddivespirit
Автор

Really great video ! One of the best tutorial I have ever seen. You're not missing anything, every action, every shortcut, every pannel or effect are explained. I really enjoyed it. Thanks.

reizhskrivadenn
Автор

I've been somewhat haphazard in my use of layer masks, but the way you shown using them here has given me great ideas in how they can work for me a lot better. Gotta get that workflow. Thanks!

emilylaurelletappan
Автор

Hey man, It works great and without any problems.

gamesstatusglerygames
Автор

Really liked your video and was easy to follow you step by step. Great Job thanks a lot! 👍🏾👌🏾

anitagreen
Автор

That selection of layers, then ctrl+alt+e, (around 33:00) was a great tip! I've used ctrl+shift+alt+e (stamp visible) many times, but his was subtly different and very useful, and worked really well for the high pass filter. The grain effect worked nicely as well.

BintyMcFrazzles
Автор

why doesn't this have like a 100 million btw great tutorial

anfffff
Автор

I'll have to watch this video 1000 times to get it down in my head! LOL! 😙

charlesbishop
Автор

The best photoshop tutorials on YouTube. Thank you!

jussiahola
Автор

Hit the 3-dot symbol to open up the toolbar menu - then click "done" while holding down shift+ctrl. I love that they added it! xD
(to undo it, just hit "done" regularly, iirc - I'll probably keep it forever, though.)

Shrinidhi-ys
Автор

I've seen this design all over tumblr and now I know where the trend has come from. :D Awesome work!

ms.dreavus
Автор

I'm a designer myself, always looking to learn more to improve my skills. Watched this entirely for fun and definitely picked up a lot of good techniques. I'm subscribing for sure. Also: I saw 6 people gave it a thumbs down...I wish they could state their reasoning behind that lol. Great work.

paoloduarte
Автор

Creating Floral Typography:

Sub Processes

-Stock Floral Photo Or take picture on white bedsheet

Masked off white background:
Select--->Select colour range
Select whites
play with fuzziness slider until it sounds good
Covert to smart object to Bake Mask Into it
(*Double click on Layer to see layer with kayer mask)

Expand Canvas Size Quickly
Crop Tool (C)
Hold down Alt
Drag Handles

Rotate Image
Cntrl T (transform)
Then Just grab on to it and twist
Press the check icon to commit change

Add Colour Fill background Method 2

Click on Moon Icon Half circle Icon on Bottom right (By look up colour)
Choose Solid Colour
When you commit change the background is automatically filled

Add Rectangle
Rectangle Tool
Draw

Make Rectangle BOX WITHOUT Fill
Rectangle Tool
Draw
Go to Fill Option on top bar
Press the little slash Icon

Stroke
Change from 10 pixel to 80 Pixel stroke
Stroke Options: Apply stroke to Outside

Make Shadow of Border/rectangle
Drag layer mask to trash can
Place beneath flowers
Layer--> Layer style --> Drop shadow
-Set blend mode back to normal
-Color 100
-Sample colour by click on color box and then using the colour picker to click desired sample area
-uncheck use global light
-Set to angle of 90 degrees
-Fuk my bitch
-Set distance (shadow distance) to 300 pixels
-Crank size to at least 100 pixelss
-Take opacity down to like 40 or 50

Back to layer settings
-Set fill opacity to 0
Note: FILL Opacity vs Regular Opacity
Fill Opacity allows you to hide the contents of the layer, but the layer style will still be there. Regular opacity would make everything dissapear.


* Shadow for Flowers

Just Copy layer style --> Paste Layer Style
But we must adjust the fill opacity back to normal

Shadow for Flowers That are in front of the border

Tips:

* We hand Paint these because drop shadow would be applied everywhere
* *Paint as though the Text isn't there. Completeness


Step A: Painting in shadows On top of the Border(makes sense later)


* Select Brush Tool
* Right Click and get you a Soft Edged brushed
* You can use the bracket keys to adjust
* Go Pretty large
* Set opacity to about 20%
* Paint in where you think the shadows should go or work


Step B Blur the shadow dem (makes sense later)
Tips:

* The shadows are in front at first but we need to do is blur it

Settings:

* Fliter --> Blur --> Gausean Blur
* Settings: 20-30 Pixels or so


Step C: Putting Shadows Behind the border

Tips:

* Bit Confusing but what we do here is


* Painting in white on a Layer mask

Settings:

* Add Layer Mask to Shadow layer we just made
* Load mask for orginal border layer (not sure how)
* Select ---> Inverse selection
* Paint with white brush on opacity 100%. Paint out shadows hanging out ahead of your border.
* Still Messy because we used outer stroke and there are stuff outside


Step D: Cleaning up
Explaination:

* Basically we are trying to first get the selection we want in a crafty way
* We want to select everything except the border
*


Duplicate border once more
Delete associated Mask layer again
Rasterize layer
Drag new border layer on top
Load a selection of your Exact Border [Cntrl click border]
Select everything except border by using Cntrl shift I (inverse selection)

Go to flower shadows layer
Foreground colour black
Fill Mask layer of Flower Shafow with black
hold down alt back space
Hit cntrl D


cot damn nigga this is a lot work

Move Shape Anyhow
Edit ---> Free Transform
Stretch and dat

Basic Movemnt
Select layer (layers) then drag items

Add a mask to a layer
Click Layer
press New Mask Icon (bottom right menue next to half moon icon)
[ A layer mask in Photoshop is used to control a layer's transparency. It's great if you wish to reveal or hide portions of a layer using a mask. While you can use the Transparency control to adjust the opacity of a layer, using a mask gives you a lot more flexibility in what you show, and what you hide.]

Then you can paint with your foreground colour set to white

Basically the mask layer was so that he could make it look the flowers were infront of the border at some bits and that.


Change Brush Size
Right Click
*Left and right bracket key to change size quickly


Shortcuts
X Switch between Foreground and background Colour

R rotate image

Press and Hold R key and when you let go gwan back to your previous tool

Bracket Keys Change brush size

CNTRL G to group layers

Video:
Text size was 275
Add Each Letter in it's own layer


Applying str

Tips:
Think in layers

We have to consider the pieces of an object that come in front of other objects and behind of other objects differently


Jargon:
A layer mask in Photoshop is used to control a layer's transparency. It's great if you wish to reveal or hide portions of a layer using a mask. While you can use the Transparency control to adjust the opacity of a layer, using a mask gives you a lot more flexibility in what you show, and what you hide

FILL Opacity vs Regular Opacity
Fill Opacity allows you to hide the contents of the layer, but the layer style will still be there. Regular opacity would make everything dissapear.

benja
welcome to shbcf.ru