filmov
tv
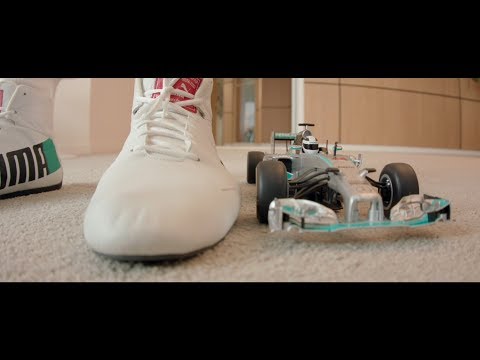
Building Senna's MP4/6 Full Build McLaren Fujimi 1/20 F1 Scale Model

Показать описание
Here is a full build compilation of the Fujimi McLaren MP4/6 1/20 scale model kit as driven by Ayrton Senna in the 1991 San Marino GP. If you'd like to watch the longer videos:
A few things to note:
1.) This Fujimi kit is known for having a bad fit. I had sanded the inside of the engine cover to create space, but neglected the monocoque which should have also been sanded to allow room for the added wiring. The end result is the cover did not close completely so I decided to display the car with the cowl off.
2.) The front suspension sits quite high and requires modification to lower the car to a normal ride height. I have detailed the steps in a recent post.
3.) My camera had trouble picking up the true appearance of the fluorescent red. It's a bit darker and more red in person, however it looks brighter and more orange in the video.
4.) I recently got a new fan for my spray booth which is 20dB quieter and will no longer have that loud drone during painting clips.
Add-Ons:
Top Studio Cockpit Detail Set
Top Studio Air Funnel Set
Top Studio Antenna Set
Hobby Design MP4/6 Brake Set
MSM Creation Sponsor Decals
Scale Motorsports Carbon Fiber Decals
(Tamiya, Model Factory Hiro, Top Studio, Fujimi, detail sets, decals, along with reference materials)
Mention Ziggy’s Desk for a 5% discount
Tools and Supplies used:
HiQParts Decal Squeegee
GodHand Small Brush
Tamiya Sanding Sponges
As an Amazon Associate I earn from qualifying purchases.
00:00 Unboxing
00:20 Primer
00:42 Base Coat
01:07 Masking
01:42 Fluorescent Red
02:35 Decals
03:24 Clear Coat
04:03 Sanding/Polishing
06:08 Carbon Fiber Decals (Undertray)
08:53 Dry Brush Weathering (Undertray)
09:41 Carbon Fiber Decals (Monocoque)
11:19 Top Studio Cockpit Detail Set
15:29 Electronic Connectors
17:18 Engine
19:55 Brakes
21:08 Assembly
23:35 Tires
25:29 Finish
 0:26:28
Building Senna's MP4/6 Full Build McLaren Fujimi 1/20 F1 Scale Model
 0:35:59
McLaren MP4/7 HONDA / TAMIYA 1/20 Formula1 / Scale Model / Ayrton Senna / full build / F1
 0:21:06
FULL VIDEO BUILD► MCLaren mp4/6 ►FUJIMI 1/20
 0:07:09
Mclaren MP4/6 1/12 scale model (Tamiya) complete build details
 0:00:19
Mr. Bean Disliked That 😬
 1:16:08
Disassembling The Greatest F1 Car With The Men Who Made It - The 1988 Prost / Senna McLaren MP4/4
 0:00:09
Unboxing Fujimi's McLaren Honda MP 4/6 Ayrton Sennas last championship F1 car
 0:15:41
Senna's McLaren Honda Mp4/4 - part 4 - V6 turbo engine - how to build 1/20 Tamiya with photo et...
 0:14:29
Senna's McLaren Honda Mp4/4 - Part 5 - Senna figure, wheels and wings - how to build the Tamiya...
 0:05:30
Fixing LEGO's McLaren MP4/4 mistake: The tire upgrade test
 0:06:51
Building and converting the 1:20 Tamiya McLaren MP4/5
 0:01:37
Lewis Hamilton vs. The Unexpected
 0:16:27
I built Ayrton Senna's final F1 car - 1/20 Williams Renault FW16 - Fujimi
 0:00:58
F1 1992 Ayrton Senna saves Erik Comas in Lego / Belgian GP
 0:19:14
Tamiya - 1988 McLaren Honda MP4/4 1/20 (Ayrton Senna) Part7
 0:05:32
Tamiya mclaren mp4/6 and top studio super detail set.
 0:00:27
I Finally Tracked Stradman😭#shorts #itsdanielmac #thestradman
 0:11:25
From 44 to 49: Journey of Senna Mclaren Scale Model Build
 0:00:22
Honda owners be like
 0:36:21
McLaren Senna | Scale model build | Step by step | Tamiya | 1/24 | ASMR
 0:00:39
fastest F1 Top Speed ever ( 378km)
 0:00:27
3D printed McLaren Honda MP4/6 #Short
 0:01:35
Ayrton Senna's McLaren Honda MP4/4 1:8 Scale Model Kit From ModelSpace
 0:12:06
Senna's McLaren Honda Mp4/4 - part 1 - how to build the Tamiya 1/20 model kit - monocoque and f...
Комментарии