filmov
tv
How Run Two Versions of macOS from External SSD

Показать описание
How To Dual-Boot Mac Run Two Versions of macOS on a Mac. How To Dual Boot macOS Sierra and El Capitan from an External SSD. Run macOS Sierra and El Capitan From an External SSD. Dual Booting macOS Sierra and El Capitan on an External USB 3.0 SSD.
Install and Run macOS Sierra From An External SSD:
How To Create macOS Sierra 10.12.0, 10.12.1 10.12.2 & 10.12.3 USB Boot Disk:
Download macOS Sierra for Free from the Mac App Store when released this fall or if you have a paid Developer License, Download Now from Apple's Developer Website or wait till July to download Public Beta Preview.
*Buy on Amazon*
(affiliate links):
My Storage Devices
(affiliate links):
Recommended Gear
(affiliate links):
Follow me on:
Performed and Tested On MacBook Air (13-inch, Mid 2012) on Samsung V-NAND SSD 850 EVO installed in External USB 3.0 Enclosure and Lexar 32GB USB 2.0 JumpDrive P10. Using OS X El Capitan 10.11.5, macOS Sierra Developer Preview 10.12, macOS Sierra 10.12 & 10.12.1 Official Release.
The Samsung V-NAND 850 EVO SSD was installed in External USB 3.0 Enclosure.
Apple's Intel Based Systems:
Mac Mini
iMac
Mac Pro
MacBook Air
MacBook Pro
TRANSCRIPT:
We've already shown on the previous episode, how to install and run macOS Sierra on an external SSD.
We're now going to create an additional partition on the external SSD, in order to dual boot macOS Sierra and El Capitan.
Soooooo, Let's Get Started.
As usual, since we'll be using Disk Utility, make sure you have or made a backup of your system hard drive or drives before proceeding.
Continuing on, after inserting the SSD in an available USB socket, open Disk Utility.
Now, click on the SSD header in the sidebar, then click the Partition button shown here.
To create an additional partition, click the plus sign button shown here and then name the Partition to whatever you like and make sure that the default format is OS X Extended (Journaled), alternatively, to delete the partition simply click the minus button.
Once satisfied with your choice, click the Apply button to create the new partition.
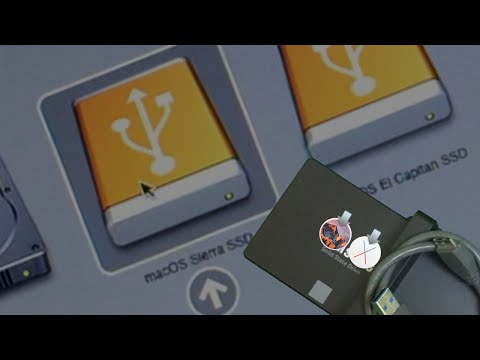
Now, close Disk Utility and simply launch the macOS El Capitan installer and choose to install on the newly created partition, which, in my case, is named macOS El Capitan SSD.
The remaining installation process, is exactly the same, as was shown in the previous episode.
In summary, after the installation process has finished, El Capitan boots to the Desktop, where, you can optionally set the default startup disk, to that of your Mac system drive after turning on your Mac
Once that's taken care of, anytime you want to run macOS Sierra or El Capitan from the SSD, simply shutdown the Mac and proceed with the power and Option key combination, to boot to the Startup Manager and click the macOS, on the SSD, that you want to boot to.
And that's all there is to it.
Thanks for watching and thumbs-up if you liked this video, and please, don't forget to click that subscribe button, to be notified of the next episode.
Thanks and Peace.
Install and Run macOS Sierra From An External SSD:
How To Create macOS Sierra 10.12.0, 10.12.1 10.12.2 & 10.12.3 USB Boot Disk:
Download macOS Sierra for Free from the Mac App Store when released this fall or if you have a paid Developer License, Download Now from Apple's Developer Website or wait till July to download Public Beta Preview.
*Buy on Amazon*
(affiliate links):
My Storage Devices
(affiliate links):
Recommended Gear
(affiliate links):
Follow me on:
Performed and Tested On MacBook Air (13-inch, Mid 2012) on Samsung V-NAND SSD 850 EVO installed in External USB 3.0 Enclosure and Lexar 32GB USB 2.0 JumpDrive P10. Using OS X El Capitan 10.11.5, macOS Sierra Developer Preview 10.12, macOS Sierra 10.12 & 10.12.1 Official Release.
The Samsung V-NAND 850 EVO SSD was installed in External USB 3.0 Enclosure.
Apple's Intel Based Systems:
Mac Mini
iMac
Mac Pro
MacBook Air
MacBook Pro
TRANSCRIPT:
We've already shown on the previous episode, how to install and run macOS Sierra on an external SSD.
We're now going to create an additional partition on the external SSD, in order to dual boot macOS Sierra and El Capitan.
Soooooo, Let's Get Started.
As usual, since we'll be using Disk Utility, make sure you have or made a backup of your system hard drive or drives before proceeding.
Continuing on, after inserting the SSD in an available USB socket, open Disk Utility.
Now, click on the SSD header in the sidebar, then click the Partition button shown here.
To create an additional partition, click the plus sign button shown here and then name the Partition to whatever you like and make sure that the default format is OS X Extended (Journaled), alternatively, to delete the partition simply click the minus button.
Once satisfied with your choice, click the Apply button to create the new partition.
Now, close Disk Utility and simply launch the macOS El Capitan installer and choose to install on the newly created partition, which, in my case, is named macOS El Capitan SSD.
The remaining installation process, is exactly the same, as was shown in the previous episode.
In summary, after the installation process has finished, El Capitan boots to the Desktop, where, you can optionally set the default startup disk, to that of your Mac system drive after turning on your Mac
Once that's taken care of, anytime you want to run macOS Sierra or El Capitan from the SSD, simply shutdown the Mac and proceed with the power and Option key combination, to boot to the Startup Manager and click the macOS, on the SSD, that you want to boot to.
And that's all there is to it.
Thanks for watching and thumbs-up if you liked this video, and please, don't forget to click that subscribe button, to be notified of the next episode.
Thanks and Peace.
 0:01:31
How To Run Two Different Versions of Chrome At The Same Time
 0:01:43
How To Install and Run Multiple Versions of the Same Program like Telegram, Skype on Windows
 0:02:30
Install/Run different Blender versions AT THE SAME TIME (2.91, 2.90, 2.79, 2.8, 2.81, 3.0...)
 0:02:38
How Run Two Versions of macOS from External SSD
 0:07:00
How to install and run two different versions of same app on Android mobile like alfa
 0:04:15
How to Run Two Versions of Rocket League for Basic Testing | RLMM Tutorial #17
 0:03:22
How To Run Two Different Versions Of An App In A Single Phone
 0:01:35
Unix & Linux: Run two Versions of Windows In one PC (2 Solutions!!)
![[How] Run Multiple](https://i.ytimg.com/vi/mbuyCU9wVhA/hqdefault.jpg) 0:02:39
0:02:39
[How] Run Multiple Versions of Firefox at Same Time | Ubuntu 18.04
 0:13:35
How to run two versions of a program, and wooden icons for free download
 0:04:02
How to run multiple versions of Python in Cloud Run
 0:01:26
Windows : How to run multiple versions of PHP on IIS simultaneously
 0:03:24
How to install and run two different versions of same app on Android | Technohub Yogesh | In Hindi
 0:05:28
HOW TO RUN DIFFERENT VERSIONS OF SAME APP ANDROID LIKE 8 BALL POOL
 0:12:27
Should You EVER Use 32-Bit Versions of Apps? (Yes Actually)
 0:10:18
How to Run Multiple Versions of Microsoft Office on One Computer
 0:07:59
How to run multiple xampp with multiple php version || Codeplaners
 0:01:48
Can I run two versions of Opera with independent cookies? (3 Solutions!!)
 0:06:39
How to run Multiple PHP version on Xampp in Windows 7/8/8.1/10 | 2021 | veTechno
 0:11:00
Run multiple versions of PHP in Windows
 0:03:23
Run 2 (or more) Copies Of The SAME Version Of Blender Great For Addons Developers And Teachers
 0:05:41
How to run multiple Python versions on Windows
 0:07:09
Vintage Story 'How do I.....Run multiple versions of the game?'
 0:15:50
How to dual boot Mac: Run two versions of macOS Catalina & macOS Mojave on a Mac | Easy Steps 20...
Комментарии