filmov
tv
Como Fazer | Fermento natural - Sourdough Starter - Levain

Показать описание
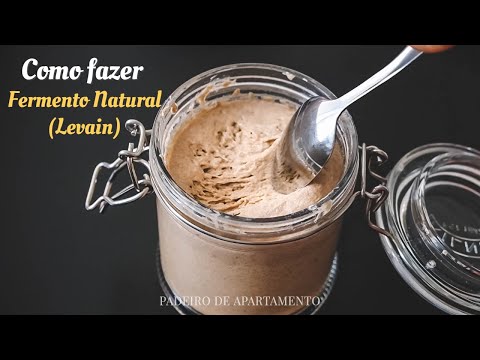
Fermento natural é uma massa que contém levedura selvagem e bactérias (presentes naturalmente no ambiente e nos cereais) que é usada para fazer pão e outras massas lêvedas. O fermento selvagem produz dióxido de carbono (e também um pouco de álcool) para deixar o pão arejado. São as bactérias que dão ao pão o sabor azedo, porque transformam o amido da farinha em ácido láctico, ácido acético e álcool.
Utilizamos farinha de trigo T65, mas aconselho a utilização sempre que possível de farinha de centeio ou trigo integral (T150), durante os primeiros dias. Farinhas orgânicas são também uma boa opção.
Certifique-se que a água que usa não contém cloro. Grande parte da água que sai das nossas torneiras contém cloro, que é usado para matar as bactérias etc. e será prejudicial para o que queremos. O ideal será usar àgua mineral ou em alternativa, coloque a àgua da torneira num recipiente sem tampa e passado 24hr pode usar, pois o cloro terá evaporado.
DIA 1
Coloque num frasco pequeno e limpo 50 gr de farinha e 50 gr de água, mexa bem e tape mas sem vedar, (o objectivo é que a massa respire) guarde durante 24hr à temperatura ambiente e protegido da luz solar.
DIA 2
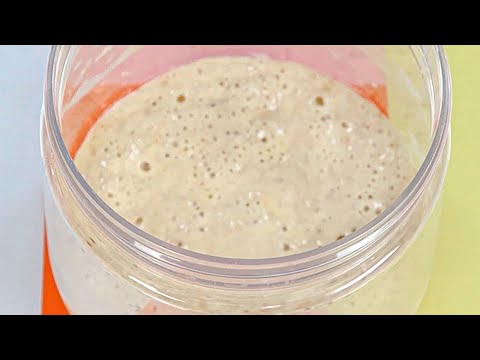
Podem começar a surgir algumas bolhas. Coloque mais 50 gr de farinha e 50 gr de àgua. Mexa e guarde como no dia anterior.
DIA 3
A mistura deverá apresentar ainda mais bolhas e estar mais ativa. Remova 2/3 do fermento e repita o procedimento e quantidades do dia 2. Refresque a massa ou alimente-a com nova farinha e água.
DIA 4
Nota-se algum progresso relativamente ao dia anterior, no entanto deverá ser "refrescada/alimentada" uma vez mais. Repita o procedimento do dia anterior e refresque com mais TPT (tanto por tanto) 50gr farinha e 50 gr de água(sempre tépida).
DIA 5
Se a massa flutuar é sinal que está pronta para usar. Após cada utilização tem duas opções para a manutenção do fermento natural, ou coloca no frio o restante que ficou no frasco (NUNCA pode usar tudo ou terá de recomeçar o processo de novo) e refresca 12hr antes da utilização ou faz isto antes e coloca no frio até à próxima vez que precisar. Estando no frio aguenta uma semana sem ser alimentado e fora do frio 2 a 3 dias.
Nota: caso não consiga os mesmos resultados aqui obtidos e o seu fermento não se desenvolver tão rápido pode ser devido a diversos factores (farinha, temperatura ambiente etc...) não desista e repita os procedimentos do dia 3 até conseguir que a massa flutue e/ou dobre de tamanho de um dia para o outro.
Natural yeast is a dough that contains wild yeast and bacteria (naturally present in the environment and in cereals) that is used to make bread and other yeast doughs. Wild yeast produces carbon dioxide (and also a little alcohol) to make bread airy. It is the bacteria that give bread the sour taste, because they transform the flour's starch into lactic acid, acetic acid and alcohol.
In this video we use wheat strong flour, but I advise the use whenever possible of rye flour or wholemeal wheat flour, during the first days. Organic flours are also a good option.
Be sure to use water which does not contain chlorine. Water companies sometimes add a little chlorine to your tap water to kill all bacteria and probably also the yeast in the water, so it is not a good idea to use this for building a sourdough starter. If in doubt you can use bottled water.
DAY 1
Place in a small clean jar 50 g of flour and 50 g of water, stir well and cover without sealing, (the goal is to let the dough breathe) store for 24 hours at room temperature and protected from sunlight.
DAY 2
Some bubbles may start to appear. Put another 50 g of flour and 50 g of water. Stir and store as before.
DAY 3
The mixture should have even more bubbles and be more active. Remove 2/3 of the starter and repeat the procedure and quantities of day 2. Refresh the dough or feed it with new flour and water.
DAY 4
Some progress is noted in relation to the previous day, however it should be "refreshed / fed" once again. Repeat the procedure from the previous day and refresh with more 50gr flour and 50g water (always warm).
DAY 5
If the dough floats it is a sign that it is ready to use. After each use you have two options for the maintenance of the starter, or put the remainder in the jar in the fridge (you can NEVER use everything or you will have to start the process again) and refresh 12hrs before use or do this before and put it in the fridge until the next time you need it. Being in the refrigerator it can last a week without being fed and out of the fridge 2 to 3 days.
Note: if you do not get the same results here and your yeast does not develop so fast it may be due to several factors (flour, room temperature etc ...) do not give up and repeat the procedures on day 3 until you get the dough to float and / or double in size overnight.
Utilizamos farinha de trigo T65, mas aconselho a utilização sempre que possível de farinha de centeio ou trigo integral (T150), durante os primeiros dias. Farinhas orgânicas são também uma boa opção.
Certifique-se que a água que usa não contém cloro. Grande parte da água que sai das nossas torneiras contém cloro, que é usado para matar as bactérias etc. e será prejudicial para o que queremos. O ideal será usar àgua mineral ou em alternativa, coloque a àgua da torneira num recipiente sem tampa e passado 24hr pode usar, pois o cloro terá evaporado.
DIA 1
Coloque num frasco pequeno e limpo 50 gr de farinha e 50 gr de água, mexa bem e tape mas sem vedar, (o objectivo é que a massa respire) guarde durante 24hr à temperatura ambiente e protegido da luz solar.
DIA 2
Podem começar a surgir algumas bolhas. Coloque mais 50 gr de farinha e 50 gr de àgua. Mexa e guarde como no dia anterior.
DIA 3
A mistura deverá apresentar ainda mais bolhas e estar mais ativa. Remova 2/3 do fermento e repita o procedimento e quantidades do dia 2. Refresque a massa ou alimente-a com nova farinha e água.
DIA 4
Nota-se algum progresso relativamente ao dia anterior, no entanto deverá ser "refrescada/alimentada" uma vez mais. Repita o procedimento do dia anterior e refresque com mais TPT (tanto por tanto) 50gr farinha e 50 gr de água(sempre tépida).
DIA 5
Se a massa flutuar é sinal que está pronta para usar. Após cada utilização tem duas opções para a manutenção do fermento natural, ou coloca no frio o restante que ficou no frasco (NUNCA pode usar tudo ou terá de recomeçar o processo de novo) e refresca 12hr antes da utilização ou faz isto antes e coloca no frio até à próxima vez que precisar. Estando no frio aguenta uma semana sem ser alimentado e fora do frio 2 a 3 dias.
Nota: caso não consiga os mesmos resultados aqui obtidos e o seu fermento não se desenvolver tão rápido pode ser devido a diversos factores (farinha, temperatura ambiente etc...) não desista e repita os procedimentos do dia 3 até conseguir que a massa flutue e/ou dobre de tamanho de um dia para o outro.
Natural yeast is a dough that contains wild yeast and bacteria (naturally present in the environment and in cereals) that is used to make bread and other yeast doughs. Wild yeast produces carbon dioxide (and also a little alcohol) to make bread airy. It is the bacteria that give bread the sour taste, because they transform the flour's starch into lactic acid, acetic acid and alcohol.
In this video we use wheat strong flour, but I advise the use whenever possible of rye flour or wholemeal wheat flour, during the first days. Organic flours are also a good option.
Be sure to use water which does not contain chlorine. Water companies sometimes add a little chlorine to your tap water to kill all bacteria and probably also the yeast in the water, so it is not a good idea to use this for building a sourdough starter. If in doubt you can use bottled water.
DAY 1
Place in a small clean jar 50 g of flour and 50 g of water, stir well and cover without sealing, (the goal is to let the dough breathe) store for 24 hours at room temperature and protected from sunlight.
DAY 2
Some bubbles may start to appear. Put another 50 g of flour and 50 g of water. Stir and store as before.
DAY 3
The mixture should have even more bubbles and be more active. Remove 2/3 of the starter and repeat the procedure and quantities of day 2. Refresh the dough or feed it with new flour and water.
DAY 4
Some progress is noted in relation to the previous day, however it should be "refreshed / fed" once again. Repeat the procedure from the previous day and refresh with more 50gr flour and 50g water (always warm).
DAY 5
If the dough floats it is a sign that it is ready to use. After each use you have two options for the maintenance of the starter, or put the remainder in the jar in the fridge (you can NEVER use everything or you will have to start the process again) and refresh 12hrs before use or do this before and put it in the fridge until the next time you need it. Being in the refrigerator it can last a week without being fed and out of the fridge 2 to 3 days.
Note: if you do not get the same results here and your yeast does not develop so fast it may be due to several factors (flour, room temperature etc ...) do not give up and repeat the procedures on day 3 until you get the dough to float and / or double in size overnight.
 0:04:28
Como fazer fermento natural (ou levain, sourdough starter) | Padeiro de Apartamento
 0:11:12
COMO FAZER FERMENTO NATURAL LEVAIN
 0:07:25
Como fazer Fermento Natural
 0:36:15
Como fazer o FERMENTO NATURAL !!! LEVAIN !!! Receita simples... Sem complicação !!!
 0:07:49
LEVAIN: como fazer fermento natural para pão caseiro | Rita Lobo | Cozinha Prática
 0:03:49
O que é o fermento natural, e como fazer levain do zero. – CANAL SENAI-PADACON
 0:04:07
Como fazer Fermento Natural PÃO DE CRISTO FEITO COM FERMENTAÇÃO NATURAL Culinária em Casa
 0:19:11
Como fazer o Fermento Natural !!! Levain !!! Utilize 300 g para cada quilo de farinha !!!
 0:00:56
Fermento natural #fermentacaonatural #fermentonatural #food #receita #foryou #shortvideo #shortvideo
 0:08:33
Fermento Natural Levain Para Iniciantes Sem Descarte
 0:24:32
COMO FAZER FERMENTO NATURAL - LEVAIN - PARA PIZZAS E PÃES
 0:13:36
Como fazer fermento natural - Levain
 0:00:12
Fermento natural, como fazer?
 0:14:12
Aprenda a Fazer seu Fermento Natural Sem Glúten | Levain
 0:09:00
COMO FAZER FERMENTO NATURAL DE MAÇÃ SEM GLÚTEN (levain, massa madre, massa mãe)
 0:34:01
Como Fazer Fermento Natural /Sourdough Starter / Passo a Passo #fermentonatural #sourdoughstarter
 0:08:14
Como fazer fermento natural (LEVAIN, SOURDOUGH, LIEVITO MADRE, MASSA MADRE)
 0:02:12
COMO FAZER FERMENTO NATURAL | LEVAIN PARA PÃES
 0:01:01
Fermento natural facil e rápido #massamae #massamadre #fermentonatural
 0:30:37
COMO FAZER FERMENTO NATURAL SEM GLÚTEN | LEVAIN SEM ACIDEZ | SEM DESCARTE
 0:13:45
Como fazer fermento Natural de maçã
 0:15:38
FERMENTO NATURAL LEVAIN sem glúten | O Guia mais completo da massa madre!
 0:05:57
MEU LEVAIN LEVOU 8 DIAS PARA FICAR PERFEITO! - VEJA COMO É SIMPLES FAZER UM FERMENTO NATURAL DO ZERO...
 0:00:26
FERMENTO NATURAL DE BATATINHA
Комментарии