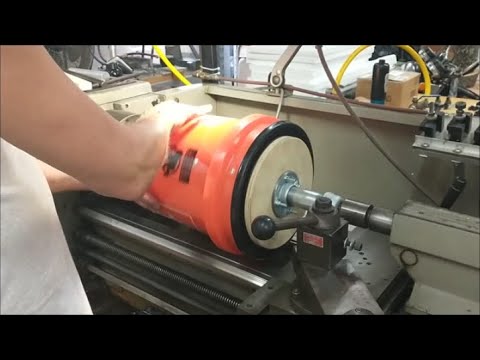
Deburr Your Parts Like a Pro ! --SHOP GEM Included--

preview_player
Показать описание
This video is your introduction to abrasive fiber wheels for deburring and finishing. Once you see the results and speed, I bet you make the investment. I also included a shop gem. Take a Look !!!
Рекомендации по теме
Комментарии
Автор

Dressing the flap-wheel by reversing it - pure genius!!! I have a couple that I was going to throw out as they were so badly grooved. Thanks again Joe, you never disappoint.

ChrisMower
Автор

It’s always a learning experience watching your videos. Thanks for sharing your knowledge. Enjoy your holiday.

magiclarry
Автор

Improve the performance of a wire wheel by reversing it occasionally. The wires get worn in one direction. When reversed, it has sharp, pointed wires that are very aggressive until they get worn down then its time to reverse it again. Try it and be surprised at the difference. 👍🏻. 🇺🇸😎

dannyakatrikerred
Автор

Here is a tip for the home shop guys who don't have the $ to drop on the wheels available commercially and aren't doing tons of work and just need to clean up a few pieces.

Make friends with the guys who take care of the floors where you work. The floor scrubbers and burnishers use wheels with a punch out center that is 3-3/4" in diameter. If you ask them nicely they will probably give you all of these little gems you could ever need. They come in a multitude of "grit sizes" from white which is a super fine burnishing wheel to black which is a stripping wheel. There are at least a dozen different colors in between. They are 3/4" thick and with a little work you can adapt them to fit on any arbor size you need to fit with a punch or die.

I use them for everything including scrubbing pots in the kitchen at home. They are fantastic for polishing metal in the shop but they will break down quickly but then the cost on them is nothing and they work like a charm. Got some rust you need to remove? Grab one. Paint to remove? Check. Get a mirror like polish? Grab a white one and go to town.

Like I said, you can probably get them for free or a six pack at most. The bigger the floor area, the more they will go through keeping them clean and shiny. I've gotten whole shopping bags full when the floors are being worked from stripping to polished.

lonnywilcox
Автор

Thank you Joe. As always, I learned several things from you. I hope you know how much you are appreciated and what a difference these videos make in the experience of everyone doing this sort of thing.

dannyl
Автор

Great deburring info, Joe! Have a happy 4th of July.

danielabbey
Автор

This is a little off topic-- but i wanted to mention that I have some sharpie pens that have lasted 7 years. Here is how I did it. When a pen starts drying up, I get a piece of 1" long surgical rubber tubing. I use the semi clear stuff. This has a about a 3/16" Id and fits the end where the pens wick (tip) sticks out. I have a piece of wood drilled with a 1/2' set of holes drilled into it, I stand up the pen in the hole, slip the tubing over the tip end, and add about 3/4' of Denatured alcohol. you can see it fill up thru the tubing. when it reaches the top - I put the pens cap on it. I stand up about 3 at a time like this, it takes about 4 hours for the d.alc to wick back into the pen. next day I observe that it is done, pull off the tubing, wipe up any residue, and recap The pen. Like I say the pens can last a long time, there is a lot of ink in them, it just prematurely dries up with all the dry stuff you mark. Another point -- These Can be used as Emergency lighting -- just light the end of the pen -- it essentially is an alcohol light. watch out it might melt down being plastic so best not to hold it.

anneinfurna
Автор

Good video, Joe.Excellent wheels.Thank you.Stay safe.

angelramos-
Автор

Fabulously useful! I have often been disappointed with the surface finish of things I have machined & now I have a way to make them look better. Thank you!

springwoodcottage
Автор

Joe, Your content is invaluable! You teach great gems of experience .

Caughtitoutdoors
Автор

Yet another great advise from The Professor!

toolbox-gua
Автор

Love to collecting that gems. Thank you for sharing 👍

maciekm
Автор

Happy Independence Day from one patriot to another... Thanks for this and all your videos!... Ironically, I just this afternoon loaded up an old pedestal grinder that needs a new switch and cord from my storage building to take it to my shop. Now I know what kind of wheels to put on it! Blessings my brother!

jeffpitzer
Автор

Wonderful video. Always interesting on your channel... thanks for sharing!

Smallathe
Автор

Once again Joe, you give us one of those "Duh!" moments. Thanks!!

skiptracer
Автор

Thank You, Joe Pie. - Those are great Gem Tips!

joecnc
Автор

Fantastic. You are a gem, thank you for giving so much back to the community.

brucewilliams
Автор

As always, good stuff Joe. I use the 3m 9s fine exclusively.. usually for deburring finished machined edges. When I was an apprentice back in the late 90s, I would have to use that wheel to buff .03 radii around a 6 sided block. If I didn't get the radii to meet perfectly at the corners, or the deburred edge wasnt the same width along the entire part, I would have to start over. I use the same practice to this day.

maxcnc
Автор

Thankyou Joe - a very useful video with good practical information (again based on experience!). Mal

MalJ-ebnv
Автор

Thank you for the video. It taught me a lot! I’m a new welder and learning about all the different kinds of tools and what works best is awesome!

chenequawilliams