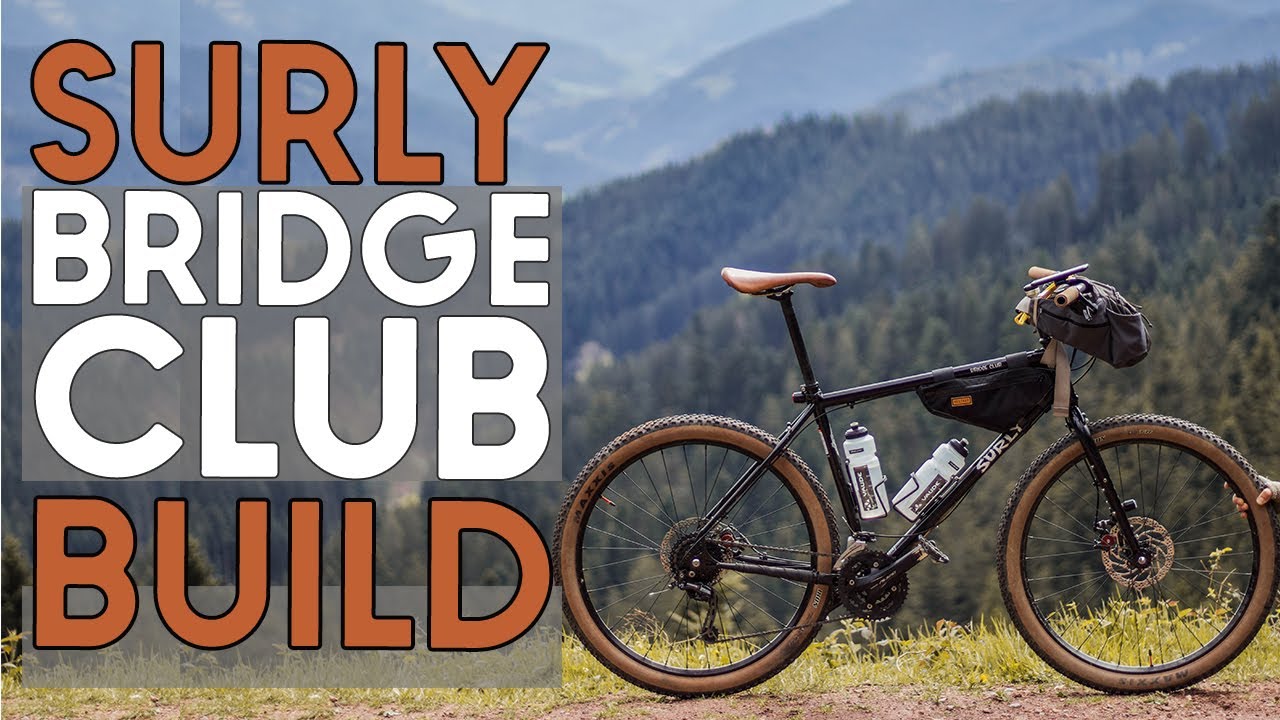
How I built my own version of a SURLY BRIDGE CLUB

preview_player
Показать описание
If you are looking to build yourself your own version of the Surly Bridge Club this video has some valuable information:
00:00 Intro
00:51 The components and theirs prices
09:01 The building process
14:11 The ride test (the result)
Рекомендации по теме
Комментарии
Автор

Thank you, well done. Both the bike, and the video. I like the level of detail that you gave, and the slow pace of delivery that allows one to absorb the info. It’s also nice to see a bike build at the lower end of the cost range, not another superbike.

PRH
Автор

Bb7 is easy to tear down and rebuild. Love them. Your build choices are almost exactly what I would choose but with a Jones HBar . Inspiring to build such a bike for my son.

charlesblithfield
Автор

Great build, great vid, thanx.
I'm 6'3" (190? cms) and am building up a 2007 gen 1 Karate Monkey in an XL frame size, very similar to your build, classic Surly Black, 3x9 drive train, Microshift thumbies, Avid brakes, brown saddle, alt bars, Mezcal tan walls etc etc.

michaelhayward
Автор

Thanks for this video. Very helpful. I ordered my Bridge club and will be setting it up as a single speed 42 oval x 18 cog using the Surely chain tensioner. Mason Hunt 27.5 wheels with 2.5" tires. Avid BB7 brakes with TRP RRL Road Levers., Ritchey Venturemax V2 Bars, Thompson seat post and Cobb SHC DRT saddle.

bikerbud
Автор

In the last weeks I've been doing some research about which bike I would like to buy and then which Surly I would like to buy. Your videos are beautiful, I love them and they are very helpful too!!

Thank you!

Ps. I'm definitely going to buy a Bridge Club and it is gonna be my first build.

pietrorosso
Автор

Thank you for sharing this build, I was having a hard time figuring out what kind of bike set up I needed this fits both worlds excellent analysis on all your details so helpful again excellent build on this thing it's so cool

chuffa
Автор

The moment you sad that u installed used parts onto your bike I hit the subscribe button. Watching your 2nd Video. Really nice down to earth bike loving content. 👍

moei
Автор

This is so helpful -- thank you very much for sharing! I am looking at doing something similar for my next touring bike and seeing what you did is really great. Thanks!!

SheelaghDaly
Автор

Subscribed! Good video with useful information. Cheers!

omare_biketonature
Автор

I just watched your other video on the bridge club where you do the calculations of the gear ratios, the casset you use has the lowest gear 36t, but on this video you used a 34t, did you replace the casete from 34 to 36t, thank you so much for posting this, i just bought a bridge club and i want to do the same exact setup.

techingo
Автор

thank you, this is what I wanted to build.

ns.hidayat
Автор

Hello, Thanks a lot for the video! What are the tooth numbers of your crankset?

sarahleclaire-fgzj
Автор

Hi really informative videos you've done on the bridge club great information thank you. I am in the process of buying parts with the frameset ordered, I have gone for the newer Avid BB7 brake calipers with 180mm front 160mm back TRP centre lock rotors, please can you advise what size Avid caliper mount adaptors I will need? Many thanks
Steve.

SteveHenderson
Автор

Great video, thanks. I wrote a long tech comment today on your other great video about the Ascent build, concerning boost crankset options. Now I'm going to point out some stuff about this front derailleur spec.

If you think carefully about the reason for Surly speccing the DM mount FD with the boost/non-boost adapters, then you can figure out that it has nothing to do with the tyre clearance. The position of the FD cage is always going to be governed by the position of the chainrings, right? By the chainline. Of course. So regardless of the mounting of the body of the FD, the cage will always be positioned where it needs to be, to shift the chain on the rings. But it is easy to get befuddled trying to figure out Surly's wack FD spec. It had me flummoxed for a while.

It took me ages to figure out the deal with Surly's annoying FD spec with those adapters. I agree with you about pretty much everything I've ever heard you say, and especially on how having to source the adapters is a pain. After some days of reading FD specs I discovered that the previous series of Shimano groupsets that offered boost options (only the XT M8000 and SLX M7000) were obviously designed and released when boost was new, because in their FD specs only the 2x11 Direct Mount and the E-Type Mount were specced as boost compatible. So their wide range of clamp band mounts (they had low, medium and high with 3x options) were only specced as 48.8 (non boost) chain line (50mm for 3x.) Therefore, Surly obviously chose the DM adapter option because they needed to spec for their bike's Gnot-Boost option.

But then I wondered why if those DM FDs were boost compatible why do you need a boosted adapter? Can you figure it out? It took me a while. The only boost compatible options were the DM and E-Type. So when Shimano stated in their specs that those models were compatible for the boost offset, they meant for bikes that were boosted with DM and E-Type mounts, so those mounts would have been offset 3mm for the boost, and that’s why those models were still specced as having a 48.8 chain line. So those FDs aren’t like the current series (which have the extra 3mm of reach designed into them making them compatible for 48.8/51.8), meaning they need the specific adapter.

Then you have to ask why Surly didn’t spec the DM for boost with an adapter, and also the Clamp Band Mount for non-boost. Further to my first explanation about the mount having nothing to do with the tyre clearance, you can clearly see on the webpage for those previous series that the cages are the same on all the 2x models (the 3x are different), so would function in the exact same position as the DM on the non-boost adapter. So why not also recommend the Clamp Band Mount?

It’s because for some reason Surly didn’t want to adopt the Side Swing. The two DM models of FD in that series are a Side Swing and that beast that Surly specs, which was offered in Top Swing and Down Swing (Dual Pull and Top Pull Exclusive.) That Top Swing has the built-in cable housing pull stop, just like the Side Swings. But the top pull Clamp Band Mounts don’t! The best option would have been to go Side Swing, but they didn’t.

I dunno when Shimano designed Side Swing and I dunno when Surly specced their boost frames, but maybe there was something in that timing. Or maybe they just didn’t like that cable route design, and seeing as how they needed a DM adapter for the boost, why not try to keep it simple with the one FD and two adapters. Makes sense, right?

Except with the release of Side Swing you then not only have the option of the Clamp Band Mounts for non-boost, you also then get the Side Swing DM FD to put on the 29mm adapter, and that’s a much sleeker unit than that freaky big Top Swing beast.

It’s a too-hard-basket thing for them to update their listed spec and/or recommendations to people questioning their crappy FD spec.

But whatever, because Shimano have streamlined the FD options in all their MTB groupsets now. The Side Swing, which can be fitted to anything like you’ve done, has eliminated the need to offer any top or bottom pull options, so they just have that and DM and E-Type, and all units are compatible with 48.8/51.8 chainlines.

So just do as you’ve done on this build, and use the Clamp Band Mount, because the DM on the adapter gives you the exact same cage position.

The reason you have tyre clearance issues is because you got a 3x, non-boost. A 2x FD has a cage made to fit a smaller diameter ring. On a non-boost 2x it might still have a tyre clearance issue.

That’s the Bridge Club’s shorter chainstays. I agree with you about how good that geometry is, and I like that riding style too, and I like cranking killer climbs, BUT...

No 29” 2.0 tyre. And I like to put my big loads in big panniers on the back of the bike. The Bridge Club has a solid rear rack mount, but the Ascent looks like (despite its long chainstays) the frame and big wheels will smooth out cranking loads on rough stuff, and ascend beautifully, especially at slow speeds using the extra low gears provided by the wide range of a 2x drivetrain (see my comment in the Ascent build video.)

In your other excellent video about the Ritchie Ascent Frameset Overview you compare the similar steering trail of the two bikes. My dream build includes a bigger front 29” tyre (like 2.4 front, 2.0 rear) which would give the Ascent a bit more trail, finding a nice balance between being agile and still holding a line in a slow cranking climb. But I’m off topic now.

Thanks again for all the smart work!

Das (Darryl) Steel.
Brisbane, Australia.
(Find me on Facebook.)

thecutrip
Автор

Great video! I'm doing a similar build with an old GT. Ill be using the surly corner bar instead. What is the max distance you ride at a time with your setup?

BudgetPedaler
Автор

I have the Saint on my Karate Monkey, best BB ever.

Ticutzugoodfella
Автор

Hi... with your inspiration, i am trying to build same bike with similar components but going with shimano SLX 2x12 drive train for greater gear ratios. As you suggested, i have selected boost configuration. what is the length of the spokes you have used for your rim-tyre combination. My query is when going with 32 spokes rim, is the bike stable enough for tours with heavy loads. can you suggest any 36 spokes tubeless ready rims to fit 2.5 inch and above tyres.

MrVarmarn
Автор

Headset presses are so easy to make, and cheap too, lots of videos on Youtube, I built mine for my mountain bike build.You obviously don't look at other videos on Youtube, learn to make a ghetto tubeless tire inflator.

johnbravo
welcome to shbcf.ru